This guide aims to illustrate the possible integration between WSO2 Identity Server and the Spring framework for application development, to achieve user authentication using the SAML 2.0 protocol.
For this purpose, the below index shall be followed:
|
|---|
1. About SAML2
SAML2 (Security Assertion Markup Language 2.0) is a version of the SAML standard for exchanging authentication and authorization identities between security domains. It is an XML-based protocol that uses security tokens containing assertions and user information.
It enables web-based, cross-domain single sign-on (SSO), which helps to reduce the administrative overhead of distributing multiple authentication tokens to the user.
2. Requirements to develop a project in Spring
In order to develop a project in Spring, the following requirements must be met:
- Java 1.8 or higher
- Maven
- web development IDE, such as STS, Eclipse, or other.
SAML configuration with WSO2 Identity Server requires version 5.7 or later.
3. Terms glossary
In order to understand the Spring project creation process, it’s necessary to familiarize ourselves with some basic concepts, as explained below:
| Word | Description |
| SAML | Secure Assertion Markup Language (SAML) is a digitally signed XML document. It includes information about the user, source, and target systems that plan to use this XML document, in addition to other information required to validate the XML signature. |
| IdP | Identity Provider (IDP) is a system that is able to identify the user and issue the signed SAML document. |
| SP | The service provider (SP) is a system that receives SAML XML. |
| Metadata | I An XML document that contains information about the identity and service provider. The identity provider issues XML metadata when a service provider registers the application. |
| Single Sign-on (SSO) | SSO: An authentication process that enables users to use unique credentials across various applications within an organization. |
4. Create a project in Spring
4.1 Before creating a project
Spring provides below two artefacts to handle SAML 2.0.
- spring-security-saml2-core: SAML2 core is an extension of Spring Security to support basic SAML processing for single sign-on.
- spring-security-saml-dsl-core: saml dsl is used in conjunction with SAML 2 core, which contains the basic configuration for request mapping, filtering, and authentication provider configuration.
We can use SAML2 core alone, but we need to configure the request mapping, filters, authentication, the SAML context, and many other details that are common to most applications. In order to avoid all this, we only use saml dsl. spring-security-saml-dsl-core, as it contains the following request assignment details, which are configured by default:
-
- /saml/metadata: this assignment is used to display and read the metadata file.
- /saml/login: responsible for generating the login request and redirecting to the IDP page for log in.
- /saml/logout: used to close the session and delete the global or local session.
- /saml/SSO: this is the successful callback URL and IDP uses this request assignment to publish the SAML.
4.2 Create a project in Spring
To begin you must create a project archetype. You can create this archetype at the following URL https://start.spring.io/ .Here, you must enter the project information as shown below.
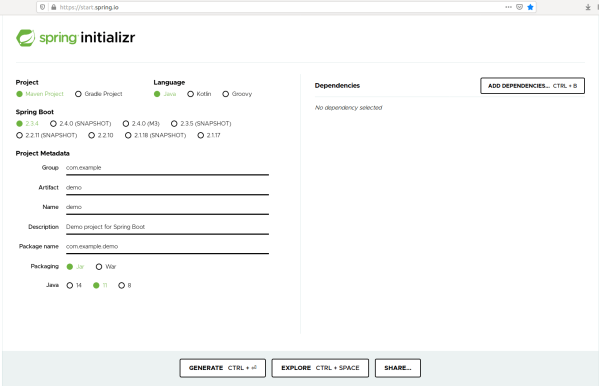
Note: you can also change the tool used to build the project (Maven o Gradle), the language (Java, Kotlin, Groovy), and the version of Spring Boot.
Then click on the ADD DEPENDENCES button to add the necessary dependencies, which are:
- Spring Boot DevTools
- Spring Web
- Spring Security
- Thymeleaf
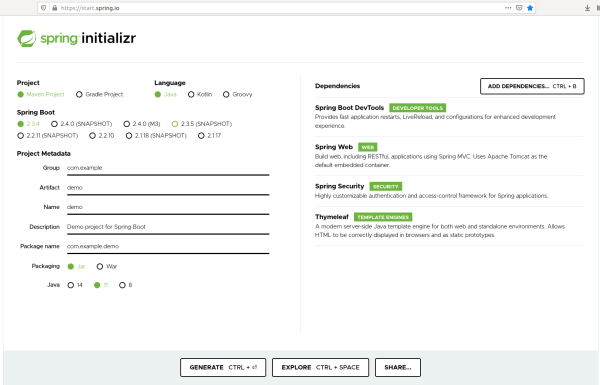
To finish you must click on the GENERATE button, which will generate the project with the information entered. It will then ask you to download the project.
4.3 Project Spring Boot Configuration
Once the project is downloaded, it will be decompressed and located in a path of the user’s preference, in order to import it into the IDE.
After importing the project it,2 additional dependencies will be added in the pom, these being spring-security-saml2-core and spring-security-saml-dsl-core.
<!-- SAML2 Dependencies -->
    <dependency>
    <groupId>org.springframework.security.extensions</groupId>
    <artifactId>spring-security-saml2-core</artifactId>
    <version>1.0.3.RELEASE</version>
    </dependency>
    <dependency>
    <groupId>org.springframework.security.extensions</groupId>
    <artifactId>spring-security-saml-dsl-core</artifactId>
    <version>1.0.5.RELEASE</version>
    </dependency>
<!-- SAML2 Dependencies -->
Next, the file application.properties will be renamed application.yml, which is located in the src/main/resources/ path. There, you should add the variables to be used in the security configuration of the ConfigSecurity class
saml2:
  metadata-path: classpath:static/saml2_metadata.xml
  sp:
    protocol: http
    host: localhost:8080
    path: /
    key-store:
      file: classpath:static/keystore.jks
      alias: saml2cert
      password: cky4159
Where:
| Parameter | Value | Description |
| saml2.metadata-path | classpath:static/saml2_metadata.xml | File containing the IdP metadata which will authenticate and authorize the user. |
| saml2.sp.protocol | http | Protocol by which the communication will be made (can also be https). |
| saml2.sp.host | localhost:8080 | Host to which the GET request is sent to the SSO service. |
| saml2.sp.path | / | If it is a non-default path. |
| saml2.sp.key-store.file | classpath:static/keystore.jks | JKS with the security certificates, either authorization certificates or public key certificates, as well as the corresponding private keys, which are used, for example, in SSL encryption. |
| saml2.sp.key-store.alias | saml2cert | Key alias. |
| saml2.sp.key-store.password | cky4159 | Password used for the key storage |
Once the previous step has been completed, the static folder should be created in the src/main/resources/ path, where the following files will be deposited.
- keystore.jks
- saml2.cer as well as saml2.pem
- saml2_metadata.xml
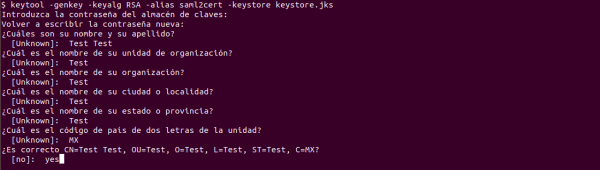
For JKS generation, the following keytool command is used:
keytool -genkey -keyalg RSA -alias saml2cert -keystore keystore.jks
Where:
| Parameter | Value | Description |
| -genkey | Used to generate a private key. | |
| -keyalg | RSA | Key algorithm name. |
| -alias | saml2cert | Key alias. |
| -keystore | keystore.jks | Indicates a keystore file name to be generated. |
When running the command, a password for the KeyStore will be requested. Then, further information will be requested, as shown below.
Then, the following keytool command must be executed in order to generate the certificate.
keytool -export -keystore keystore.jks -alias saml2cert -file saml2.cer
Where:
| Parameter | Value | Description |
| -export | Used to export a private key. | |
| -keystore | keystore.jks | Specifies the jks file that will be read to generate the certificate. |
| -alias | saml2cert | Alias to be searched in the KeyStore. |
| -file | saml2.cer | Certificate file to which the public key will be exported. |
Note: When exporting the certificate, the KeyStore password will be requested.
Finally, the OpenSSL command is executed for the generation of the pem file.
openssl x509 -inform der -in saml2.cer -out saml2.pem
Where:
| Parameter | Value | Description |
| -inform | der | The input or output file is found in the configuration format, which can be PEM or DER. |
| -in | saml2.cert | The CSR for signing is in the given file as an item. |
| -out | saml2.pem | The signed certificate will be stored in the given file. |
Having performed the previous steps, we proceed to configure the project connection to WSO2 Identity Server using Spring Security.
4.4 Project Spring Security Configuration
Firstly, you must create a new package (com.example.demo.sso) within the project in which the SecurityConfig class will be created, where the default security settings are determined based on the spring-security-saml-dsl-core using the saml() method, as shown below:
package com.example.demo.sso;

import static org.springframework.security.extensions.saml2.config.SAMLConfigurer.saml;

import org.springframework.beans.factory.annotation.Autowired;
import org.springframework.beans.factory.annotation.Value;
import org.springframework.context.annotation.Configuration;
import org.springframework.security.config.annotation.method.configuration.EnableGlobalMethodSecurity;
import org.springframework.security.config.annotation.web.builders.HttpSecurity;
import org.springframework.security.config.annotation.web.configuration.EnableWebSecurity;
import org.springframework.security.config.annotation.web.configuration.WebSecurityConfigurerAdapter;

import com.example.demo.services.SamlUserService;

@EnableWebSecurity
@Configuration
@EnableGlobalMethodSecurity(securedEnabled = true)
public class SecurityConfig extends WebSecurityConfigurerAdapter {

    @Value("${saml2.metadata-path}")
    private String metadataPath;

    @Value("${saml2.sp.protocol}")
    private String spProtocol;

    @Value("${saml2.sp.host}")
    private String spHost;

    @Value("${saml2.sp.path}")
    private String spBashPath;

    @Value("${saml2.sp.key-store.file}")
    private String keyStoreFile;

    @Value("${saml2.sp.key-store.password}")
    private String keyStorePassword;

    @Value("${saml2.sp.key-store.alias}")
    private String keyStoreAlias;

    @Autowired
    private SamlUserService samlUserService;

  @Override
  protected void configure(final HttpSecurity http) throws Exception {
    http
      .csrf().and()
      .authorizeRequests()
        .antMatchers("/saml/**").permitAll()
        .anyRequest().authenticated()
        .and()
      .apply(saml())
      	.userDetailsService(samlUserService)
        .serviceProvider()
          .protocol(spProtocol)
          .hostname(spHost)
          .basePath(spBashPath)
          .keyStore()
            .storeFilePath(keyStoreFile)
            .keyPassword(keyStorePassword)
            .keyname(keyStoreAlias)
          .and()
        .and()
        .identityProvider()
          .metadataFilePath(metadataPath)
        .and()
    .and();
  }
}
4.5 Previous code explanations
| Note | Description |
| @EnableWebSecurity | Entry that enables Spring to automatically find and apply the class to the global WebSecurity.
Provides configuration via HttpSecurity, allows access to be configured according to URL patterns, authentication endpoints, drivers, etc. |
| @Configuration | Entry responsible for defining what a configuration class for the Spring framework is. |
| @EnableGlobalMethodSecurity | Provides AOP security in methods. Some of the entries that it will enable are PreAuthorize, PostAuthorize, and it also has support for JSR-250.
securedEnabled: Defines whether Spring Security’s safe entries should be enabled. |
Class Extension
Extending the abstract class WebSecurityConfigurerAdapter provides a convenient base class for creating a WebSecurityConfigurer instance, which allows for the customization of WebSecurity, thus enabling overriding methods.
The @EnableWebSecurity entry and the WebSecurityConfigurerAdapter class operate together to provide web-based security. By extending WebSecurityConfigurerAdapter and with a few lines of code, the following can be achieved:
- Require the user to be authenticated before accessing any URL within our application
- Possibility to create a user with the user name “N”, the password “C” and the role “R”.
- Enables basic HTTP and forms-based authentication.
- Spring Security will automatically generate a login and a logout success page for you.
Overwriting Configuration
As explained above, the @EnableWebSecurity entry helps with the setup of an HttpSecurity, which is similar to Spring Security’s XML <http> element in the namespace configuration.
This enables the setting up of web-based security for specific http requests. It will be applied to all requests by default.
| Methods | Description |
| .csrf().and() | Adds support for CSRF(cross-site request forgery). It is enabled by default when the predefined WebSecurityConfigurerAdapter constructor is used. |
| .authorizeRequests()
.antMatchers(“/saml/**”).permitAll() .anyRequest().authenticated() .and() |
It enables the restriction of access based on HttpServletRequest.
With the antMatchers configuration, authentication is required only at the URL “/saml/**” and will grant access to all users. |
| .apply(saml())
.userDetailsService(samlUserService) .serviceProvider() .protocol(spProtocol) .hostname(spHost) .basePath(spBashPath) .keyStore() .storeFilePath(keyStoreFile) .keyPassword(keyStorePassword) .keyname(keyStoreAlias) .and() .and() |
Apply a SecurityConfigurer to this SecurityBuilder, overriding any SecurityConfigurer from the exact same class.
The important thing to note is the saml() method, which is a static method that returns the singleton SAMLConfigurer instance containing the details of the authentication, filtering, and SAML2 request assignment provider. When an application receives the SAML response, it will first validate the XML SAML. The validation includes the source and destination identifiers, the time of the session, the signature, etc. If the XML response is valid, SAML DSL will call the userDetailsService method , which built a custom user service to convert the XML into a custom user model. As regards the configuration in the serviceProvider() section, often, when a user successfully logs in, the IDP will publish a SAML response in /saml/SSO of the service provider. Upon receipt of the SAML, a service provider will validate the XML. As part of the validation process, it will search for entity identification, destination, audience, and other details. When a request is published in the localhost instance it will verify the destination attribute with the local instance domain. If both (SAML target attribute and local instance name) do not match, the validation request will fail. |
| .identityProvider()
.metadataFilePath(metadataPath) .and() |
The metadataFilePath() method, looks for the metadata in the IdP xml file, which authenticates and authorizes the user. For this example it will be the IdP Resident of WSO2. |
Attributes
As can be exemplified in the SecurityConfig class, the following attributes have been declared which will obtain their value mostly from the application.yml file.
| Attribute | Value |
| metadataPath | ${saml2.metadata-path} |
| spProtocol | ${saml2.sp.protocol} |
| spHost | ${saml2.sp.host} |
| spBashPath | ${saml2.sp.path} |
| keyStoreFile | ${saml2.sp.key-store.file} |
| keyStorePassword | ${saml2.sp.key-store.password} |
| keyStoreAlias | ${saml2.sp.key-store.alias} |
| samlUserService | Customized service to obtain information from the authorized user. |
4.6 Service and Model class creation
In the SAMLUserDetailsService interface, the SAML data is used to obtain information about the user. By implementing the interface, they place the user in an arbitrary data store based on the information present in SAMLCredential and return that data in an application-specific UserModel object form.
As with the previous explanation, you must create a new package with the com. example.demo.services name, where you will create a java class called SamlUserService. Within it, a simple parsing of the information will be carried out for its optimal use later on.
package com.example.demo.services;

import java.util.HashMap;
import java.util.Map;

import org.opensaml.saml2.core.Attribute;
import org.opensaml.xml.schema.XSString;
import org.springframework.security.core.userdetails.UsernameNotFoundException;
import org.springframework.security.saml.SAMLCredential;
import org.springframework.security.saml.userdetails.SAMLUserDetailsService;
import org.springframework.stereotype.Service;

import com.example.demo.models.UserModel;

@Service
public class SamlUserService implements SAMLUserDetailsService {

    @Override
    public Object loadUserBySAML(SAMLCredential credential) throws UsernameNotFoundException {
        Map<String, String> attributes = new HashMap<String, String>();
        String userID = credential.getNameID().getValue();
        for (Attribute element : credential.getAttributes()) {
            String name = element.getName().replace("http://wso2.org/claims/", "");
            XSString value = (XSString) element.getAttributeValues().get(0);
            attributes.put(name, value.getValue());
        }
        return new UserModel(userID, attributes.get("givenname"), attributes.get("emailaddress"));
    }
}
When overwriting the method, loadUserBySAML() identifies the local account of the user referred to in the data in the SAML assertion, and returns the UserModel object that describes the user (id, givenname and emailladdress).
A new package must be created which will be named com.example.demo.models, and where a java class named UserModel will be created. Within it, the user information will be managed in an easier way.
package com.example.demo.models;

import lombok.Getter;
import lombok.ToString;

@Getter
@ToString
public class UserModel {

    private String id;
    private String givenname;
    private String emailaddress;

    public UserModel(String id, String givenname, String emailaddress) {
        this.id = id;
        this.givenname = givenname;
        this.emailaddress = emailaddress;
    }

    public String getId() {
        return id;
    }

    public void setId(String id) {
        this.id = id;
    }

    public String getGivenname() {
        return givenname;
    }

    public void setGivenname(String givenname) {
        this.givenname = givenname;
    }

    public String getEmailaddress() {
        return emailaddress;
    }

    public void setEmailaddress(String emailaddress) {
        this.emailaddress = emailaddress;
    }

}
Note: the @Getter and @ToString notes allow the lombok library to automatically generate the default method.
4.7 Create Controller Class
One of the advantages of using Spring to build RESTful web services are the HTTP requests, which can be handled by a controller. These components are identified by the @RestController or @Controller note.
As specified in the application.yml file, the path will be “/”, which through the @GetMapping entry, will enter the index method to convert the getPrincipal() method to the UserModel. This is possible, because in the SecurityConfig configuration class, it was stated that the SamlUserService would be in charge of the UserDetails class, which has been changed in the response by UserModel.
Later, a new package needs to be created which will be named com.example.demo.controllers and where later a Java class called LoginController will be generated.
package com.example.demo.controllers;

import org.springframework.security.providers.ExpiringUsernameAuthenticationToken;
import org.springframework.stereotype.Controller;
import org.springframework.web.bind.annotation.GetMapping;
import org.springframework.web.bind.annotation.RequestMapping;
import org.springframework.web.bind.annotation.RequestMethod;
import org.springframework.web.servlet.ModelAndView;

import com.example.demo.models.UserModel;

@Controller
@RequestMapping(path = "/", method = RequestMethod.GET)
public class LoginController {

    @GetMapping(path = "/")
    public ModelAndView index(ExpiringUsernameAuthenticationToken userToken) {
        ModelAndView mav = new ModelAndView("index");
        UserModel user = (UserModel) userToken.getPrincipal();
        mav.addObject("user", user);
        return mav;
    }
}
Create HTML and CSS
In order to interact with the form that WSO2 Identity Server displays when authenticating users, an html page must be created. In order to complete this process, it should be created in the folder src/main/resources/templates the file index.html, in which the user data that are handled in the class UserModel will be referenced. In the controller it was renamed user (line 20 of the Controller class).
<!DOCTYPE html>
<html>
<head>
<meta charset="utf-8">
<meta http-equiv="X-UA-Compatible" content="IE=edge">
<meta name="viewport" content="width=device-width, initial-scale=1">
<meta http-equiv="Expires" content="-1" />
<meta http-equiv="Cache-Control" content="private" />
<meta http-equiv="Cache-Control" content="no-store" />
<meta http-equiv="Pragma" content="no-cache" />
<link th:href="@{/styles/cssandjs/main.css}" rel="stylesheet" />
<title>Spring Security SAML Example</title>
</head>
<body>
<img src="https://cdn.chakray.com/styles/image/spring-boot-600x300.png" style="width: 10%">
<img src="https://cdn.chakray.com/styles/image/tech-spring-security.width-1024.png"
style="width: 13%">
<img src="https://cdn.chakray.com/styles/image/WSO2_Software_Logo.png" style="width: 10%">
<div class="login">
<h1>Congratulations on logging in with SAML2</h1>
<h1>
Welcome <span style="font-weight: bold" th:text="${user.id}"></span>
</h1>
<a href="/saml/logout/"><button
class="btn btn-primary btn-block btn-large">Logout</button> </a>
</div>
<p> </p>
<p> </p>
<div>
<table style="width: 0%">
<thead>
<tr>
<th>Atribute</th>
<th>Value</th>
</tr>
</thead>
<tbody>
<tr>
<td>givenname</td>
<td><span th:text="${user.givenname}"></span></td>
</tr>
<tr>
<td>emailaddress</td>
<td><span th:text="${user.emailaddress}"></span></td>
</tr>
</tbody>
</table>
</div>
</body>
</html>
Since it is an html file, you can include the performance with css classes, which can be according to the preferences of each person. For further reference, you can visit https://templated.co/. Just add the css class reference, which must be created in the path src/main/resources/styles/cssandjs, in the html with the following instruction.
<link th:href="@{/styles/cssandjs/main.css}" rel="stylesheet" />
5. Create Service Provider in WSO2
In order to start the WSO2 Identity Server service, if it is not on, the following command must be executed inside the bin folder of the WSO2 Identity Server distribution being handled.
sh wso2server.sh
Once the service has been initiated, the following instructions must be followed:
- Login to the Administration Console with the administrator user.
- Navigate to the Main Menu to access the Identity menu.
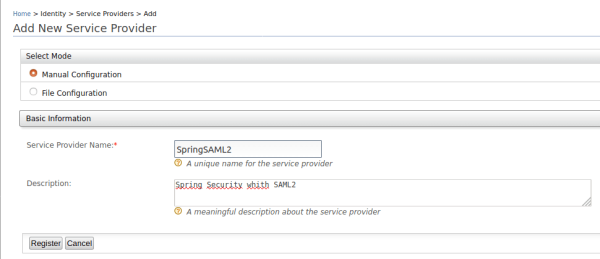
- Click on Add under Service Providers.
- Complete the form with the following information:
- Service Provider Name: SpringSAML2
- Description: Spring Security with SAML2
- Click Register to add the new service provider.
- The Service Providers screen will appear, in which the application certificate must be pasted into the Application Certificate file. If you do not have the certificate, follow the steps below:
- Go to the folder within the WSO2 Identity Server version /repository/resources/security
- Open a terminal and execute the following commands to export the keystone certificate.
- The exported certificate will be in binary format.
keytool -export -keystore wso2carbon.jks -alias wso2carbon -file wso2carbon.crt
-
- Convert the previous binary encrypted certificate to a PEM encrypted certificate.
openssl x509 -inform der -in wso2carbon.crt -out wso2carbon.pem
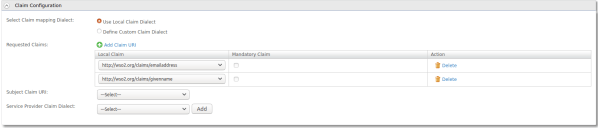
- In the Service Provider information, click the arrow buttons to expand the Claim Configuration and Inbound Authentication Configuration forms. Here, you will find:
- Claim Configuration: where the claims that will be sent in the Assertions are configured, in which the dialect of the local claims ( wso2.org ) will be used.iIn the Requested Claims, the emailaddress and givenname claims need to be added.
- Inbound Authentication Configuration: the responsibility of the inbound authenticator component is to identify and analyze all inbound authentication requests and then generate the corresponding response. A given incoming authenticator has two parts:
- Application Processor
- Response Generator
To configure Inbound Authentication, click on the Configure button, which will redirect you to the form that will request the information necessary to establish the connection between WSO2 Identity Server and the application that has been previously generated.
Complete the form with the following information:
| Field | Value | Description |
| Issuer | http://localhost:8080/saml/metadata | This is the <saml element: Issuer> containing the unique identifier of the service provider. This is also the sender value, specified in the SAML authentication request issued by the service provider. |
| Assertion Consumer URLs | http://localhost:8080
http://localhost:8080/saml/SSO http://localhost:8080/saml/metadata |
This is the URL to which the browser should be redirected after successful authentication. |
| Enable Response Signing | Selected | Sign the SAML2 responses returned after the authentication process. |
| Enable Signature Validation in Authentication Requests and Logout Requests | Selected | This specifies whether the identity provider must validate the signature of the SAML2 authentication request and the SAML2 logout request sent by the service provider. |
| Enable Single Logout | Selected | If single sign-off is enabled, the identity provider sends sign-off requests to all service providers. |
| Enable Attribute Profile | Selected | The identity server provides support for a basic attribute profile where the identity provider can include the user’s attributes in the SAML statements as part of the attribute declaration. |
| Always Include Attributes in the Response | Selected | The identity provider always includes the values of the attributes related to the selected statements in the SAML attribute declaration. |
| Enable IdP Initiated SSO | Selected | When enabled, the service provider is not required to submit the SAML2 application. |
Then, click on the Update button to update the information in the Service Provider.

Once the configuration of the Service Provider is complete, all that remains is to obtain the Identity Provider metadata. To do this, click on the Resident option in Identity Providers, which will redirect you to the form with the IdP information.
Click the arrow button to expand the Inbound Authentication Configuration forms, expand the SAML2 Web SSO Configuration tab, and click the Download SAML Metadata button.
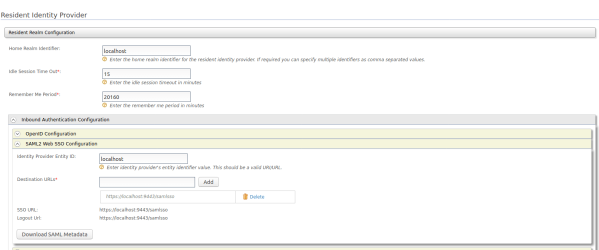
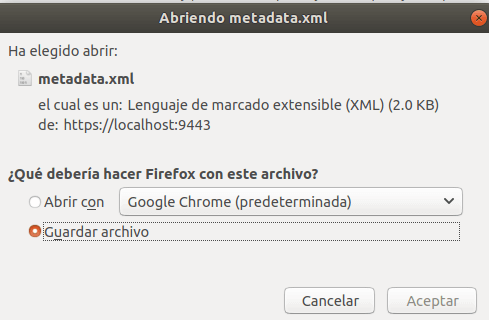
Once the metadata is downloaded, the xml file will be renamed saml2_metadata and placed in the src/main/resources/static path.
5.1 Trials – Creating a test user
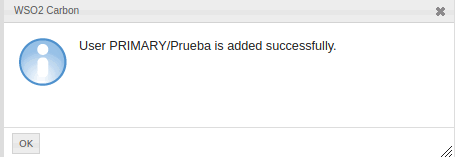
In order to create a new user in the WSO2 Identity Server administration console, the following steps must be followed:
- Click on Add, under Users and Roles.
- Click on Add New User, on the page where the console was redirected.
- You will be asked to fill out a form which contains basic user information, such as Username and Password:
| Field | Value |
| Username | Prueba |
| Password | qazse4159 |
| Confirm Password | qazse4159 |

- Afterwards, the message that the new user was successfully added must be displayed.
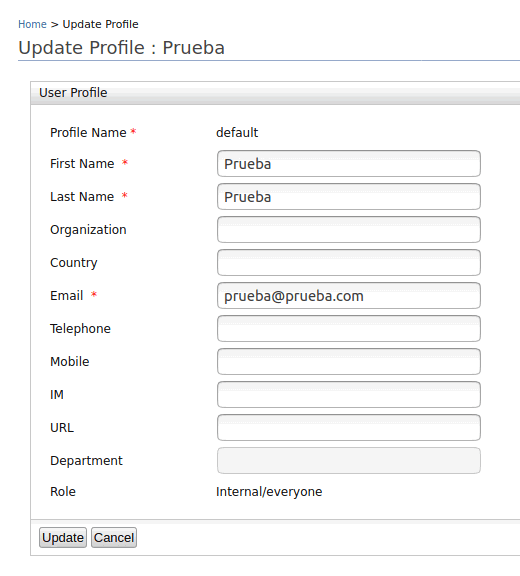
- This will display the list of registered users.You must click on the User Profile option of the newly created user, which will display a new form containing more information about the user.
| Field | Value | Required |
| First Name | prueba | Yes |
| Last Name | prueba | Yes |
| Organization | No | |
| Country | No | |
| prueba@prueba.com | Yes | |
| Telephone | No | |
| Mobile | No | |
| IM | No | |
| URL | No | |
| Department | No |
- Now click Add under Users and Roles.
- Click on Add New Role on the page to which the console was redirected.
- You will be asked to fill out a form, which contains basic information about the role.
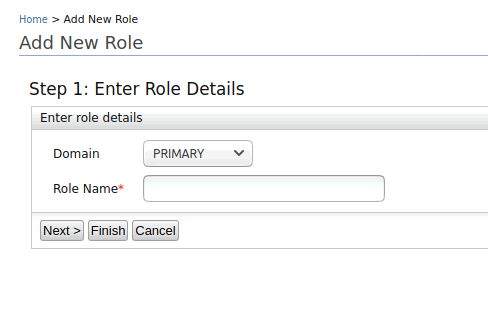
| Field | Value |
| Role Name | Login |
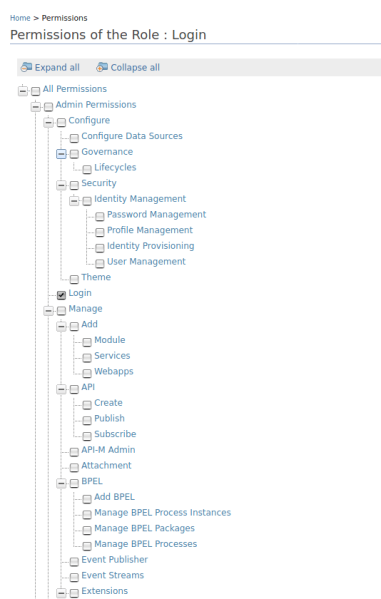
- Then you must click on the Next button. This is to display the list of permissions that the role can have, in this Role only select the Login permission.
Finally, you must click on the Finish button.
- You must click List, in Users and Roles, and then in the Users option the list of users will be shown.
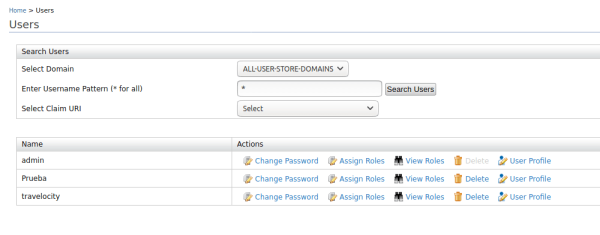
- In the users’ options, click on the Assign Roles option in the Test user that was created. Performing this action will display another list with the roles that can be assigned to the user, select the Login role.
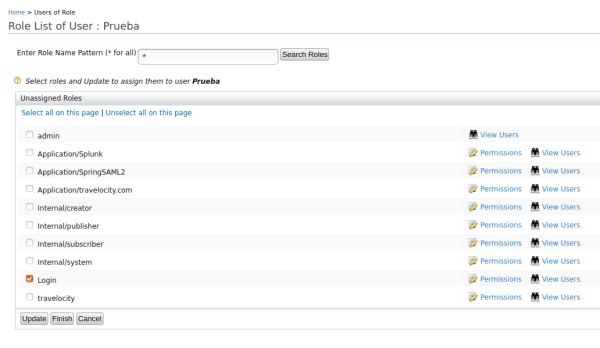
- Once the role is selected, click on the Finish button.
Once the previous steps have been completed, you will have to run the Maven project that has been generated in previous steps.You can do this in several ways, as set out below:
1. From the IDE, you must select the project folder by right clicking and in the Run As option the Spring Boot App sub option.
-
- Ifyou cannot findthe option mentioned above you in the IDE, you must download an add-on entitled Spring Tool Suite (STS). For Eclipse users, you must go to Help -> Eclipse MarketPlace
2. From the console. You must place it in the terminal on the project root folder and execute the following by command line:
mvn clean install
- Then
java -jar target/demo-0.0.1-SNAPSHOT.jar
- Now enter the URL: http://localhost:8080/
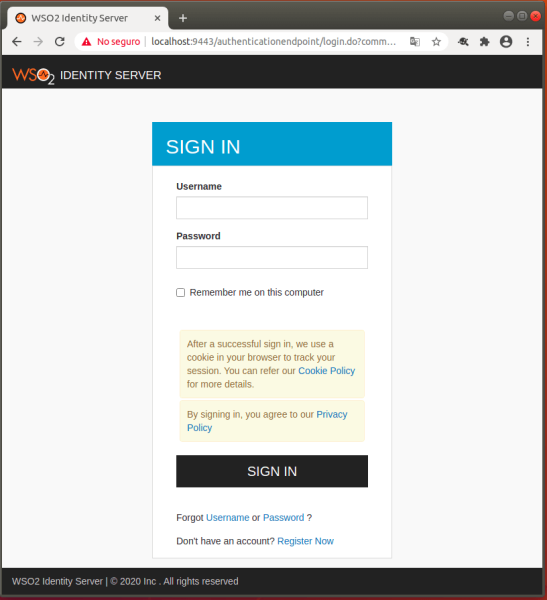
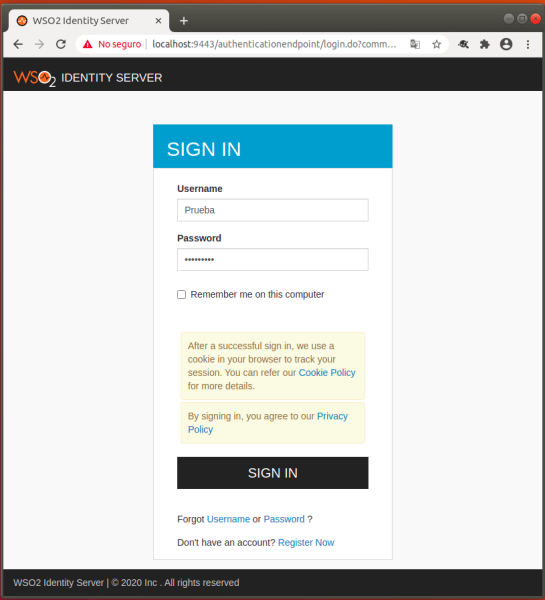
- Here, the WSO2 Identity Server authentication form will be displayed, and in which the previously created user credentials are entered.
- Then the SpringSAML2 application requests access to the user’s profile information.
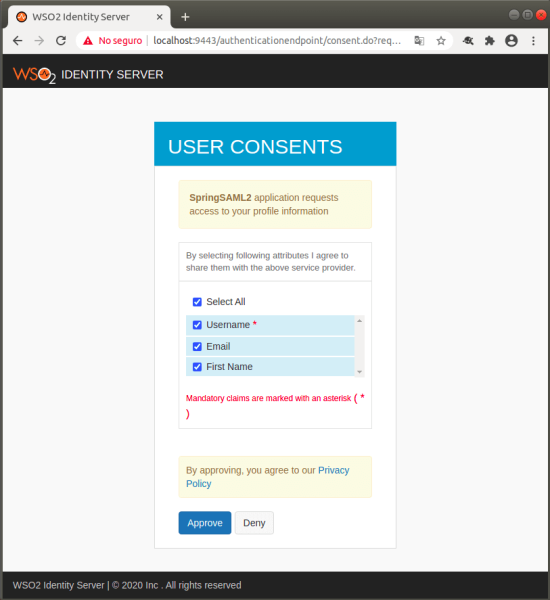
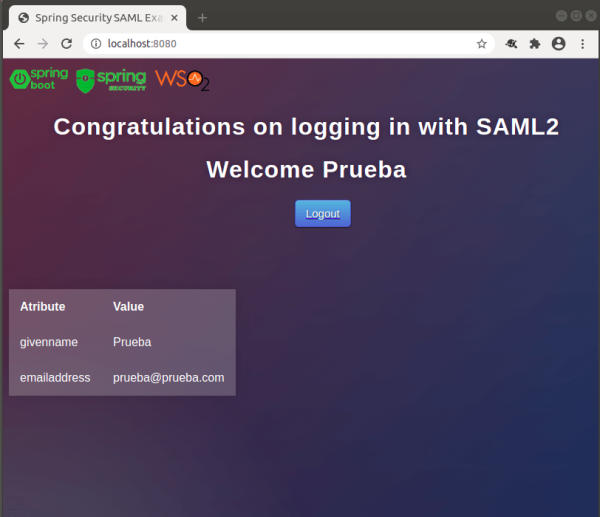
- For this trial, select the option Select All and click on the Approve button. You will then be directed to the page that was created in the project (index.html), and it will show the base information of the user (Name and email).
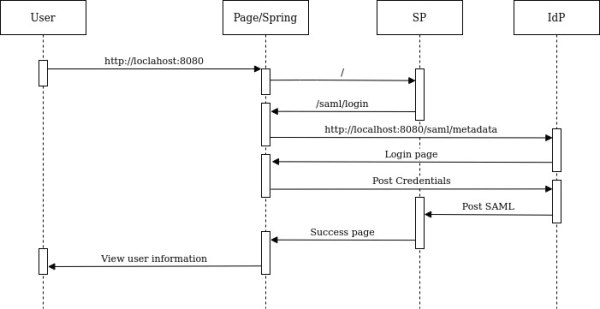
6. CONCLUSIONS AND RESULTS
As reviewed in this tutorial, by using the Spring framework (Spring Boot and Spring Security) you can establish a connection using the SAML2 to WSO2 Identity Server protocol in a simpler and faster way.
It was also possible to review components and protocols that interact to authenticate and authorize the user when he or she tries to log in.
In conclusion, the project covered the following points:
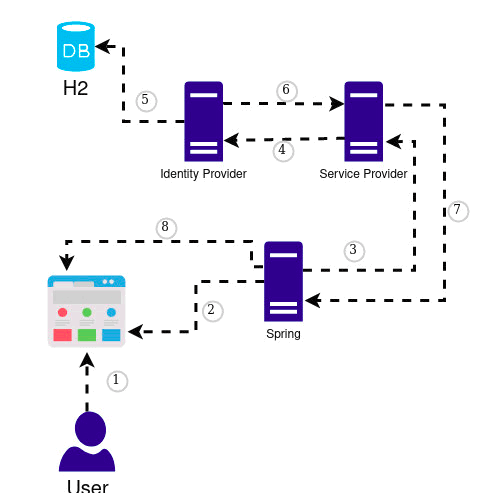
- The user enters the application via the URL: http://localhost:8080
- Spring’s controller intercepts the request.
- The user authentication request is sent to the SP.
- The SP generates an authentication request, and then sends the request and the user to the IdP.
- Check the database (H2) for user information, which is by default in WSO2 Identity Server.
- IdP authenticates the user, and sends the authentication response and user information back to the SP.
- The SP verifies the response of the IdP and sends the request to the resource that returns the originally requested content (Spring Security).
- It creates the mapping of the answer of the request, to be shown in the html.
References:
- http://stuff.gpul.org/2004_cripto/doc/chuleta_openssl.pdf
- https://docs.wso2.com/display/IS570/Configuring+Single+Sign-On
- https://docs.spring.io/spring-security/site/docs/5.2.1.RELEASE/reference/htmlsingle/#saml2
- https://docs.wso2.com/display/IS570/Configuring+Inbound+Provisioning+for+a+Service+Provider
- https://medium.com/@piraveenaparalogarajah/add-saml-authentication-to-spring-boot-app-with-wso2-is-17ed3d12c60d
- https://mencrypto.com/saml2-with-spring-and-wso2-is/
- http://www.techsams.com/java/spring/sso/onelogin/single-sign-on-with-spring-saml.html
- https://github.com/Mencrypto/SSOWSO2ISSPRING – Connect to preview
- https://spring.io/blog/2013/07/03/spring-security-java-config-preview-web-security/#wsca
- https://dzone.com/articles/get-started-with-spring-boot-saml-and-okta
- https://blog.joshsoftware.com/2020/04/22/single-sign-on-with-saml-and-spring-boot/
Contact us and we will help you with the integration of WSO2 IS