In this article, we’re going to take a look at how to configure the Camunda BPM web application and the Keycloak server for single sign-on (SSO) through the OpenID Connect protocol. They will both share the same user repositories and groups in LDAP.
To configure the web application, we will use the Keycloak Camunda Identity Provider plugin as this facilitates the integration with Keycloak.
1. Keycloak Configuration
First we must set up a new realm in Keycloak. This will be shared with the Camunda web application. A realm is a combination of users, credentials, roles, and groups. In this case, we are going to configure a realm in an existing LDAP user repository.
1.1 LDAP realm configuration
We are now going to configure the LDAP user realm. The steps are as follows:
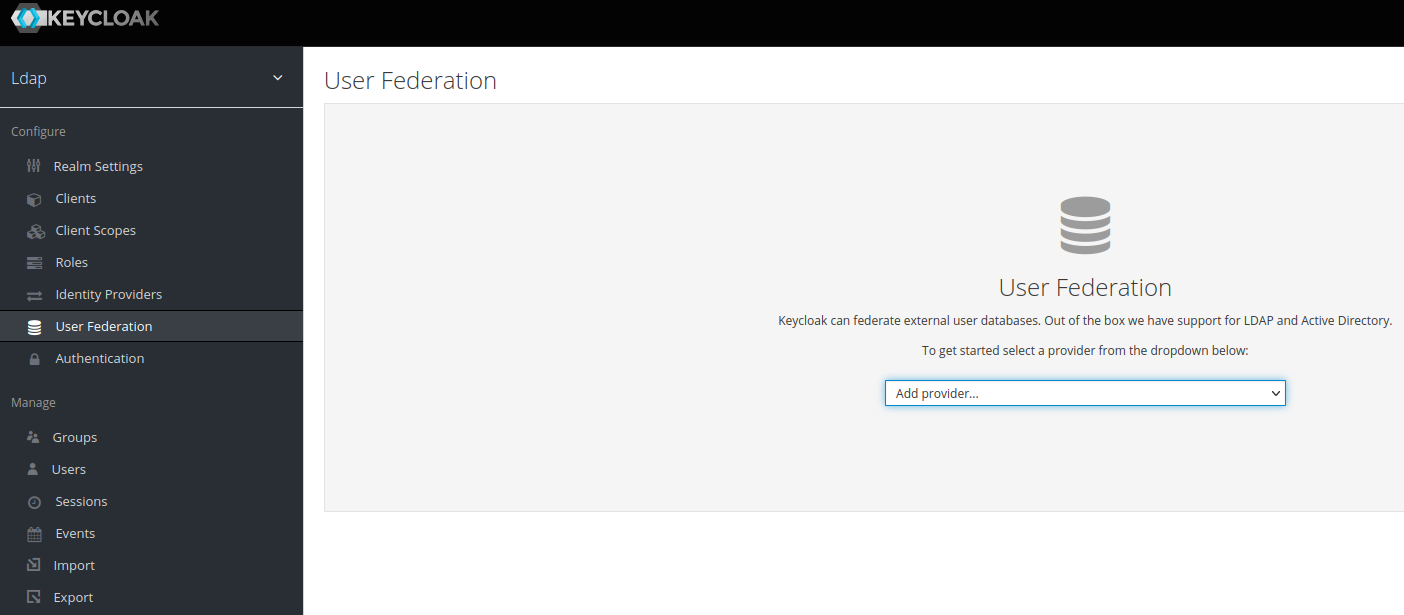
1.From the administration panel, select the Add Realm option and create a realm with the name Ldap. Next, add an LDAP provider in Add user federation provider.
2. Then configure the LDAP parameters in the following form:

3. Next, activate synchronization with the Periodic Full Sync and Periodic Changed Users Sync options.
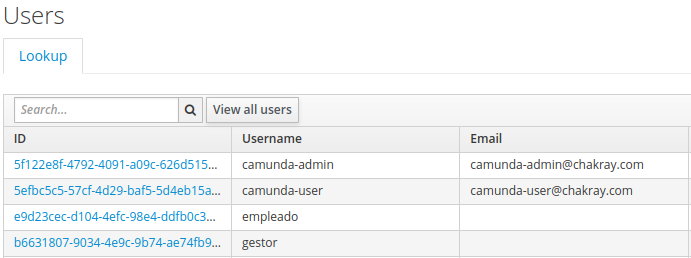
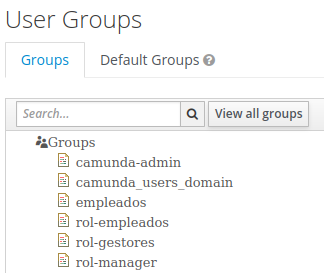
4. Finally, save and run the Synchronize all users option. At this stage, we are able to view the existing users in our LDAP in the Users tab:
1.2 LDAP group configuration
Once the first part is complete, the LDAP groups can then be configured.
1.Within User Federation, in the Mappers tab, we are able configure the LDAP groups. In order to do so we must add a new mapper. The parameters will be as follows:
1.3 Configuring the Camunda client application in Keycloak
In this step, we will configure the Camunda client application in Keycloak by following the steps below:
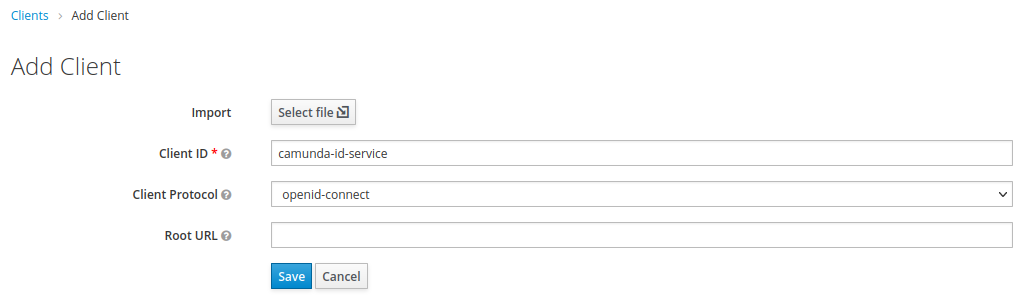
1.We must register the Camunda application in Keycloak. To do so, we must first create a new client called camunda-id-service:
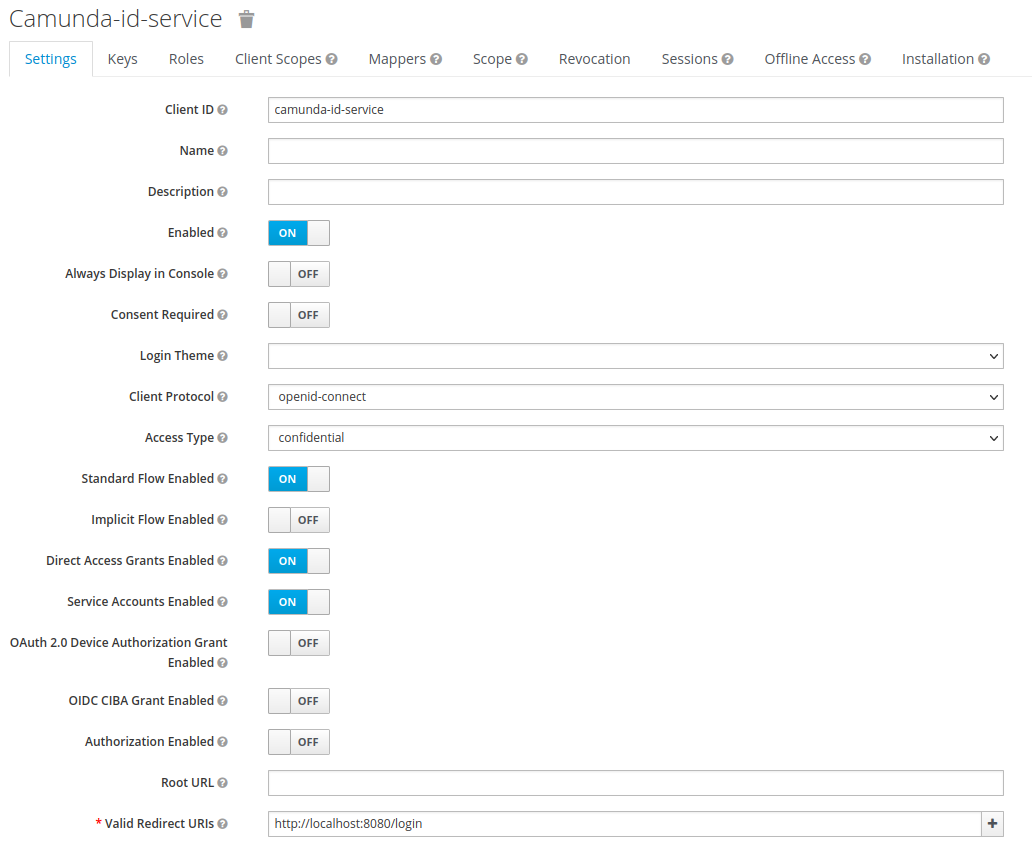
2. We must then select the following options:
- Access Type: confidential
- Service Accounts Enabled: ON
- Valid Redirect URIs
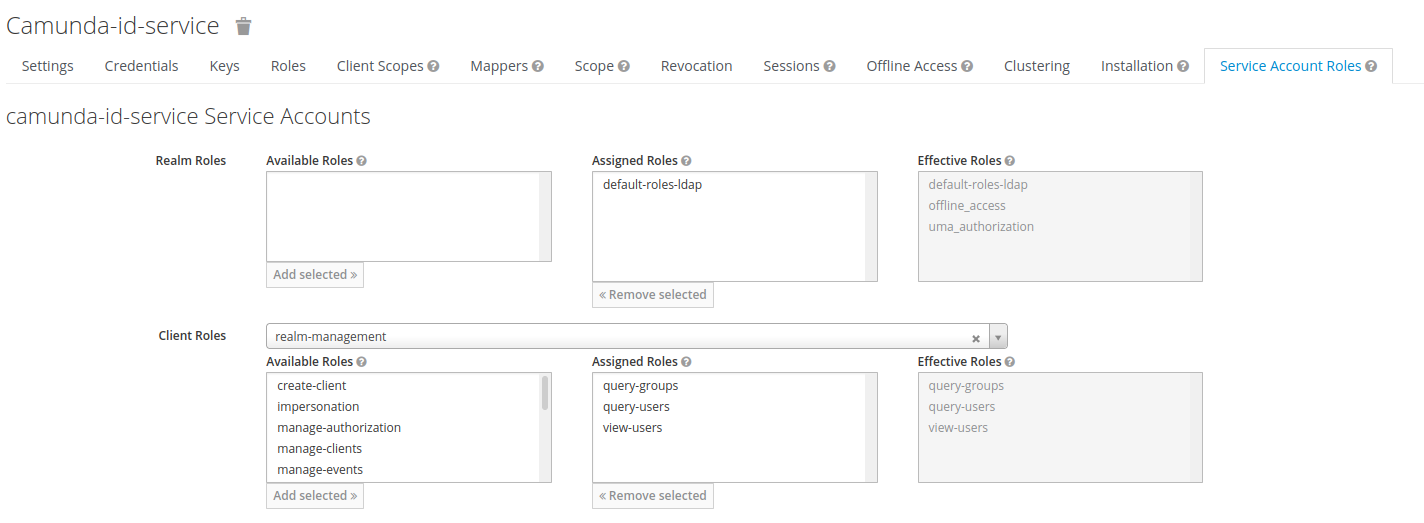
3. Next, in the Service Account Roles tab, we add the roles query-groups, query-users, view-users to the client roles of the service account realm-management (if we were in the realm master, we would use the realm master-realm).
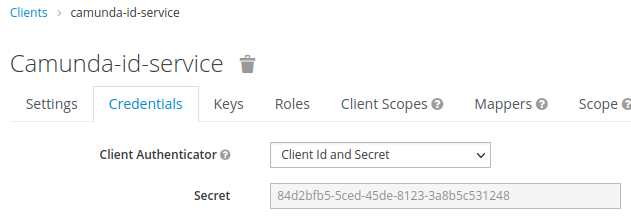
4. Finally, we make a note of the customer credentials in:
2. Camunda Configuration
In this penultimate step, we will configure Camunda and LDAP, and Camunda and single sign-on (SSO).
2.1 Camunda and LDAP configuration
1.In order to connect Camunda with LDAP, we add the configuration to the conf/bpm-platform.xml file as shown in the example below:
<plugin>
        <class>org.camunda.bpm.identity.impl.ldap.plugin.LdapIdentityProviderPlugin</class>
        <properties>

          <property name="serverUrl">ldap://sandbox-openldap:389/</property>
          <property name="acceptUntrustedCertificates">false</property>
          <property name="managerDn">cn=admin,dc=demo,dc=chakray,dc=cloud</property>
          <property name="managerPassword">password</property>

          <property name="baseDn">dc=demo,dc=chakray,dc=cloud</property>

          <property name="userSearchBase">ou=Users</property>
          <property name="userSearchFilter">(objectclass=person)</property>

          <property name="userIdAttribute">uid</property>
          <property name="userFirstnameAttribute">cn</property>
          <property name="userLastnameAttribute">sn</property>
          <property name="userEmailAttribute">mail</property>
          <property name="userPasswordAttribute">userpassword</property>

          <property name="groupSearchBase">ou=Groups</property>
          <property name="groupSearchFilter">(objectclass=groupOfNames)</property>
          <property name="groupIdAttribute">cn</property>
          <property name="groupNameAttribute">cn</property>

          <property name="groupMemberAttribute">member</property>
          <property name="sortControlSupported">false</property>

        </properties>
      <plugin>

      <!-- LDAP CONFIGURATION -->
      <!-- The following plugin allows you to grant administrator authorizations to an existing LDAP user -->
      <plugin>
        <class>org.camunda.bpm.engine.impl.plugin.AdministratorAuthorizationPlugin</class>
        <properties>
          <!--<property name="administratorUserName">camunda-admin</property>-->
          <property name="administratorGroupName">camunda-admins</property>
        </properties>
      <plugin>
2.2 Camunda and single sign-on (SSO) configuration
1.In this step, we must edit the conf/bpm-platform.xml file and add the following plugin configuration. In this case, we are including the key we obtained from Keycloak.
<plugin>
    <class>org.camunda.bpm.extension.keycloak.plugin.KeycloakIdentityProviderPlugin</class>
    <properties>
        <property name="keycloakIssuerUrl">http://localhost:8081/auth/realms/Ldap</property>
        <property name="keycloakAdminUrl">http://localhost:8081/auth/admin/realms/Ldap</property>
        <property name="clientId">camunda-id-service</property>
        <property name="clientSecret">84d2bfb5-5ced-45de-8123-3a8b5c531248</property>
        <property name="useUsernameAsCamundaUserId">true</property>
        <property name="useGroupPathAsCamundaGroupId">true</property>
        <property name="administratorGroupName">camunda-admin</property>
        <property name="disableSSLCertificateValidation">true</property>
        <property name="authorizationCheckEnabled">true</property>
    </properties>
<plugin>
2. The webapps/camunda/WEB-INF/web.xml file must also be edited and the following filter configured after the session-config element:
<filter>
    <filter-name>KeyCloak OpenID Connect Filter</filter-name>
    <filter-class>org.keycloak.adapters.servlet.KeycloakOIDCFilter</filter-class>
</filter>
<filter-mapping>
    <filter-name>KeyCloak OpenID Connect Filter</filter-name>
    <url-pattern>/*</url-pattern>
    <dispatcher>REQUEST</dispatcher>
</filter-mapping>
<!-- Container Based Authentication filter -->
<filter>
    <filter-name>Container Based Authentication Filter</filter-name>
    <filter-class>org.camunda.bpm.webapp.impl.security.auth.ContainerBasedAuthenticationFilter</filter-class>
    <init-param>
        <param-name>authentication-provider</param-name>
        <param-value>org.camunda.community.auth.keycloak.sso.KeycloakSSOAuthenticationProvider</param-value>
    </init-param>
</filter>
<filter-mapping>
    <filter-name>Container Based Authentication Filter</filter-name>
    <url-pattern>/*</url-pattern>
    <dispatcher>REQUEST</dispatcher>
</filter-mapping>
3. Edit the following files with the same content and copy the Secret obtained in a previous step, in addition to the Keycloak URL and the name of the client we have created:
- webapps/camunda/WEB-INF/keycloak.json
- webapps/engine-rest/WEB-INF/keycloak.json
{
  "realm": "Ldap",
  "auth-server-url": "http://localhost:8081/auth",
  "ssl-required": "external",
  "resource": "camunda-id-service",
  "verify-token-audience": true,
  "credentials": {
    "secret": "84d2bfb5-5ced-45de-8123-3a8b5c531248"
  },
  "use-resource-role-mappings": true,
  "confidential-port": 0
}
3. Single sign-on (SSO) test
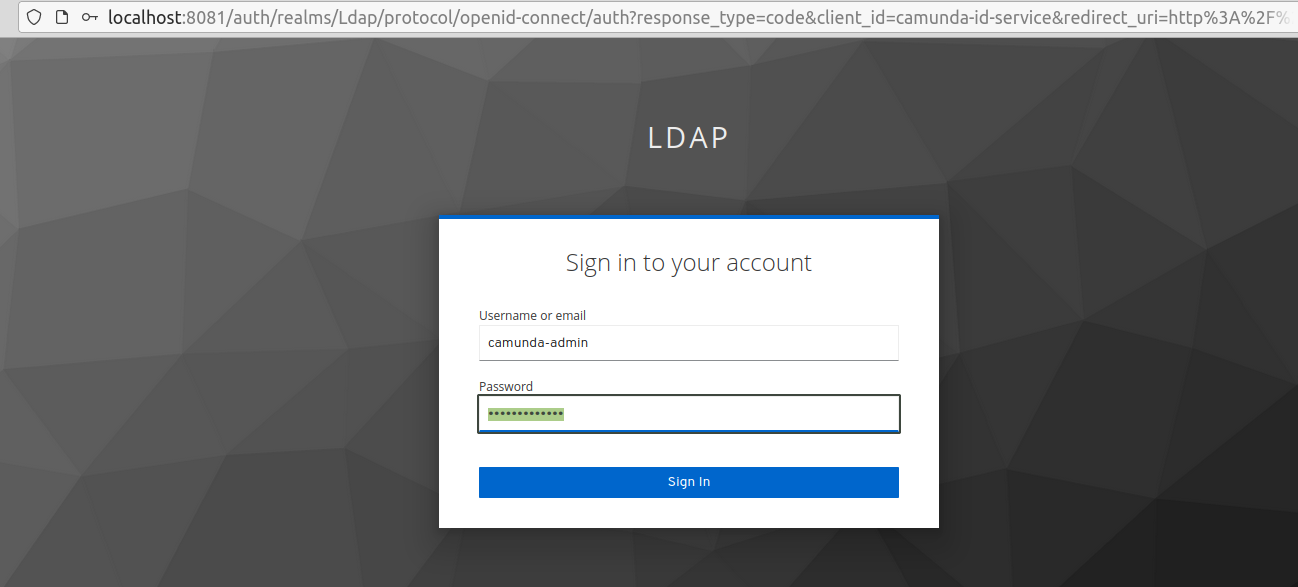
Once the configuration is complete, we must perform a test to see if the previous steps have been correctly executed.
1.If we have correctly configured and restarted the servers, the Camunda page will automatically redirect us to the Keycloak page with no authentication required:
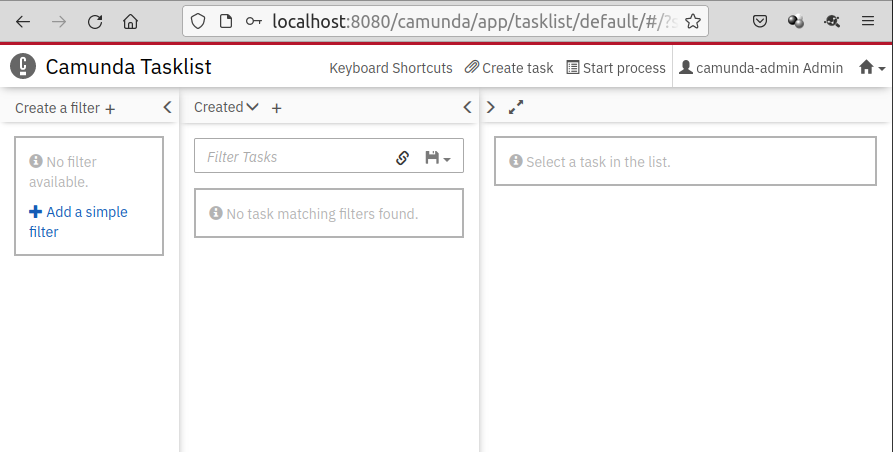
2. Once authenticated, we will be redirected back Camunda web application with the session initiated:
If you want to find out more, don’t hesitate to contact us for information.