
Get ready to take your applications to the next level with Docker Swarm, the most powerful container orchestration tool. In this guide, we’ll show you how to install and configure Docker Swarm step by step, so you can deploy, manage, and scale services easily and efficiently in a cluster environment. In addition, you’ll discover how to automate tasks by using Ansible and Jenkins, by optimizing your configuration and deployment process. It’s time to take full advantage of the Docker Swarm’s power and take your infrastructure to new heights in performance and flexibility!
The table of contents is presented below:
|
1. Docker Swarm installation: How to deploy, manage, and scale services in a cluster environment
1.1 Prerequisites for installing Docker Swarm
Before installing Docker Swarm, you need to have a compatible operating system and meet some prerequisites. The prerequisites for installing Docker Swarm are described below:
Operating system
Docker Swarm is compatible with several operating systems, including Linux, Windows, and macOS. It is recommended to have installed the most recent version of the operating system to ensure compatibility with Docker.
Docker Engine
It is necessary to have Docker installed on the system before installing Docker Swarm. Docker is the engine that enables the creation and execution of containers on the system.
Network configuration
You need to have a configured network for Docker Swarm nodes to communicate with each other. It is recommended to use an overlay network to allow communication between the containers that are being run on different nodes.
Nodes
You need to have at least two available nodes to create a Docker Swarm cluster. Nodes can be physical or virtual and must be connected to the same network.
You can proceed with the installation of Docker Swarm on the system once the prerequisites have been met. It is important to follow the installation instructions carefully and to make sure that you configure the cluster correctly to ensure its proper functioning.
1.2 Creation of Docker Swarm
Once you have installed Docker, you can follow the following steps to set up a Docker Swarm cluster:
- Begin a Docker session on the system that you want to use, as the cluster master node.
- Run the “docker swarm init” command to initialize the swarm mode on the master node. This command will generate a join token that will be used to join other nodes to the cluster.
- Once the swarm mode is initialized, other nodes can be joined to the cluster by using the command “docker swarm join”, and by providing the join token that was generated in the previous step.
- You can run the command “docker node Is” on the master node to verify that the nodes have been joined successfully to the cluster. This will display a list of all the nodes joined to the cluster.
- The “docker service create” command is used to create a service in the cluster and to specify the details of the service, such as the container image, the port, etc.
- The “docker service scale” command is used to scale a service and to specify the desired amount of service replicas.
- You can use the “docker service Is” command to see the state of the services in the cluster.
With these steps, you will have a Docker Swarm cluster ready for use, which will allow you to scale services automatically, balance the load between the cluster nodes, and ensure the application’s availability.
1.3 Considerations for choosing the right amount of nodes
The recommended amount of nodes to use in a Docker Swarm cluster depends on several factors, such as the size and the application complexity, as well as the required output and availability. In general, it is recommended to have at least three nodes in a production cluster to ensure high availability and fault tolerance.
However, it is also important to bear in mind that adding more nodes to the cluster can increase the configuration and management complexity, as well as the infrastructure costs. Therefore, it is important to evaluate your application needs carefully, as well as your budget before deciding how many nodes to add to the cluster.
1.4 Practical scenario with a manager node and two workers
We are going to create a test environment using Vagrant, where we will configure a Docker Swarm cluster with a manager node and two workers nodes.
 1. Image Docker swarm scenario with 1 manager node and 2 workers
You must follow the following steps to set up this scenario:
Down below, I attach the scenario’s Vagrantfile file, so that you can replicate it in Vagrant, if desired.
Vagrant.configure("2") do |config|
  config.vm.define "manager" do |manager|
    manager.vm.box = "ubuntu/focal64"
    manager.vm.hostname = "manager.local"
    manager.vm.network "private_network", ip: "192.168.56.4"
    manager.vm.network :public_network,:bridge=>"enp3s0"
    config.vm.provider "virtualbox" do |vb|
      vb.memory = "4096"
    end
  end
  config.vm.define "worker1" do |worker1|
    worker1.vm.box = "ubuntu/focal64"
    worker1.vm.hostname = "worker1.local"
    worker1.vm.network "private_network", ip: "192.168.56.5"
    worker1.vm.network :public_network,:bridge=>"enp3s0"
  end
  config.vm.define "worker2" do |worker2|
    worker2.vm.box = "ubuntu/focal64"
    worker2.vm.hostname = "worker2.local"
    worker2.vm.network "private_network", ip: "192.168.56.6"
    worker2.vm.network :public_network,:bridge=>"enp3s0"
  end
end
After the deployment, we proceed to install Docker on all machines.
Cluster initiation
The “docker swarm init –advertise-addr” is used to initialize a new Docker Swarm cluster, and to specify the IP address or the hostname that will be used to announce the manager node in the cluster. This address will be used to connect the worker nodes to the cluster and register them to the manager.
The “–advertise-addr” option specifies the IP address or the hostname that will be used to announce the manager node in the cluster. If this option is not specified, Docker Swarm will use the system’s default IP address. It is important to specify an IP address, or a hostname that is accessible from the worker nodes that will be joined to the cluster.
vagrant@manager:~$ ip a

4: enp0s9: <BROADCAST,MULTICAST,UP,LOWER_UP> mtu 1500 qdisc fq_codel state UP group default qlen 1000
    link/ether 08:00:27:aa:e5:e9 brd ff:ff:ff:ff:ff:ff
    inet 192.168.1.129/24 brd 192.168.1.255 scope global dynamic enp0s9
       valid_lft 85923sec preferred_lft 85923sec
    inet6 fe80::a00:27ff:feaa:e5e9/64 scope link
       valid_lft forever preferred_lft forever


vagrant@manager:~$ docker swarm init --advertise-addr 192.168.1.129
Swarm initialized: current node (v8v3rx3xidhukg7grxjrsyfhb) is now a manager.
To add a worker to this swarm, run the following command:
docker swarm join --token SWMTKN-1-2i6w0b1r1bl9ujoiqve2qyr5jdg4tpdt87svju0u7aj26cay75-3u5ce967axholeyf4xj5gx3y0 192.168.1.129:2377
To add a manager to this swarm, run ‘docker swarm join-token manager’ and follow the instructions.
Linking with workers
The “docker swarm join” command is used to join an existing node to an existing Docker Swarm cluster. This command is run in the node that you want to join to the cluster and requires a previously generated union token on the cluster manager node. Services can be deployed in the node once it was joined to the cluster, and you will benefit from the scalability and the availability features provided by Docker Swarm.
vagrant@worker1:~$ docker swarm join --token SWMTKN-1-2i6w0b1r1bl9ujoiqve2qyr5jdg4tpdt87svju0u7aj26cay75-3u5ce967axholeyf4xj5gx3y0 192.168.1.129:2377
This node joined a swarm as a worker.
vagrant@worker2:~$ docker swarm join --token SWMTKN-1-2i6w0b1r1bl9ujoiqve2qyr5jdg4tpdt87svju0u7aj26cay75-3u5ce967axholeyf4xj5gx3y0 192.168.1.129:2377
This node joined a swarm as a worker.
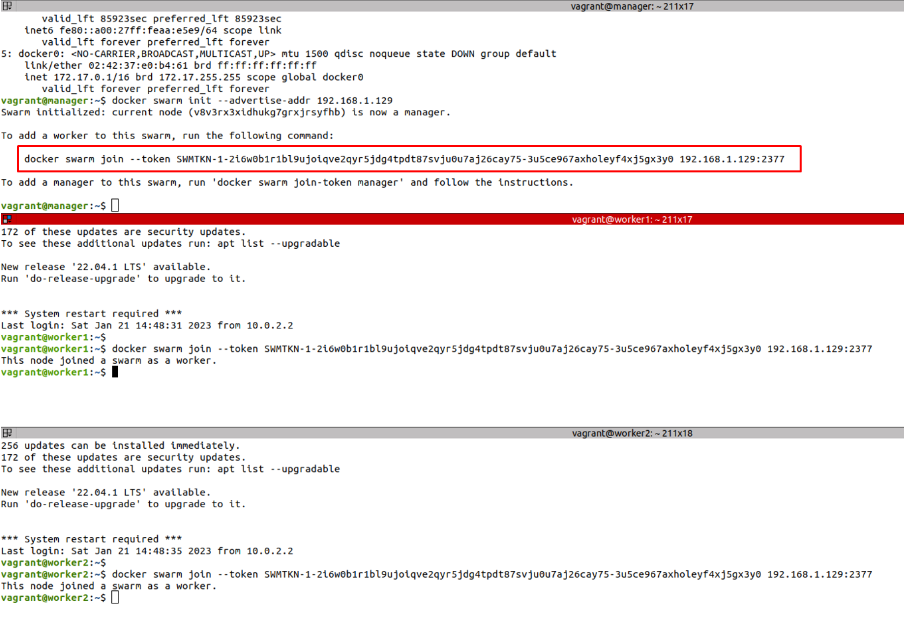
2 Image. Adding the worker’s nodes
List nodes
The docker node ls command is a Docker Swarm command that is used to list all the nodes joined to the cluster. This command is run on the cluster’s manager node and shows basic information about each node, such as its ID, name, status, and IP address.
The docker node ls command also allows you to filter the nodes that are shown in the output by using additional options like “–filter” or “–quiet”. For example, the “–filter role=worker” option can be used to see only the worker nodes in the cluster.
vagrant@manager:~$ docker node ls
ID                            HOSTNAME   STATUS    AVAILABILITY   MANAGER STATUS   ENGINE VERSION
v8v3rx3xidhukg7grxjrsyfhb *   manager    Ready     Active         Leader           20.10.23
hdje1ueuvr5hx5a3m31t2lkta      worker1    Ready     Active                          20.10.23
0tblr3pgc5oq7w89kh46qozjv      worker2    Ready     Active                          20.10.23
First service deployment in the cluster
Deploying a service on a Docker Swarm cluster is a simple process that allows you to scale and manage your applications efficiently. You can ensure a high availability and fault tolerance with a cluster, which is especially important for critical applications.
Create network
To create a customized network in Docker Swarm, and associate it with a WordPress service, you can use the docker network create and docker service create commands.
For example, to create a network called “my-network” we will run the following command:
vagrant@manager:~$ docker network create --driver overlay my-network
5f1aqbozitf0jdx0e0ja0wbp1
Once the network is created, it can be used to create a service by using the docker service create command and specifying the –network option to connect to the customized network.
Create service
Once you have logged in to the cluster, you can create a Docker Swarm service by using the docker service create command. This command accepts several parameters, such as the service name, the Docker image to be used, and the network and volume options.
For example, to create a service called “mi-servicio” which uses the “mi-imagen” image, and listens on port 80, run the following command:
docker service create --name mi-servicio --publish 80:80 mi-imagen
The –name option specifies the service name, while the –publish option indicates the service that should be listened to on port 80 of the host and expose it on port 80 of the container.
Let’s see an example of the WordPress service deployment. Deploying WordPress on a Docker Swarm cluster is a process that consists of creating two services, one for the database, and one for the WordPress application.
MySQL
It is necessary to create a service for the database, in this case, it is recommended to use a mariadb or mysql image.
vagrant@manager:~$ docker service create --name mysqldb --constraint 'node.role == worker' --network my-network --env MYSQL_ROOT_PASSWORD=mypassword --env MYSQL_DATABASE=wordpress --env MYSQL_USER=wpuser --env MYSQL_PASSWORD=wppassword mariadb:latest
9zr2rp3l3juqseqcf3bi02s98
overall progress: 1 out of 1 tasks
1/1: running   [==================================================>]
verify: Service converged
In this example, a service called “mysqldb” is being created that uses the image “mariadb:latest”; environment variables are being set to specify the root password, the database name, the user, and the password.
The –constraint ‘node.role == worker’ parameter is used in the docker service create command to specify a constraint on the service creation by indicating that the service should only be run on the cluster nodes with the “worker” role. The role of a node in Docker Swarm can be “manager” or “worker” and is used to identify the nodes which act as leaders or as workers in the cluster.
WordPress
Once the database service is created, we can create a WordPress service by using the docker service create command.
vagrant@manager:~$ docker service create --name wordpress --constraint 'node.role == worker' --network my-network --env WORDPRESS_DB_HOST=mysqldb --env WORDPRESS_DB_USER=wpuser --env WORDPRESS_DB_PASSWORD=wppassword --env WORDPRESS_DB_NAME=wordpress --replicas 3 --publish 80:80 wordpress:latest
dfelq7oumbhfojx0qx2f7ig7t
overall progress: 3 out of 3 tasks
1/3: running   [==================================================>]
2/3: running   [==================================================>]
3/3: running   [==================================================>]
verify: Service converged
In this example, a service called “wordpress” is being created that uses the “wordpress:latest” image, it is connecting to “my-network” network, 3 replicas are being set, port 80 of the host is being published to port 80 of the container, environment variables are being set to connect to the database, and the database name is being set.
Portainer
Continuing with the deployment process, we are going to create a Portainer service by using the docker service create command. Here is an example of how to create the Portainer service efficiently:
vagrant@manager:~$ docker service create --name portainer --publish 9000:9000 --constraint 'node.role == manager' --mount type=bind,src=//var/run/docker.sock,dst=/var/run/docker.sock portainer/portainer
oilvsqvlqkdwy7366j3q94c7x
overall progress: 1 out of 1 tasks
1/1: running   [==================================================>]
verify: Service converged
In this example, a service called “portainer” is being created that uses the “portainer/portainer” image, port 9000 of the host is being published to port 9000 of the container, and a constraint is being set so that it only runs on the cluster’s manager nodes, and the docker socket is being assembled so that the portainer can interact with the docker daemon.
List services
Once the services are created, their state can be verified with the docker service ls command. If everything is working correctly, you should see the “mysqldb”, “wordpress”, and “portainer” services in the list with the state “Running”, and the established replicas.
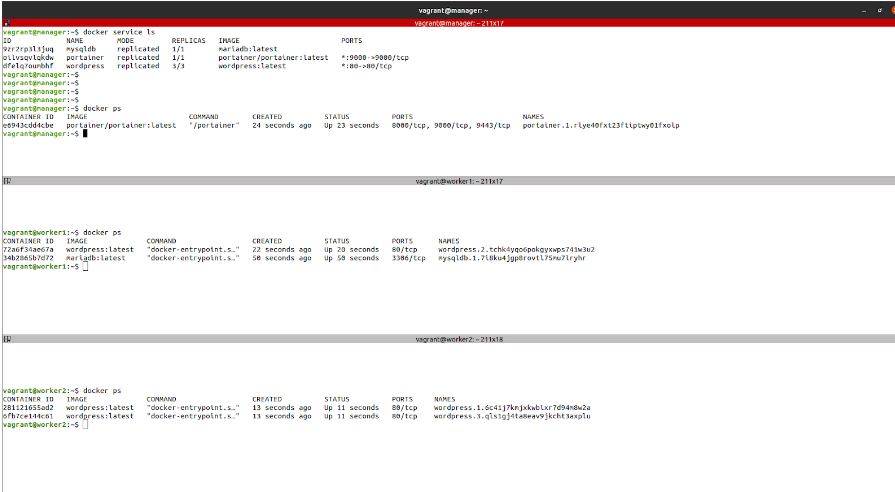
3. Image Two listings are provided: One for services and the other for containers to visualize the assignment and distribution of resources in a clear and organized way.
Now that we have WordPress deployed in the cluster, we can access the web application by using the docker service inspect command to obtain the node IP address where the service, as well as the published port, are located. In this case, the web application would be available at http://[IP-NODO]:80
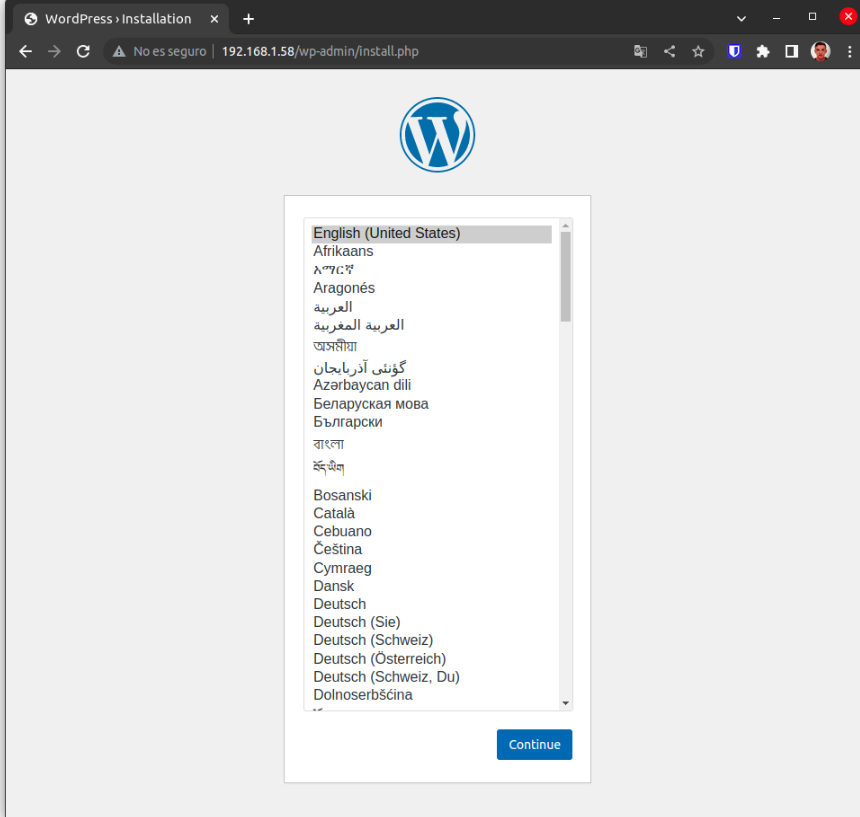 4. Image: Wordpress installation screen
1.5 Portainer
Portainer is an open code software tool that provides a graphical user interface (GUI) for Docker container management. With Portainer, you can see an overview of all the containers and services that are being run in the Docker cluster, manage and monitor the containers and services, create and scale services, and perform many other tasks related to container management. The main advantage of Portainer is that allows users to interact with the Docker cluster easily and intuitively, without the need to use complex command line commands.
To access the Portainer interface, just open the web browser and go to http://[IP-NODO]:[PUERTO-PUBLICADO].
Once you access the interface, you can use a user and password to log in. By default, Portainer doesn’t have a set user and password, so you can create one during the first login. Once you have logged in, you will have access to the Portainer container management interface.
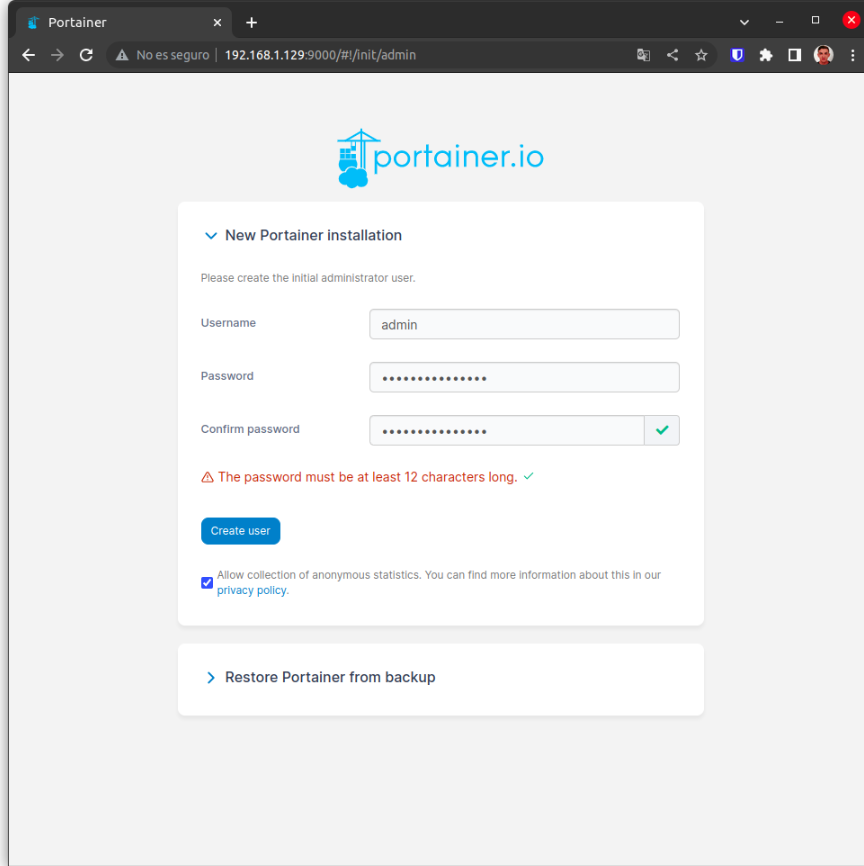 5. Image. Portainer login, and password creation screen
Portainer home page
The Portainer home page is where an overview of all the environments available on the system is presented; in the case of local installation, only “local” will be shown as an option. By clicking on it, you will access the configuration and container management options, and services in that specific environment.
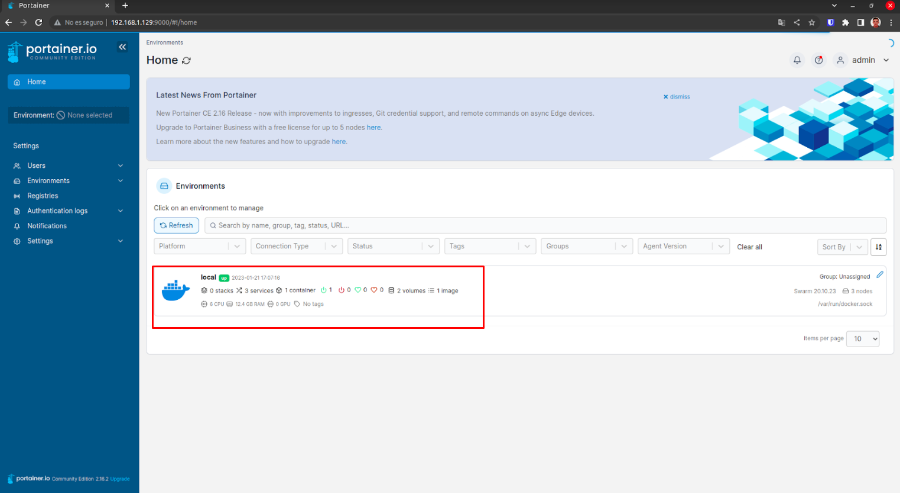
- Image: Portainer home screen
Dashboard
On the Portainer Dashboard page, you can find several functions and features that allow you to see and manage your containers and services; here are some examples:
- General information about the system: On the Dashboard page you can see general information about the system, such as the total number of containers, services, nodes, etc.
- Resource usage statistics: On the Dashboard page you can see the resource usage statistics, such as CPU usage, memory, storage, etc.
- Graphics: On the Dashboard page you can see interactive graphics which show the resources usage in real-time.
- Status indicators: On the Dashboard page you can see the status indicators that show the containers and services status, such as if they are being run, stopped, etc.
- Quick actions: On the Dashboard page you can find quick actions that allow you to perform common tasks, such as the initialization or detention of containers or services.
- Notifications: On the Dashboard page you can see notifications in case of a relevant event happening to the system, such as a container that stops working or a service that fails.
- Access to the system sections: From the Dashboard, you can access the different sections of the system, such as the containers, services, volumes, networks, and users.
In short, the Portainer Dashboard page is an overview of all the information related to the containers and services that are being run on the system, as well as tools to manage them efficiently.
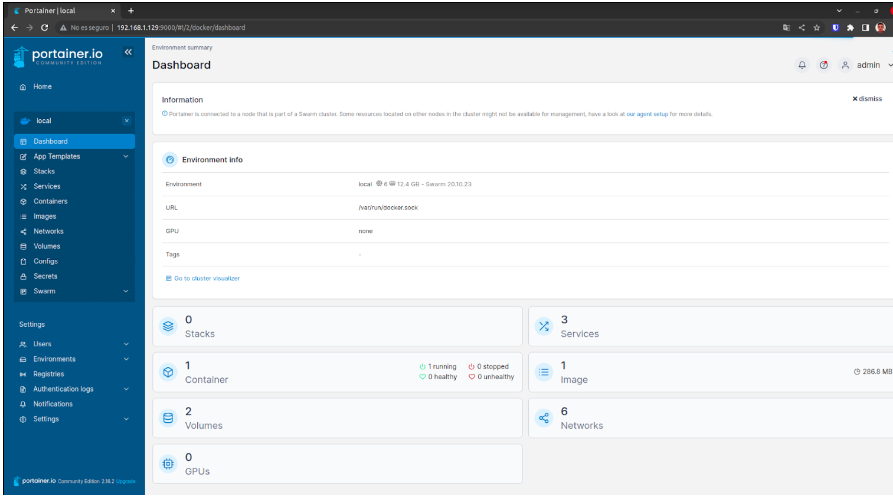 7. Image Portainer Dashboard screen
Services list:
The Service List page in Portainer is where you can see and manage all the services that are being run in the Docker cluster. On this page, you can see the list of all the services, including details such as the service name, the current status, the number of replicas, the resource usage, and the endpoint, among others.
From the Service List page, you can perform several actions, such as:
- Seeing the details of a specific service: By clicking on a service in the list, you can see the additional details about that service, such as the configuration, the associated containers, and the logs, among others.
- Scaling services: You can change the number of replicas of a service.
- Stopping or initiating services: You can stop or initiate a selected service.
- Deleting services: You can delete a selected service.
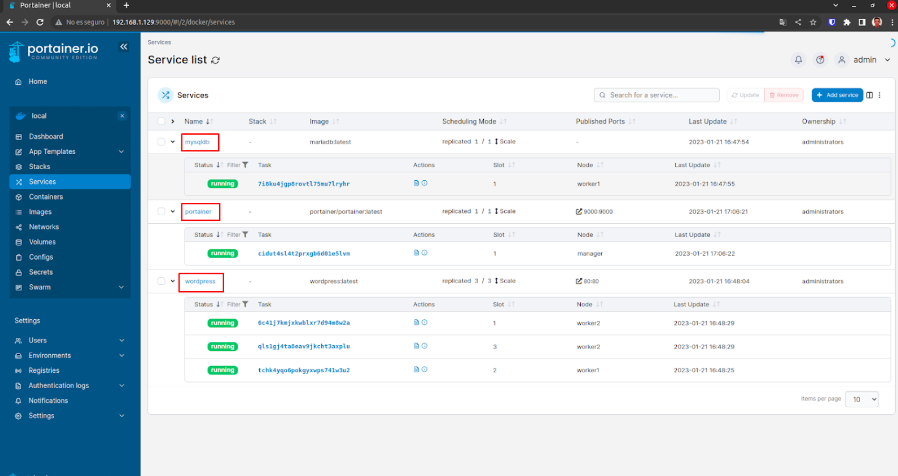
8. Screen of both active and inactive services
Logs
The logs page in Portainer allows you to see the containers and services logs that are being run on your Docker cluster. Logs can be useful for detecting problems, debugging errors, or just for having a better comprehension of what is happening in your system.
From the logs page, you can see the logs of a specific container or service, apart from having options to filter the records by date, and log level, among others. You can also see the logs in real-time, which allows you to see the events that are happening in real-time.
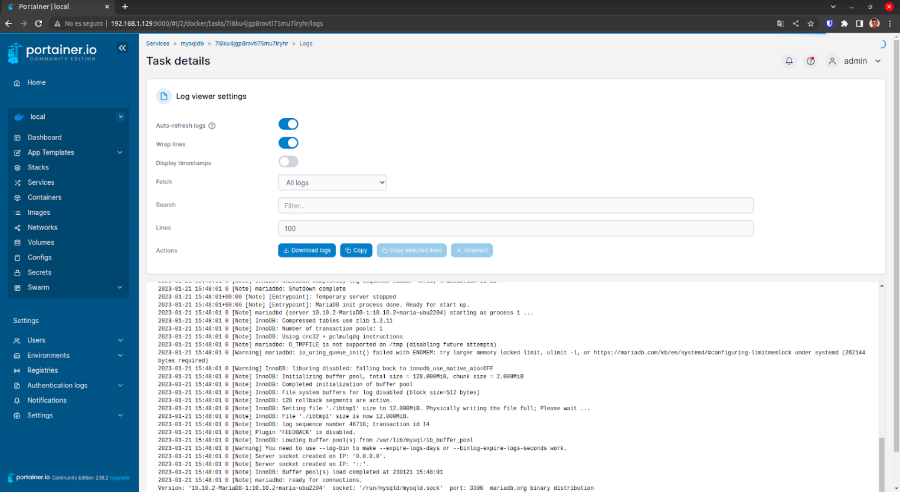 9. Image Log Screen
Conclusions about Portainer
These are just some of the many possibilities that Portainer offers to us, as it is a very complete and versatile tool that allows users to have better control and visibility over their containers and services in a Docker cluster. In addition to the functions mentioned above, Portainer also offers other advanced functions, such as volume management, networks, users, and permissions, and the creation and management of templates for services, among others. With Portainer, users can automate and simplify many of the container management tasks, which allows them to save time and effort, and focus on their applications development and deployment.
1.6 Replicas and scaling
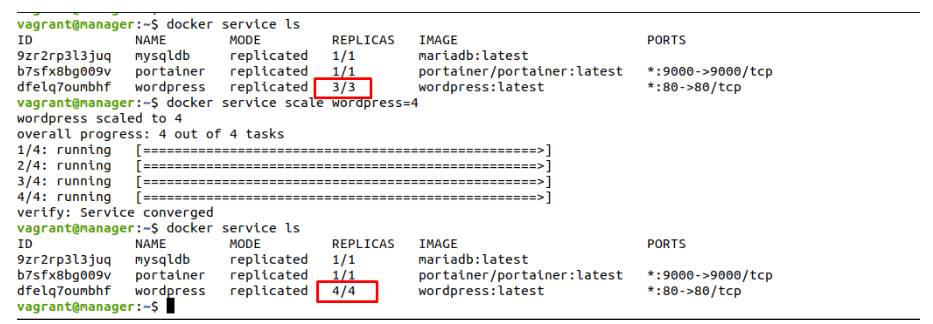
The docker service scale command is used to scale an existing service on a Docker Swarm cluster. This command allows you to increase or decrease the amount of replicas of a service. This means that you can increase or decrease the number of containers that are being run for a particular service.
The command has the following syntax:
docker service scale [OPTIONS] SERVICE=REPLICAS
Where SERVICE is the service name that you want to scale, and REPLICAS is the new amount of replicas you want. For example, if you want to scale the “wordpress” service to four replicas, you would use the following command:
vagrant@manager:~$ docker service scale wordpress=4
wordpress scaled to 4
overall progress: 4 out of 4 tasks
1/4: running   [==================================================>]
2/4: running   [==================================================>]
3/4: running   [==================================================>]
4/4: running   [==================================================>]
verify: Service converged
 10. Image: Visualizing a service scalability
The docker service scale command also accepts several additional options to customize the scaling behavior, such as specifying a waiting time, and forcing the scaling, among others.
1. 7 Update the service
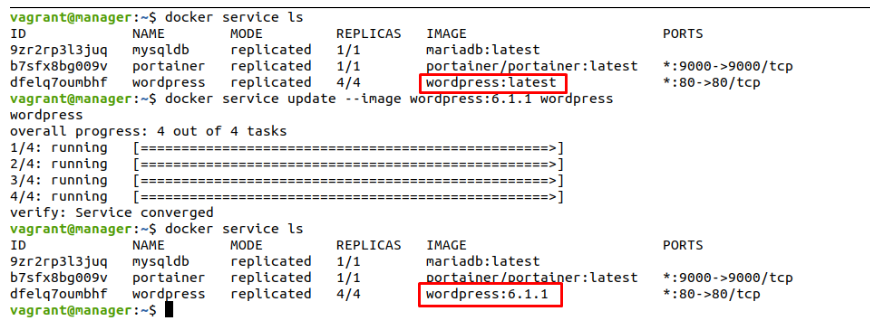
The docker service update command is used to update an existing service in a Docker Swarm cluster. With this command, you can upgrade the settings, and the options of an existing service. This allows, for example, to modify the resource amount assigned to a service, to change the environment variables, to upgrade a volume’s content, or to change the image used to create the service.
An example of changing the image to a wordpress service could be the following:
vagrant@manager:~$ docker service update --image wordpress:6.1.1 wordpress
wordpress
overall progress: 4 out of 4 tasks
1/4: running   [==================================================>]
2/4: running   [==================================================>]
3/4: running   [==================================================>]
4/4: running   [==================================================>]
verify: Service converged
Where “wordpress” is the service name you want to upgrade, and “wordpress:6.1.1” is the new WordPress image you want to use. With this command, the “wordpress” service will be upgraded to the image version we have indicated.
 11. Image Viewing the Wordpress service image upgrade
It is important to mention that the service will be upgraded without stopping or interrupting its functioning, and there will be a seamless transition to the new configuration. It is possible to specify additional options to customize the upgrade process.
1.8 Tag Nodes
Tagging nodes is a Docker Swarm feature that allows you to assign custom labels to cluster nodes. You can use these labels to identify or classify the nodes according to a set of criteria, such as the hardware type, the physical location, and the intended purpose, among others.
An example of how tagging a node to assign a specific database could be the following:
docker node update --label-add db=true nodo1
In this example, the tag “db=true” is being assigned to the “nodo1” node, which indicates that this node has an installed and configured database. Then, you can create services that use this tag to ensure that they are being run only on that specific node.
docker service create --name mydb --constraint 'node.labels.db==true' --replicas 1 mydatabase
In this case, the “mydb” service will only be running on the “nodo1” node, since it is the only node with the “db=true” tag.
In short, tagging nodes is a useful feature that allows you to classify and organize the Docker Swarm cluster nodes, making it easy to assign specific services to the nodes.
1.9 Docker secrets
Docker Secrets is a Docker Swarm feature that allows you to manage and protect the secrets (such as passwords, tokens, and certificates, among others) that are being used by your services in a Docker cluster. Secrets are encrypted and stored in the cluster manager’s file system and are securely distributed to the nodes that are running the service.
-This article may be of your interest: “Automation processes with n8n“-
An example of how to use Docker Secrets with a MySQL service could be the following:
Creating the secret for the database password:
echo "mydbpassword" | docker secret create mysql_root_password -
Creating the MySQL service using the secret:
docker service create --name mysql --secret mysql_root_password -e MYSQL_ROOT_PASSWORD_FILE=/run/secrets/mysql_root_password mysql
This service uses the MYSQL_ROOT_PASSWORD_FILE environment variable to specify where the secret file is located; in this case in the /run/secrets/mysql_root_password path.
In this example, a secret called “mysql_root_password” is being created, which contains the database password, and is used to create the MySQL service. In this way, the password will be protected, and will not be stored in an insecure environment file or variable.
In short, Docker Secrets is a Docker Swarm feature that allows you to manage and protect the secrets used by your services in a secure and easy-to-use way.
1.10 Delete the service
You can use the docker service rm command to delete an existing service in a Docker Swarm cluster. This command has the following syntax:
docker service rm [OPTIONS] SERVICE
Where SERVICE is the service name that you want to delete.
For example, if you want to delete a service called “portainer”, you would use the following command:
vagrant@manager:~$ docker service rm portainer
portainer
It is important to mention that when you delete a service, all replicas will stop automatically, and all the resources associated with the service, such as configurations, networks, and volumes, among others, will also be removed.
There are additional options that you can use with the docker service rm command to customize the way the service is deleted, such as specifying a waiting time, and forcing the deletion, among others.
In short, deleting a Docker Swarm cluster service is simple, just by using the docker service rm command, and allows you to delete a service and its associated resources safely.
1.11 Using Ansible and Docker Swarm
Ansible is a system configuration and management automation tool that you can use to automate tasks in a Docker Swarm cluster. With Ansible, you can create playbooks (a set of tasks) to automate tasks, such as the creation and upgrade of services, the management of nodes, and the configuration of networks on a Docker Swarm cluster.
You must follow the following steps to use Ansible and Docker Swarm:
- Install Ansible on a controller machine.
- Create an inventory (configuration file) that contains the Docker Swarm cluster nodes list.
- Create Ansible playbooks that contain the tasks to be automated.
- Run the Ansible playbooks on the Docker Swarm cluster nodes.
An example of an Ansible playbook to deploy a WordPress service on a Docker Swarm cluster:
- name: Create WordPress service
  docker_service:
    name: wordpress
    image: wordpress:latest
    state: present
    replicas: 3
    ports:
      - "80:80"
    volumes:
      - "/data/wp:/var/www/html"
    environment:
      - WORDPRESS_DB_HOST=db
      - WORDPRESS_DB_USER=wpuser
      - WORDPRESS_DB_PASSWORD=wppass
In this example, the Ansible “docker_service” module is used to create a WordPress service called “wordpress”, by using the “wordpress:latest” image, with 3 replicas, exposing port 80, assembling the “/data/wp” volume in “/var/www/html”, and setting the necessary environment variables for the connection to the database.
Once the playbook is running, Ansible will create, and configure the WordPress service in the Docker Swarm cluster.
What if we already have the service in an external file?
It is possible to deploy a service on a Docker Swarm service using Ansible, and a previously created configuration file. You can do this by using the Ansible “docker_service” module, and the “config_file” option to specify the configuration file path.
An example of an Ansible playbook to deploy a service on a Docker Swarm cluster by using an already created configuration file:
name: Deploy service
  docker_service:
    config_file: /path/to/service.yml
    state: present
In this example, the Ansible “docker_service” module is used to deploy a service on a Docker Swarm cluster by using the “service.yml” configuration file located in the “/path/to/service.yml” path. The “state: present” option indicates that the service must be present in a cluster once the playbook is run. With this parameter, Ansible will try to install the package if it is not yet on the system, but will not reinstall it if it is already present.
It is important to mention that the configuration file must be in the proper format to be interpreted by Docker Swarm.
In short, Ansible is a system configuration and management automation tool that you can use to automate tasks in a Docker Swarm cluster, which allows easier and more automated management of the services, and the cluster resources, in this specific case of WordPress.
2. Jenkins + Ansible + Docker Swarm
Jenkins is a software construction and deployment automation tool that you can use in cooperation with Ansible and Docker Swarm to automate construction processes, testing, and deployment processes in a Docker Swarm cluster.
You must follow the following steps to use Jenkins with Ansible, and Docker Swarm:
- Setting up the environment:
- Install Jenkins on a server.
- Install Ansible on the same server or a different one.
- Configure Jenkins so that you can access GitLab and Docker Swarm.
- Install the “Ansible” plug-in in Jenkins to be able to use Ansible from Jenkins.
- Create a project in Jenkins to automate an application construction and deployment in a Docker Swarm cluster.
- Configure the project to use Ansible to deploy the application in the Docker Swarm cluster.
- Run the project in Jenkins to automate the application construction, testing, and deployment in the Docker Swarm cluster.
You may also be interested in “High availability in Nginx by using Keepalived – IP Virtual“-
In the following image, we can see a configuration made for a customer, in which the different service deployment environments are organized, allowing an easy and comfortable deployment with just one click.
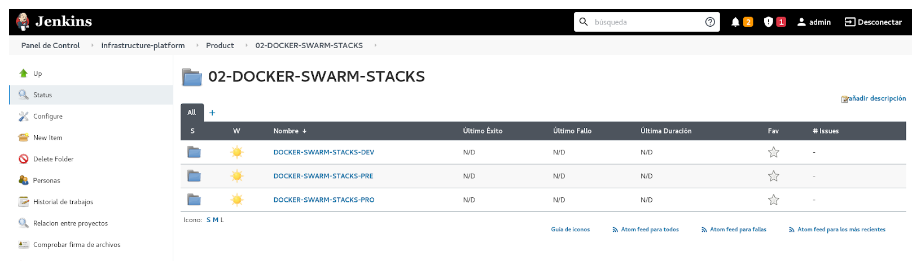
12. Image Jenkins screen to select the environment we want to deploy
In short, the Jenkins, Ansible, and Docker Swarm combination is a very powerful solution to automate IT infrastructures and to deploy applications in container environments. This combination allows IT programs to create highly scalable and flexible infrastructures, reduce human errors, and improve the quality of the applications. However, these technologies might require a significant investment in training and resources, which must be considered carefully before implementing them.
3. Conclusion
In conclusion, we have seen throughout this guide how Docker Swarm is a solid option for those who are looking for an easy-to-use but powerful container orchestration platform. We have explored the steps that are needed to install and configure Docker Swarm, from the preparation of the environment to the creation of a cluster, and the implementation of services. Therefore, anyone who follows the steps that were described in this guide will be one step closer to making the most of Docker Swarm, and taking their container infrastructure to the next level.
If you want to find out more about how to configure this type of system in your environment, do not hesitate to contact us. We will be happy to assist and help you through every step of the configuration process, ensuring a successful implementation, and optimal output on your system.