
In this post we are going to show a simple n8n workflow that involves getting data from a MySQL database, performing a data transformation, and then making a POST request to a REST API using the transformed data. We will use a Docker Compose file to run all the necessary services for this workflow.
For this post a basic knowledge of Docker, Docker Compose, MySQL, JSON and APIs is needed.
What is n8n?
N8n is a low-code process automation tool that allows users to create custom processes and automate tasks across a variety of applications and services.
It can be self-hosted with no cost. But n8n also provides a Enterprise Support for self-hosted installations and a Cloud service if you don’t want to maintain a n8n installation in your infrastructure.
Set up n8n with docker compose
Using Docker Compose can be a convenient way to run the n8n server and all the necessary backend services, such as the database or the REST API, in a single, easy-to-manage local environment.
To use Docker Compose with n8n, you will first need to define all the necessary services in a docker-compose.yml file. This file specifies the images of each service, any necessary environment variables or configurations, and how the services should be connected. We are going to define the following services:
- MySQL service: This service is used to register and obtain products in a database.
- API service: This service provides an endpoint “http://api:3000/products/mysql” that returns a JSON response {“status”: “success”} when a new product is created.
- n8n service: This service runs the process that integrates the different services and performs the necessary actions when it is executed.
The docker-compose.yml file will look like this:
version: '3.8'

services:

# n8n

  n8n:
    image: n8nio/n8n
    ports:
      - "5678:5678"
    environment:
      - N8N_BASIC_AUTH=true
      - N8N_BASIC_AUTH_USERNAME=myusername
      - N8N_BASIC_AUTH_PASSWORD=mypassword

# MySQL

  mysql:
    image: mysql:latest
    restart: always
    environment:
      - MYSQL_ROOT_PASSWORD=mypassword
      - MYSQL_DATABASE=mydatabase
      - MYSQL_USER=myuser
      - MYSQL_PASSWORD=mypassword
    ports:
      - "3306:3306"
    volumes:
      - ./scripts/mysql:/docker-entrypoint-initdb.d

# API REST

  api:
    build:
      context: ./simple-api-rest
      dockerfile: Dockerfile
    ports:
      - "3000:3000"
    command: npm run start
Clone the repository https://github.com/ChakrayES/docker-compose-n8n-wf-example-1, and in the folder n8n-application-post run:
docker compose build
This will build the image for our API rest app. Then run:
docker compose pull
to pull the images of n8n and MySQL with the latest version of the applications.
Finally start the services with:
docker compose up
The n8n Workflow
The example workflow has a sequence of connected nodes to periodically gather information of products created during the last day from a MySQL database, transform the data to generate a JSON request and then send it to a specific endpoint via HTTP POST request. The workflow is triggered by a schedule trigger to execute the workflow once per day.
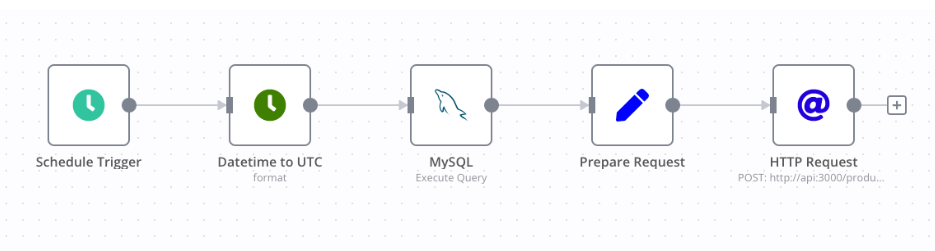
Figure 1. N8N Workflow
Before starting to explain the workflow in detail, first you need to import it in your n8n instance.
1.Enter the http://localhost:5678/ on a browser and skip the setup
2. Click on start a new workflow from scratch
3. In settings click on Import from URL… and enter the URL to the JSON configuration of the Workflow stored in Github: https://raw.githubusercontent.com/ChakrayES/docker-compose-n8n-wf-example-1/main/Workflow.json

Figura 2. Workflow in detail
4. Finally, save the workflow
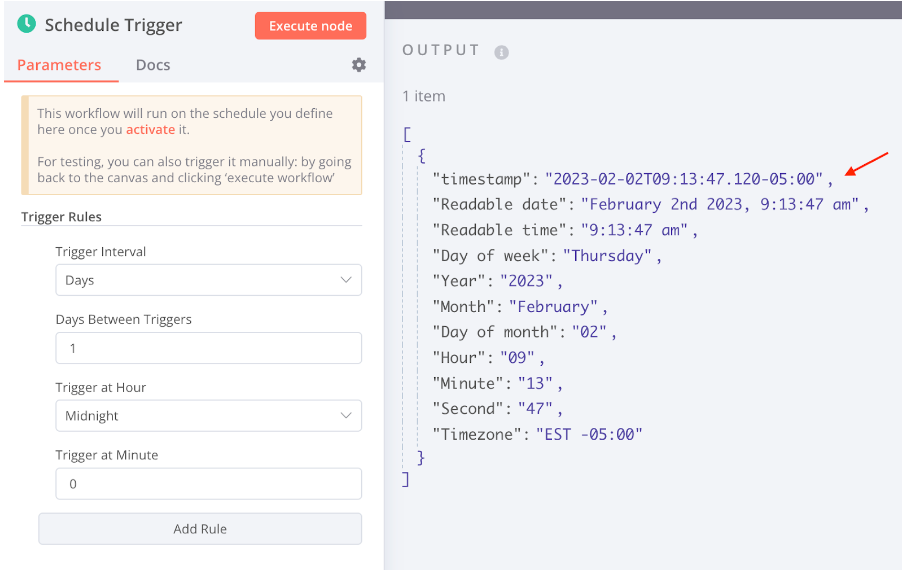
Schedule Trigger
The schedule trigger in n8n allows configuring frequency and timing of workflow execution. The following configuration sets workflow execution at 8am time daily:
Date & Time node
The Date & Time node provides a powerful and flexible tool for working with date and time values, making it easier to automate tasks that require time-based calculations.
We use it to get the timestamp when the workflow starts and convert that timestamp to the UTC timezone.
Using {{ }} we can use JavaScript in the different parameters of the nodes. With the operator $json, we can access the values of the previous item. In this case, we need to access the timestamp value of the input item.
In the Property Name field we have set the name of the property of the output item where the result of the conversion will be stored. We have called fromDatetime to that property.
We have activated the Custom Format option for specifying the output format to “YYYY-MM-DDTHH:mm:ss.SSSZ”.
In Options we can see:
- To Timezone Name or ID with the timezone to “UTC”, so the resulting date will be in the UTC timezone
- From Format with the format of the timestamp input value “YYYY-MM-DDTHH:mm:ss.SSSZ”.
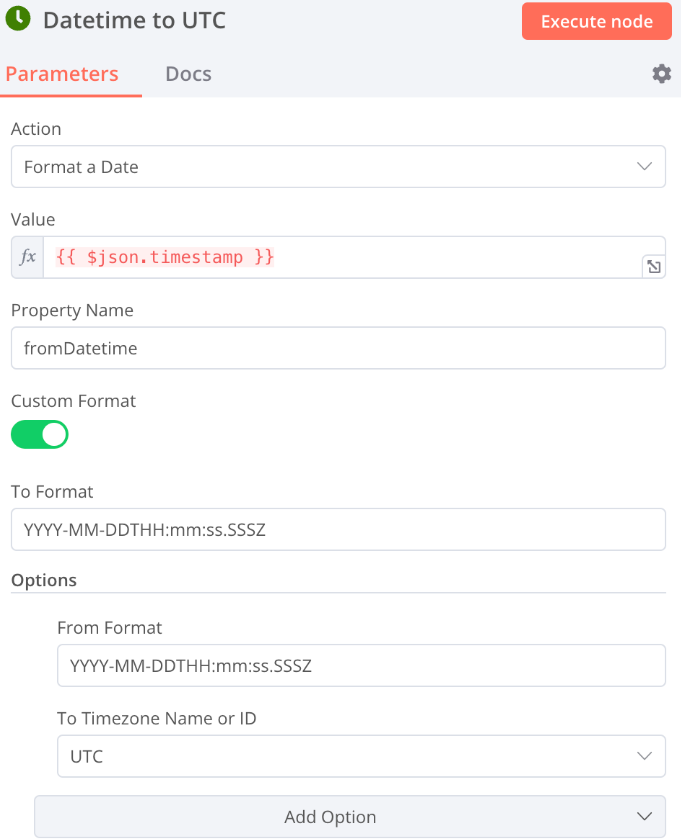
Figura 3. Date format
Again, if you click in the node and in the Execute node button you will force the execution, and will see how the fromDatetime property appears in the output item:
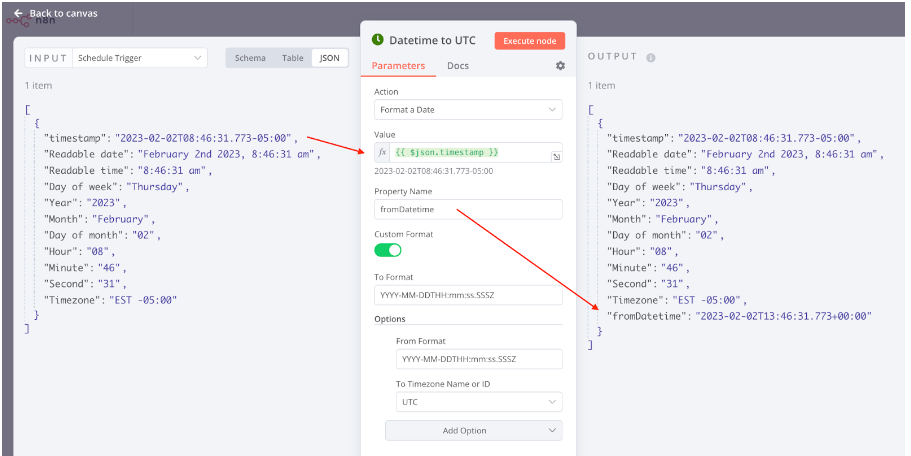
Figura 4. Date format II
MySQL node
This node allows you to execute a MySQL query.
We have configured this node to execute a query that selects all the rows from the products table which were created between the current timestamp and one day ago. We will use the UTC datetime we generated in the previous node as a parameter of the query:
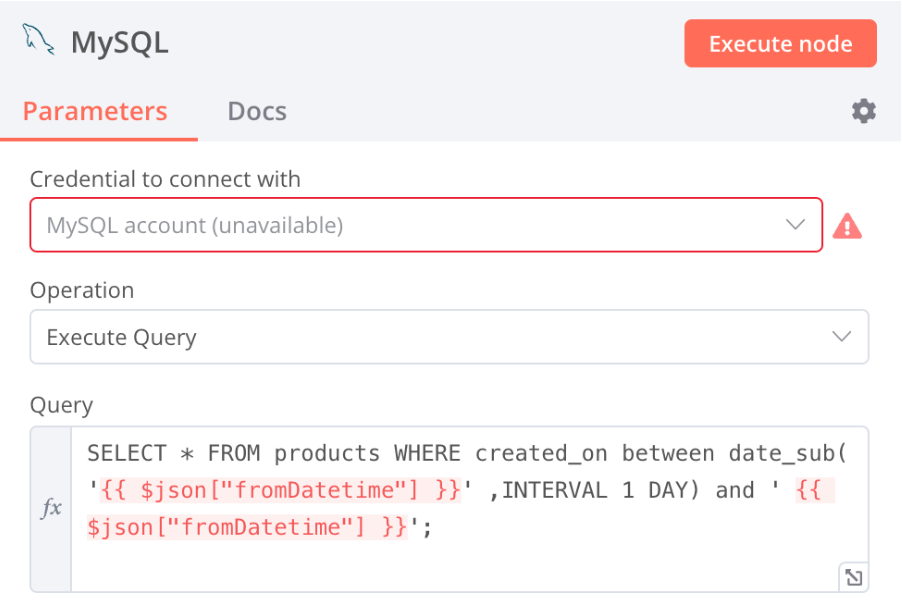
Figure 5. MySQL
You can notice how the MySQL node was in red and we have a warning in it. That’s because the MySQL node needs a credential to connect to the database.
1.Click on the Create New Credential to create the credential:
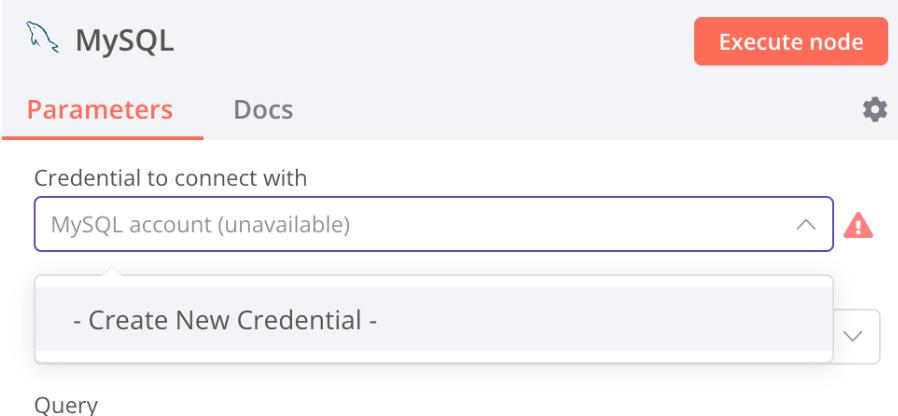
Figure 6. MySQL Credentials
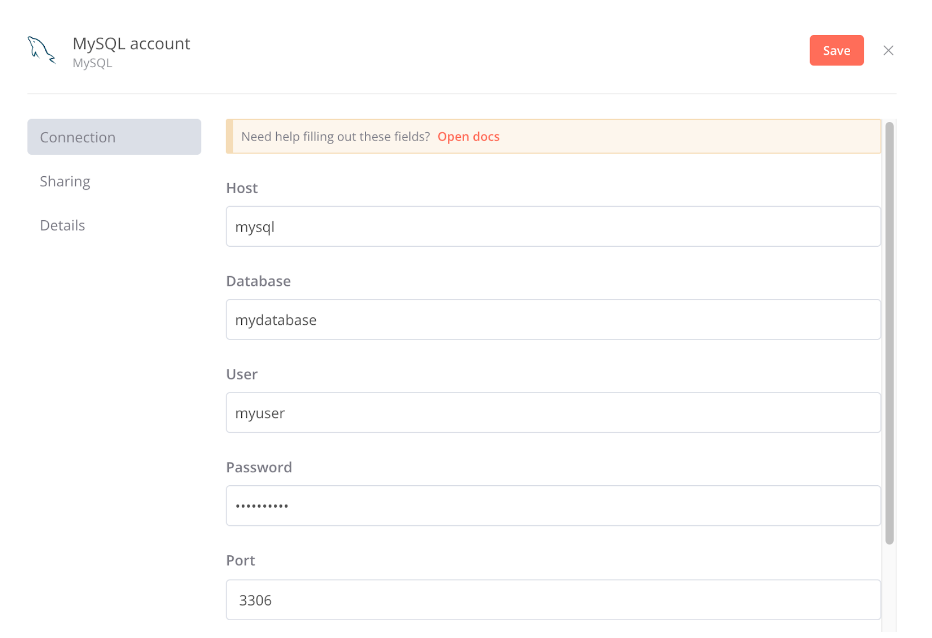
Figure 7 . MySQL Account
2. Once saved, return to the MySQL node and force the execution of the node:

Figure 8. Execution Node
Set node
It allows you to set or modify the values of incoming data, such as updating a value, combining strings, formatting dates, and more. We will use this node to set new values for creating a new product in our API.
We will use this node to generate the request for the REST API call.
Activate “Keep only set” check to generate an output that only contains the values we are setting in the node. The default behavior would copy all the input properties to the output.
Also, add the option “Dot notation” that modifies the way the generated properties are generated. If “Dot notation” is enabled the result of setting a property xxx.yyy with value zzz is: { “xxx”: { “yyy”: “zzz” } }, if not enabled, the result would be this one { “xxx.yyy”: “zzz” }
As the request we need to send to the API to create a product is like this one { “item”: { “nameProduct”: “Some Product”, “priceItem”: “10” } } we will set two values in the node:

Figure 9. Prepare request
If we force the execution we can see how a node executes its logic for each of the input items:
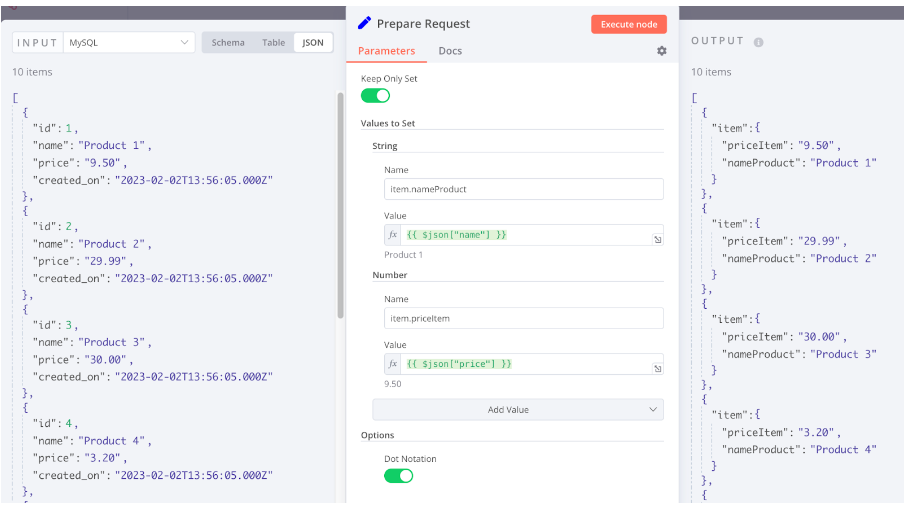
Figure 10. Input items
HTTP request node
It is used to make an HTTP request to a specified URL. This node can be used to retrieve data from external APIs or to communicate with web services.
We have used this node to make a POST request to our API for creating the products obtained in the database.
The configuration of the node is the following:
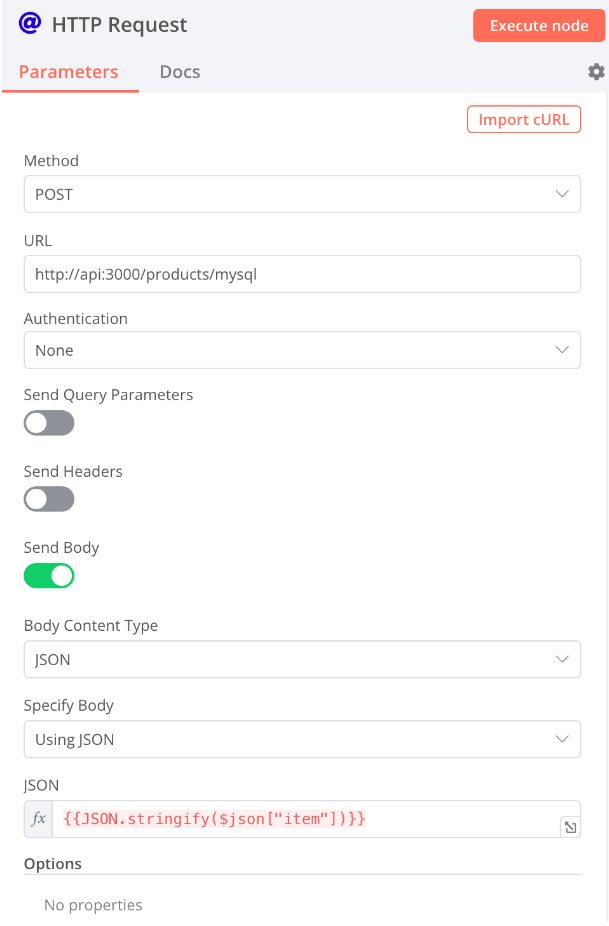
Figure 11. HTTP request
We can see the HTTP method and the URL. And the configuration to send the JSON body, using the following JavaScript code to set the JSON parameter {{ JSON.stringify($json[“item”]) }}.
If you force the execution you will see how the 10 calls corresponding to the 10 input items end with the success status:

Figure 12. HTTP request II
Activate the workflow
Until now, you have been manually executing the workflow node by node.
We have configured the Schedule Trigger to execute the trigger every day at midnight because we wanted the workflow to run automatically. But it will not trigger at the defined hour yet.
That is because a workflow needs to activate the workflows to activate the trigger. To do that just click in the switch at the top of the screen and the workflow will trigger automatically every day at midnight.

Figure 13. My workflow
Conclusion
In conclusion, n8n is a robust solution for unifying various applications and services. Its capability of seamlessly connecting to multiple sources, such as MySQL databases and REST APIs, and executing data transformation functions, showcases its adaptability and versatility. Additionally, the utilization of Docker Compose for running all required services, testifies its compatibility with current development technologies and methodologies. All in all, n8n’s powerful and intuitive workflow features make it an optimal choice for handling data and integration projects.
If you need help with it, do not hesitate to contact us!