
Today, we’re going to show you an example of a configuration combining both types of VRRP, at a global and an individual level, in order to achieve a balance between high availability and scalability in Nginx through Keepalived.
1. VRRPs between CPDs
1.1 What is VRRP (Virtual Router Redundancy Protocol)?
VRRP (Virtual Router Redundancy Protocol) is a network protocol designed to provide router redundancy to a network. It’s used to ensure that a specific IP address is always available to a network, even if there are issues with a router or it fails. In order to achieve this, many routers work together to share the routing load and stay connected in case one of them fails. This is an open communications protocol that serves machines of the same subnet by increasing the availability of the default gateway.
It’s important that the infrastructure has High Availability. Our servers will never cease their operations or stop performing due to issues or external causes.
1.2 Types of Virtual IP: Scenarios for configuration
Two or more virtual IPs can be defined for the same machine. We’ll now see one of the scenarios we developed with this type of configuration.
- All the load balancers of each environment are included in a global VRRP. If there is a failure that affects one of the load balancers, the traffic will be redirected automatically to another active balancer of any environment. Since traffic can be redirected to any active environment regardless of the CPT it’s in, this configuration provides a higher level of fault tolerance and improved fault capacity.
- An environmental VRRP configuration is similar to a global configuration, but it is limited to just one specific environment. In this case, only the two load balancers from that environment will be configured to work together as a high availability group. If one of the load balancers fails, the other one would automatically take control and handle traffic distribution. This configuration is more limited in terms of fault recovery, but it is suitable for those environments that have lower traffic or less tight availability requirements.
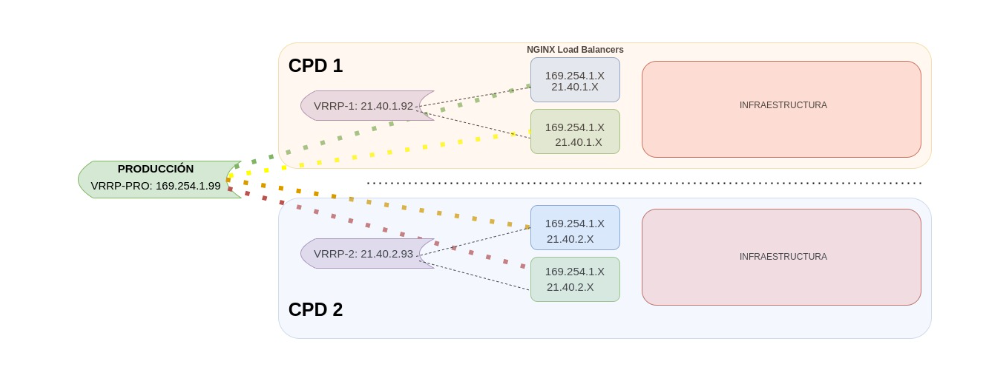
Figure 1. VRRP
Infrastructures of this style are useful for providing constant communication when a server is down or deals with a large load that affects communication. It automatically redirects the traffic to the second machine that has already been configured.
In the example, we created two VRRPs scenarios. In the first one, the load balancers were connected by environment, separating PRE and PRO, so we only have to point to a single IP address and it redirects us to the machine that has a higher active priority.
In the second one, we created a VRRP per environment and CPD. A virtual IP from this group can only redirect to the other load balancer of the same environment and CPD.
2. Install Nginx
We installed Nginx and configured it as a load balancer, allowing the distribution of incoming requests among several backend servers. This increases the scalability and availability of our services.
vagrant@nginx:~$ apt install nginx
In the lab, we’ll set up a custom index.html file on both nodes, making it easy to identify which server is handling requests when accessing the website via the virtual IP address.
In order to customize the html file, we’ll run the following command on node 1:
vagrant@nginx1:~$ echo "<h1>This is NGINX Web Server from Node 1</h1>" | sudo tee /var/www/html/index.nginx-debian.html
We follow the same steps on the second node to customize its html file:
vagrant@nginx2:~$ echo "<h1>This is NGINX Web Server from Node 2</h1>" | sudo tee /var/www/html/index.nginx-debian.html
3. Install Keepalived
3.1 What is Keepalived?
Keepalived is a software tool which enables us to implement VRRP on a network. It allows communication between routers participating in VRRP in order to clarify which is the active router and which is the backup one. The backup router takes over and begins directing network traffic if the active one fails or an error occurs.
3.2 Keepalived configuration
The next step is to enable the high availability configuration through the installation of the Keepalived package on both nodes.
vagrant@nginx:~$ apt install keepalived
Node 1
VRRPs are configured on both nodes through the /etc/keepalived/keepalived.conf file.
## install yum install gcc kernel-headers kernel-devel
## install yum install keepalived , directory config Keepalived configuration File: /etc/keepalived/keepalived.conf

global_defs {
    vrrp_version 3
}

vrrp_script chk_manual_failover {
    script "/usr/libexec/keepalived/nginx-ha-manual-failover"
    interval 10
    weight   50
}

#vrrp_script chk_nginx_service {
# script "/usr/libexec/keepalived/nginx-ha-check"
# interval 3
#    weight   50
#}

# Script to check whether Nginx is running or not
vrrp_script check_nginx {
  script "https://cdn.chakray.com/bin/check_nginx.sh"
  interval 2
  weight 50
}

vrrp_instance VI_1 {
    interface enp0s9
    priority 100
    virtual_router_id          51
    advert_int                 1
    accept
    garp_master_refresh        5
    garp_master_refresh_repeat 1
    unicast_src_ip 192.168.1.32

    unicast_peer {
        192.168.1.85
    }

    virtual_ipaddress {
        192.168.1.99
    }

    track_script {
        chk_nginx_service
        chk_manual_failover
    }

    notify "/usr/libexec/keepalived/nginx-ha-notify"
}
It’s time to explain the essential parameters that have been configured in the file.
A verification mechanism to determine if the Nginx service is up is the first thing we have configured. If it is inactive, the Keepalived service automatically redirects the traffic to the highest priority node.
This verification script can be created in several different ways, such as building it manually or using an existing library like nginx-ha-check. If we choose to build it manually, we can make a small script that returns the process ID of Nginx.
vagrant@nginx1:~$ sudo vi /bin/check_nginx.sh

#!/bin/sh
if [ -z "`pidof nginx`" ]; then
  exit 1
fi

vagrant@nginx1:~$ sudo chmod 755 /bin/check_nginx.sh
The next step is configuring the VRRP instances. Each of them is associated with a different virtual IP, with a specific name (for example, VI_1) to easily identify them.
- Interface: The name of the network interface where we will have the Virtual IP.
- Priority: The priority, 100 being the one with the highest priority and 97 the minimum. Each machine will be given a lower number than the previous one, so the virtual IP prioritizes the first machines. In case of failure of that environment, it will choose the second with the highest priority (99) and so on.
- Unicast_src_ip: The IP of the node where Keepalived is being configured.
- Unicast_peer: The list of IPs to redirect traffic if there are any issues.
- Virtual_ipaddress: Where the new IP of the interface will be added.
Node 2
It’s time to configure the second node.
vagrant@nginx2:~$ sudo cat /etc/keepalived/keepalived.conf

## install yum install gcc kernel-headers kernel-devel
## install  yum install keepalived , directory config Keepalived configuration File: /etc/keepal>

global_defs {
    vrrp_version 3
}

vrrp_script chk_manual_failover {
    script "/usr/libexec/keepalived/nginx-ha-manual-failover"
    interval 10
    weight   50
}

#vrrp_script chk_nginx_service {
# script "/usr/libexec/keepalived/nginx-ha-check"
# interval 3
#    weight   50
#}

vrrp_script check_nginx {
  script "https://cdn.chakray.com/bin/check_nginx.sh"
  interval 2

weight 50
}


vrrp_instance VI_1 {
    interface enp0s9
    priority 99
    virtual_router_id          51
    advert_int                 1
    accept
    garp_master_refresh        5
    garp_master_refresh_repeat 1
    unicast_src_ip 192.168.1.85

    unicast_peer {
        192.168.1.32
    }

    virtual_ipaddress {
        192.168.1.99
    }

    track_script {
        chk_nginx_service
        chk_manual_failover
    }

    notify "/usr/libexec/keepalived/nginx-ha-notify"
}
The configuration of the second node is similar to the previous one, but some parameters need to be modified.
- It is necessary to set a lower priority number than the first node’s in the cluster.
- We will modify the configuration of the unicast_src_ip option, establishing the IP address of this node as its value.
- Lastly, since there are only two nodes, the list of IP addresses of the unicast_peer option will be updated by adding the IP address of the first node in the cluster. If this node fails, the first node of the cluster will automatically gain control if it is active.

4. Keepalived service activation and cluster checks
Once both nodes are configured, the Keepalived service must be activated, and the necessary checks executed in order to verify that the cluster is working correctly.
When the Keepalived service is active, the necessary cluster will take place to verify that the cluster is working properly. The ‘ip a’ command will be run to check the list of IP addresses and ensure that the virtual IP address has been successfully added to our network interface.
vagrant@nginx1:~$ sudo systemctl start keepalived


vagrant@nginx2:~$ sudo systemctl start keepalived

vagrant@nginx1:~$ ip a
1: lo: <LOOPBACK,UP,LOWER_UP> mtu 65536 qdisc knockout state UNKNOWN group default qlen 1000
    link/loopback 00:00:00:00:00:00 brd 00:00:00:00:00:00
    inet 127.0.0.1/8 scope host lo
       valid_lft forever preferred_lft forever
    inet6 ::1/128 scope host
       valid_lft forever preferred_lft forever
2: enp0s3: <BROADCAST,MULTICAST,UP,LOWER_UP> mtu 1500 qdisc fq_codel state UP group default qlen 1000
    link/ether 02:de:e5:0c:c2:13 brd ff:ff:ff:ff:ff:ff
    inet 10.0.2.15/24 brd 10.0.2.255 scope global dynamic enp0s3
       valid_lft 86259sec preferred_lft 86259sec
    inet6 fe80::de:e5ff:fe0c:c213/64 scope link
       valid_lft forever preferred_lft forever
3: enp0s8: <BROADCAST,MULTICAST,UP,LOWER_UP> mtu 1500 qdisc fq_codel state UP group default qlen 1000
    link/ether 08:00:27:b1:9d:28 brd ff:ff:ff:ff:ff:ff
    inet 192.168.56.4/24 brd 192.168.56.255 scope global enp0s8
       valid_lft forever preferred_lft forever
    inet6 fe80::a00:27ff:feb1:9d28/64 scope link
       valid_lft forever preferred_lft forever
4: enp0s9: <BROADCAST,MULTICAST,UP,LOWER_UP> mtu 1500 qdisc fq_codel state UP group default qlen 1000
    link/ether 08:00:27:14:00:bd brd ff:ff:ff:ff:ff:ff
    inet 192.168.1.32/24 brd 192.168.1.255 scope global dynamic enp0s9
       valid_lft 86260sec preferred_lft 86260sec
    inet 192.168.1.99/32 scope global enp0s9
       valid_lft forever preferred_lft forever
    inet6 fe80::a00:27ff:fe14:bd/64 scope link
       valid_lft forever preferred_lft forever
When the Keepalived service is active, the necessary checks will be carried out to ensure that the cluster is working properly. The ‘ip a’ command will be run to check the list of IP addresses and ensure that the virtual IP address has been successfully added to our network interface.
As you can see, the IP address 192.168.1.99 has been successfully added to the enp0s9 interface we configured. We will carry out the same check on the second node of the cluster to verify it has been added successfully.
vagrant@nginx2:~$ ip a
1: lo: <LOOPBACK,UP,LOWER_UP> mtu 65536 qdisc knockout state UNKNOWN group default qlen 1000
    link/loopback 00:00:00:00:00:00 brd 00:00:00:00:00:00

 inet 127.0.0.1/8 scope host lo
       valid_lft forever preferred_lft forever
    inet6 ::1/128 scope host
       valid_lft forever preferred_lft forever
2: enp0s3: <BROADCAST,MULTICAST,UP,LOWER_UP> mtu 1500 qdisc fq_codel state UP group default qlen 1000
    link/ether 02:de:e5:0c:c2:13 brd ff:ff:ff:ff:ff:ff
    inet 10.0.2.15/24 brd 10.0.2.255 scope global dynamic enp0s3
       valid_lft 86286sec preferred_lft 86286sec
    inet6 fe80::de:e5ff:fe0c:c213/64 scope link
       valid_lft forever preferred_lft forever
3: enp0s8: <BROADCAST,MULTICAST,UP,LOWER_UP> mtu 1500 qdisc fq_codel state UP group default qlen 1000
    link/ether 08:00:27:92:f3:d0 brd ff:ff:ff:ff:ff:ff
    inet 192.168.56.5/24 brd 192.168.56.255 scope global enp0s8
       valid_lft forever preferred_lft forever
    inet6 fe80::a00:27ff:fe92:f3d0/64 scope link
       valid_lft forever preferred_lft forever
4: enp0s9: <BROADCAST,MULTICAST,UP,LOWER_UP> mtu 1500 qdisc fq_codel state UP group default qlen 1000
    link/ether 08:00:27:2c:4a:24 brd ff:ff:ff:ff:ff:ff
    inet 192.168.1.85/24 brd 192.168.1.255 scope global dynamic enp0s9
       valid_lft 86287sec preferred_lft 86287sec
    inet6 fe80::a00:27ff:fe2c:4a24/64 scope link
       valid_lft forever preferred_lft forever
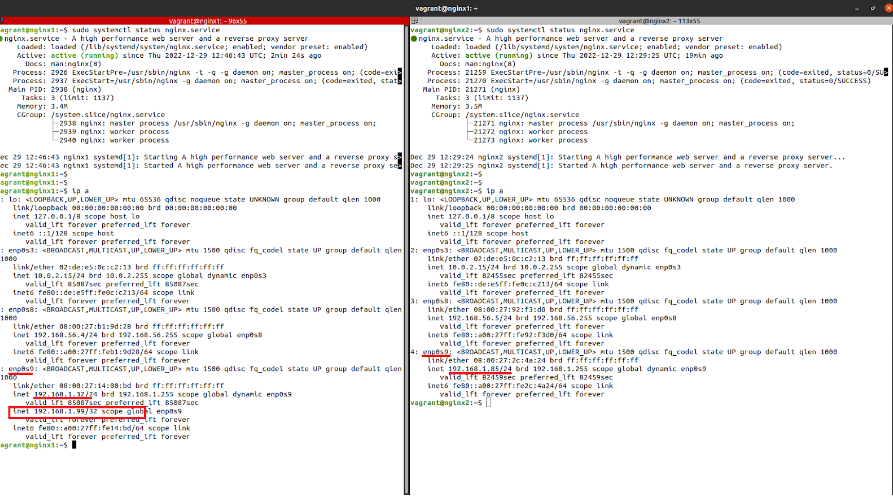
Figure 2. Checks
In this node, the virtual IP address won’t be found since it can only exist in a single node – the active node in the cluster. Making a web request to the virtual IP address allows us to check that the first node is responding correctly.

Figure 3. Web request
Node 1 is working properly, as can be verified.
We will stop the Keepalived service on node 1 to show how failover works. This will cause the virtual IP to be transferred into the second node and traffic will be redirected to this machine.
vagrant@nginx1:~$ sudo systemctl stop keepalived
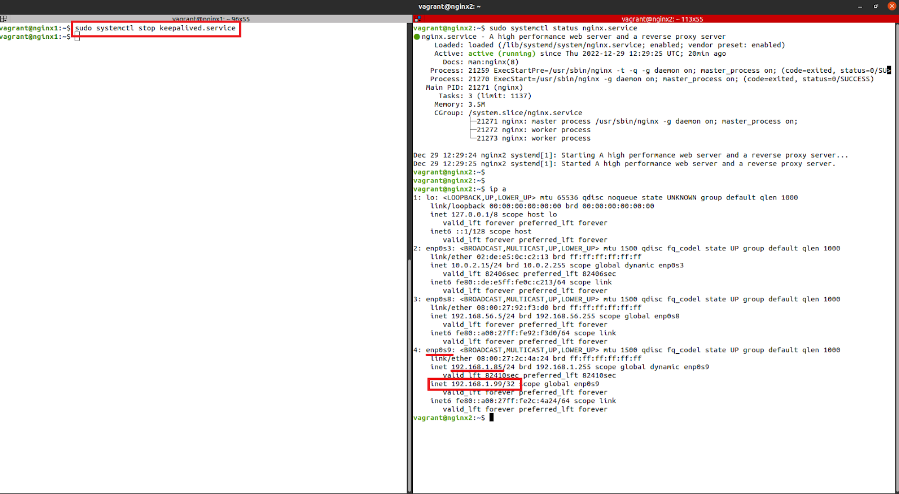
Figure 4. Keepalived on node 1
The virtual IP has been correctly moved to the second node, as can be verified. Performing a web check will prove that node 2 is responding correctly.

Figure 5. Web Request Node 2
5. Enable/Disable Keepalived
If we need to deactivate or activate Keepalived so that the Virtual IP can be used on the other machines, only Keepalived will have to be deactivated. This is achieved through the ‘systemctl stop keepalived.service’ command in the load balancers console.
Furthermore, this process can be automated through a Jenkins task by setting parameters, making easier to perform this action without manually accessing the machines.

Figure 6. Enable/Disable Keepalived
In this way, it is simple to redirect the traffic to another node with just one click, something useful for performing maintenance on one of the nodes without interrupting any services. This is done without the need to perform a reboot.
6. Conclusion
Keepalived is a very powerful platform for load balancing and maintaining network services in High Availability. It is easy to configure and to install, as it is compiled and packaged in the repositories of most Linux distributions.
Thanks to our laboratory we’ve been able to see first-hand one of the many options offered by building our infrastructure with this type of configuration. Chakray Consulting offers support and professional development for this type of High Availability software. Don’t hesitate to contact us here.