
This article is based on how to configure NGINX as the LoadBalancer to work with WSO2 Enterprise Integrator two-node cluster. Basically it guides on how to write a customized NGINX configuration file for both HTTP and HTTPS. It includes all the fundamental concepts and syntax explanations which helps a beginner can do the configs.
For this purpose, the below index shall be followed:
1. What is NGINX and what is WSO2 Enterprise Integrator?
Let’s start by talking about NGINX. NGINX is a web server which can also be used as a reverse proxy, load balancer, mail proxy and HTTP cache. The load balancer automatically distributes the inbound traffic across multiple WSO2 product instances. NGINX default port 80 is open for HTTP traffic and port 443 is open for HTTPS traffic.
In the other hand, WSO2 Enterprise Integrator is an open-source integration product that enables enterprise integration developers to build centralized integration solutions.
WSO2 EI uses 03 default ports for traffic management.
-
8280 – http traffic
-
8243 – https traffic
-
9443 – management console
2. Why we need Nginx with WSO2 EI?
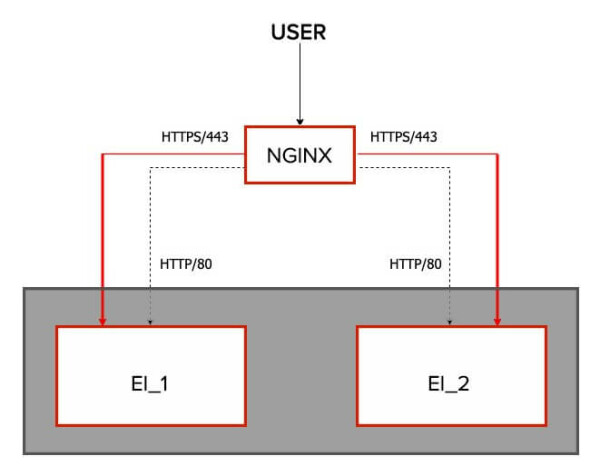
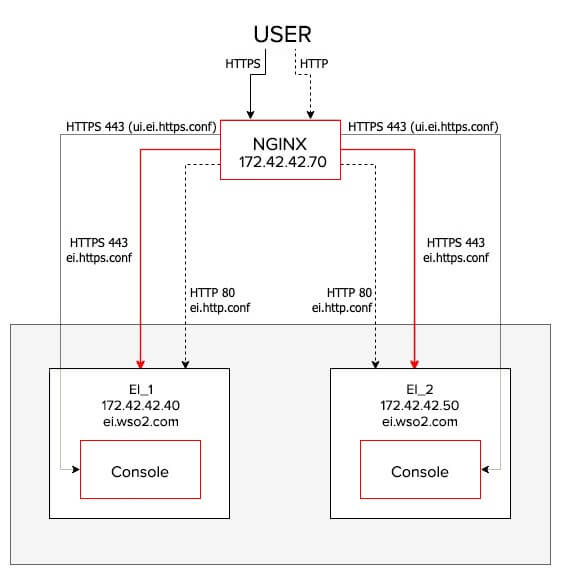
WSO2 Enterprise Integrator supports high availability. Therefore many of the times there can be more than many servers in a cluster. So, it is required to have a loadbalancer to distribute the traffic among the servers without failures. In that case, NGINX comes to the play to manage the traffic between the nodes. In this scenario, we have two EI nodes in an active-active cluster. The nodes are ei_1 and ei_2.
Below is the high-level picture of the NGINX and EI setup:
3. How to configure the NGINX Loadbalancer with WSO2 EI?
Configuring WSO2 EI with NGINX is really simple and easy. It only requires 03 configuration files for traffic management. In earlier versions of WSO2 products, these configurations were maintained using only one configuration file. Later it was separated into 3 config files to keep the code clean and easy to use.
In this tutorial, we are using WSO2 EI 6.6.0 version. Actually, the 03 configurations files are for HTTP request handling, HTTPS request handling and accessing the management console. The file names are:
-
ei.http.conf → HTTP request handing
-
ei.https.conf → HTTPS request handing
-
ui.ei.https.conf → management console accessing
Let’s dig down into these configuration files.
3.1 ei.http.conf file
The below code snippet is the configuration for HTTP traffic. Each configuration block is described in the latter part of the article.
upstream ei.wso2.com {
        server ei1_ip:8280;
        server ei2_ip:8280;
}

server {
        listen 80;
        server_name ei.wso2.com;

        location / {
          proxy_set_header X-Forwarded-Host $host;
          proxy_set_header X-Forwarded-Server $host;
          proxy_set_header X-Forwarded-For $proxy_add_x_forwarded_for;
          proxy_set_header Host $http_host;
          proxy_read_timeout 5m;
          proxy_send_timeout 5m;
          proxy_pass http://ei.wso2.com;

          proxy_http_version 1.1;
          proxy_set_header Upgrade $http_upgrade;
          proxy_set_header Connection "upgrade";
        }
}
ei1_ip and ei1_ip are the IP addresses of each EI node. As an example, if ei1_ip is 172.42.42.40 and ei2_ip is 172.42.42.50, the config file have to be
upstream ei.wso2.com {
        server 172.42.42.40:8280;
        server 172.42.42.50:8280;
}
4. What is an UPSTREAM?
Upstream is used to define the servers in the cluster for loadbalancing. The servers defined under upstream either can be a web server cluster for load balancing or an app server cluster for routing/load balancing. But here, in WSO2 EI cluster upstream is used to define EI cluster nodes and then we can proxy the inbound requests.
The defined servers can listen to different ports. By default, the requests are distributed between the defined servers using round-robin algorithm. If an error occurs during the communication with a server, the request is passed to the next server and so on until all the functioning servers will be tried. If a successful response could not be obtained from any of the servers, the client will receive the result of the communication with the last server. But there are few additional configurations which can be applied for these servers.
-
ip_hash: This configuration can be applied for the defined servers to make the loadbalancer sticky, which means requests are distributed between servers based on client IP addresses. Example:
upstream ei.wso2.com {
        server 172.42.42.40:8280;
        server 172.42.42.50:8280;
        ip_hash;
}
- weight: This tag can be added for each server. As an example, if you want to send more amount of traffic to the node 01, let’s say 2. So all you have to do is update the server as server 172.42.42.40:8280 weight=2;. This way when 3 requests are sent, 2 requests goes to node 01 and the other request goes to node 02. Default each member has a weight of 01. Example:
upstream ei.wso2.com {
        server 172.42.42.40:8280 weight=2;
        server 172.42.42.50:8280;
}
There are more additional configurations for timeouts and failures such as max_fails, fail_timeout etc. Refer http://nginx.org/en/docs/http/ngx_http_upstream_module.html for more additional configurations.
5. What is a SERVER?
Server block is a subset of NGINX configurations. It defines the virtual server used to handle requests of a defined type. Multiple servers can be defined in a single configuration file and decide which block should handle which connection based on the requested domain name, port, and IP address. Each server has a unique name. server_name directive is used to set the server name.
You can refer http://nginx.org/en/docs/http/server_names.html for more information on server naming.
The listen directive tells NGINX the hostname/IP and the TCP port where it should listen for HTTP connections. Inside the server block, there is another block as location.
6. What is a LOCATION?
Well, location is can be defined with request path. If the location is defined as /, all the requests traffic refer to it. But also you can specify the location with the URL context. As an example, the below location config snippet is for /services URL context. So, it responds to all requests match with /services, such as /services, /services/api, /services/home/index.html etc.
In WSO2 EI pack, multiple locations can be used for different request paths. As an example, HTTPS requests to the port 9443 with the request path /carbon is for the EI management console. In that case, the configuration is as below. But as there are no other request paths, location block can also be defined as a wildcard as /.
server ei.wso2.com {
  server1 172.42.42.40:9443;
}

location /carbon {
  proxy_set_header X-Forwarded-Host $host;
  proxy_set_header X-Forwarded-Server $host;
  proxy_set_header X-Forwarded-For $proxy_add_x_forwarded_for;
  proxy_set_header Host $http_host;
  proxy_read_timeout 5m;
  proxy_send_timeout 5m;
  proxy_pass http://ei.wso2.com;

  proxy_http_version 1.1;
  proxy_set_header Upgrade $http_upgrade;
  proxy_set_header Connection "upgrade";
}
The important fact is, when the request comes into the location block, it passes to the upstream by the proxy_pass directive.
NOTE !!! As a summary, when an HTTP request comes to the NGINX server, it goes into the server block and matches with the location. Then it refers the proxy_pass. Finally, it goes to the upstream block and passes the request to the defined servers in it.
You can refer https://www.digitalocean.com/community/tutorials/understanding-nginx-server-and-location-block-selection-algorithms for more information on server and location block.
6.1 ei.https.conf file
The below code snippet is the configuration for HTTPS traffic.
upstream ssl.ei.wso2.com {
    server ei1_ip:8243;
    server ei2_ip:8243;

}

server {
    listen 443 ssl;
    server_name ssl.ei.wso2.com;
    ssl_certificate /etc/nginx/ssl/server.crt;
    ssl_certificate_key /etc/nginx/ssl/server.key;

    location / {
        proxy_set_header X-Forwarded-Host $host;
        proxy_set_header X-Forwarded-Server $host;
        proxy_set_header X-Forwarded-For $proxy_add_x_forwarded_for;
        proxy_set_header Host $http_host;
        proxy_read_timeout 5m;
        proxy_send_timeout 5m;
        proxy_pass https://ssl.ei.wso2.com;

        proxy_http_version 1.1;
        proxy_set_header Upgrade $http_upgrade;
        proxy_set_header Connection "upgrade";
    }
}
Same as in the ei.http.conf file, this also consists of upstream, server and location blocks. In the upstream block, the servers are defined with the port 8243 which is used to call HTTPS requests of APIs, proxies etc. Other than this change in this configuration file, the keys should be defined.
Normally the keys can be found in the directory /etc/nginx/ssl folder. These keys can be generated or use the keys you already have. Normally this ssl is not available in a fresh installed NGINX server. All you have to do is create a folder as ssl in the directory /etc/nginx and put the keys.
If you are using a different name for the folder, make sure to mention the correct folder path in the HTTPS traffic config file.
FACT !!! The upstream name cannot be duplicated. As an example, we use ei.wso2.com for the upstream in the HTTP config file. So, for HTTPS upstream name we use ssl.ei.wso2.com. Likewise you can change the upstream name in the config file. But specify the correct upstream in the proxy_pass directive.
6.2 ui.ei.https.conf file
The last config file is ui.ei.https.conf file. This file is used to direct all the HTTPS traffic for the management console. Below are the configurations of the file.
upstream ui.ssl.ei.wso2.com {
    server ei1_ip:9443;
    server ei2_ip:9443;
}

server {
    listen 443 ssl;
    server_name ui.ei.wso2.com;
    ssl_certificate /etc/nginx/ssl/server.crt;
    ssl_certificate_key /etc/nginx/ssl/server.key;

    location / {
        proxy_set_header X-Forwarded-Host $host;
        proxy_set_header X-Forwarded-Server $host;
        proxy_set_header X-Forwarded-For $proxy_add_x_forwarded_for;
        proxy_set_header Host $http_host;
        proxy_read_timeout 5m;
        proxy_send_timeout 5m;
        proxy_pass https://ui.ssl.ei.wso2.com/;

        proxy_http_version 1.1;
        proxy_set_header Upgrade $http_upgrade;
        proxy_set_header Connection "upgrade";
    }
    error_log  /var/log/nginx/ui-error.log ;
    access_log  /var/log/nginx/ui-access.log;
}
This file also contains the same configuration as in the HTTPS traffic config file. The difference is, the servers defined in the upstream are directing to the port 9443 which access the management console of WSO2 EI.
Now we have all the configurations files to connect NGINX loadbalancer with WSO2 EI.
7. NGINX Default configurations
NGINX default configuration file is nginx.conf located in the directory /etc/nginx. Here is the default config file.
# For more information on configuration, see:
#   * Official English Documentation: http://nginx.org/en/docs/
#   * Official Russian Documentation: http://nginx.org/ru/docs/

user nginx;
worker_processes auto;
error_log /var/log/nginx/error.log;

pid /run/nginx.pid;
# Load dynamic modules. See /usr/share/doc/nginx/README.dynamic.

include /usr/share/nginx/modules/*.conf;

events {
    worker_connections 1024;
}

http {
    log_format  main  '$remote_addr - $remote_user [$time_local] "$request" '
                      '$status $body_bytes_sent "$http_referer" '
                      '"$http_user_agent" "$http_x_forwarded_for"';

    access_log  /var/log/nginx/access.log  main;
    sendfile            on;
    tcp_nopush          on;
    tcp_nodelay         on;
    keepalive_timeout   65;
    types_hash_max_size 2048;
    include             /etc/nginx/mime.types;
    default_type        application/octet-stream;

    # Load modular configuration files from the /etc/nginx/conf.d directory.
    # See http://nginx.org/en/docs/ngx_core_module.html#include
    # for more information.
    include /etc/nginx/conf.d/*.conf;

    server {
        listen       80 default_server;
        listen       [::]:80 default_server;
        server_name  _;
        root         /usr/share/nginx/html;
        # Load configuration files for the default server block.
        include /etc/nginx/default.d/*.conf;

        location / {
        }
        error_page 404 /404.html;
            location = /40x.html {
        }
        error_page 500 502 503 504 /50x.html;
           location = /50x.html {
        }
    }
}
This configuration file contains a default server block for HTTP requests. So, if you are using a customized configuration file for HTTP, you need to remove this server block from nginx.conf file, or edit nginx.conf file with the configurations. For the best practice, it is good to use a separate file for configuring HTTP traffics.
Using the include directive, you can include your configuration files to NGINX default config file. Even though include /etc/nginx/conf.d/*.conf; (line 35) configured to include all the files with the extension .conf sometimes it does not take all the files. To overcome these issues you can mention the exact files which should be included as below.
include /etc/nginx/conf.d/ui.ei.https.conf;
include /etc/nginx/conf.d/ei.https.conf;
include /etc/nginx/conf.d/ei.http.conf;
Refer to https://nginx.org/en/docs/dirindex.html for more information on NGINX directives.
8. Configuring NGINX with an Active-Passive WSO2 cluster
If you are configuring an Active-Passive cluster, you need to configure your passive node as backup node. By default, NGINX provides 10 seconds of time for the backend node to response the user request and a single failure. If there is no response the node will be marked as unavailable. Then NGINX checks again every 10 seconds for the server whether it is in the running stage again. But these default configurations can be changed using the directives max_fails and fail_timeouts.
Following is an example for all the configurations discussed for an Active-Passive cluster:
upstream ui.ssl.ei.wso2.com {
    server ei1_ip:9443 backup;
    server ei2_ip:9443 max_fails=3 fail_timeouts=20s;
}
9. Configuring NGINX with WSO2 EI cluster
Let’s start configuring NGINX with WSO2 EI cluster. In this use case, there is a two EI clustered node and an NGINX node. Altogether there are 03 nodes standing separately. Let’s assume:
- LB vm IP → 172.42.42.60
-
EI_1 vm IP → 172.42.42.50
-
EI_2 vm IP → 172.42.42.40
EI_1 and EI_2 nodes are clustered.
9.1 Step 01 – Configure NGINX
-
Install NGINX in the VM.
-
Open etc/nginx/nginx.conf file and remove or comment the http section.
-
Create the following config files in the directory /etc/nginx/conf.d/
-
ei.http.conf
-
ei.https.conf
-
ui.ei.https.conf
-
-
Add the above mentioned configurations in each file.
-
Remove the server block in NGINX default config file and add the below configuration instead of include /etc/nginx/conf.d/*.conf;
include /etc/nginx/conf.d/ui.ei.https.conf;
include /etc/nginx/conf.d/ei.https.conf;
include /etc/nginx/conf.d/ei.http.conf;
9.2 Step 02 – Key generation
-
Create a folder as ssl in the NGINX installation directory (etc/nginx)
-
Now execute following commands inside the folder created. Enter ei.wso2.com as the common name and wso2carbon as the password.
-
Create the Server Key:
sudo openssl genrsa -des3 -out server.key 1024
- Sign the certificate:
sudo openssl req -new -key server.key -out server.csr
- Remove the passwords:
sudo cp server.key server.key.org
sudo openssl rsa -in server.key.org -out server.key
- Sign your SSL Certificate:
sudo openssl x509 -req -days 365 -in server.csr -signkey server.key -out server.crt
keytool -import -trustcacerts -alias server -file server.crt -keystore client-truststore.jks
Replace the <EI_HOME>/repository/resources/security/client-truststore.jks in both EI nodes with the generated client-truststore.jks file.
9.3 Step 03 – Accessing NGINX
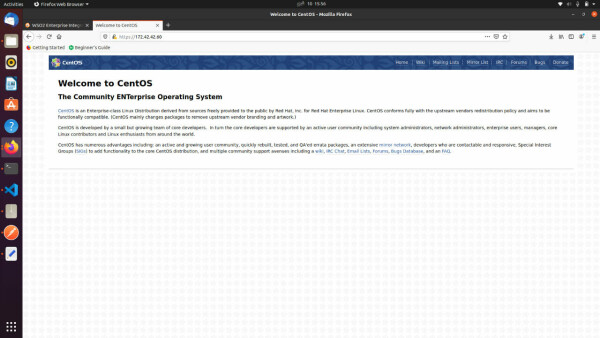
Now restart NGINX. Then open the browser and go to the NGINX homepage using the IP of the NGINX VM.
Finally, access the EI management console through NGINX. Open another tab and go to https://<LB_IPADDRESS>/carbon. In this case, it is https://172.42.42.60/carbon/admin/login.jsp.
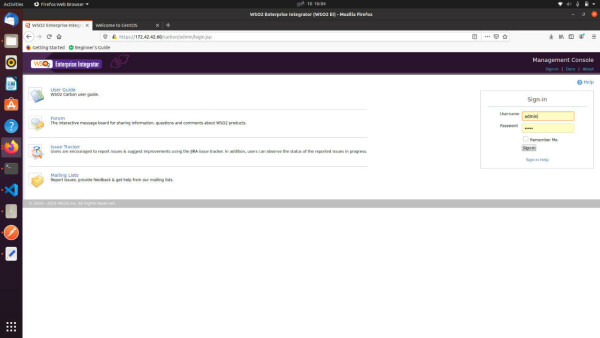
Now you can access WSO2 EI through the LB without exposing EI IP address. In a nutshell, we configured NGINX to work with WSO2 EI two nodes cluster. Then we access the EI management console through NGINX Loadbalancer.
10. CONCLUSION ABOUT NGINX Loadbalancer
We can configure WSO2 products with NGINX Loadbalancer within few minutes only using three configuration files. It is very simple and easy to do for anyone even with a moderate knowledge about NGINX configurations.
WSO2 EI can be integrated with many top-level technologies such as NGINX, Kubernetes, Docker etc.
As partners, Chakray provides full digital transformation solutions, which includes Identity & Access Management, API Management, Integrations and Analytics.