
In this article, we will explain how to configuring and using workers in n8n, an automation platform. We will discover what n8n is, discuss its various modes of operation, and explain how to configure workers to power task automation with n8n. In addition, we will learn how to set up webhooks and use balancers to optimize automated workflows efficiently.
What is n8n?
N8N is a highly versatile and easy-to-use open-source job automation tool. With N8N, you can create automated workflows for various tasks, such as application integration, task automation, and data management.
One of the most attractive features of N8N is its easy-to-use visual interface. With N8N, you can create workflows by dragging and dropping nodes, making it easy for anyone to understand, regardless of their level of programming experience.
This article may interest you: Why is N8N the best automation tool for your company?
N8N deployment with docker
Using N8N tasks with Docker Compose is an excellent option to run N8N in an isolated, controlled environment. By using Docker Compose, you can ensure that N8N is running in a consistent and reproducible environment on any machine.
To use N8N tasks with Docker Compose, you must first create a configuration file docker-compose.yml. In this file, specify which N8N container image you want to use and how the network and volume options should be configured. A basic example of a docker-compose.yml file for N8N could be:
version: '3
services:
  n8n:
    image: n8nio/n8n
    ports:
      - "5678:5678"
    volumes:
      - "./n8n:/app/n8n"
    environment:
      - N8N_WEB_PORT=5678
Once your configuration file is created, you can use the “docker-compose up” command to start N8N. The N8N container will run on port 5678 on your machine and connect to a local volume named “n8n” that contains your custom configurations.
Access to the web interface
Open a web browser and type the address “http://localhost:5678” (or the machine’s IP address where you are running the container and the port specified in your configuration file) to access the N8N web interface.
Note that if you are running N8N on a remote server, you must replace “localhost” with the server’s IP address or domain name.
It is also important to mention that when accessing the web interface, a username and password may be requested; if so, you must configure it in the configuration file or in the N8N image you are using.
In this case, to access the N8N web interface, we have configured access via a custom domain in Nginx. In this way, it is only necessary to enter the domain in a web browser, and Nginx automatically redirects to the port of the N8N service, allowing easy and convenient access to the product’s web interface.
If you need help with this configuration, Chakray can assist you in setting up this type of configuration; contact
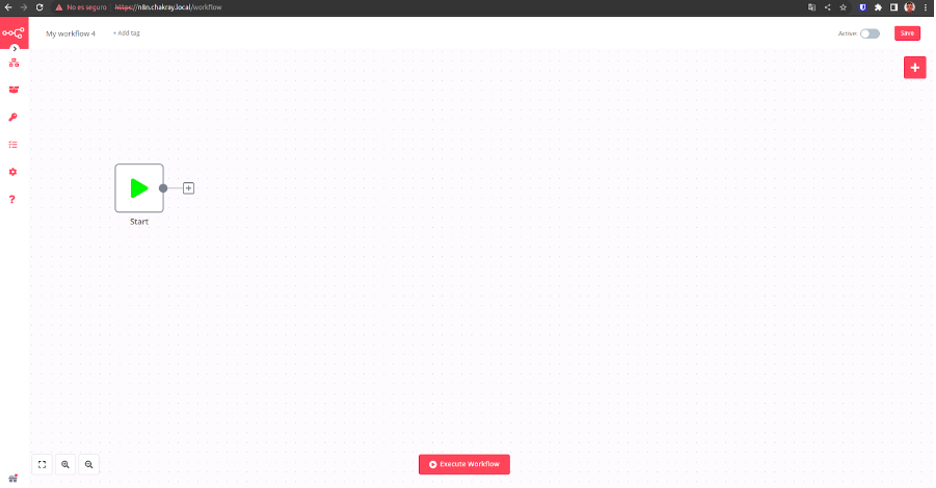
Image: First screen after accessing via the web.
What is a Workflow?
A workflow is an automated process that defines how a series of tasks should be performed. A workflow can automate repetitive tasks, integrate applications, manage data, and more.
An example of a workflow could be the automated process for creating a social media post. The workflow could include tasks such as writing the post’s content, choosing an image, scheduling the post, and publishing it to various social networks.
Workflows are usually represented visually by a flowchart, where tasks are represented as arrows represent nodes and relationships between tasks. This visual representation makes it easier to understand and modify the workflow.
Types of operation and configuration in n8n
N8N has two different operating modes: primary mode and own mode.
Main Mode
Primary mode is the default mode of N8N and runs on the N8N server. In this mode, workflows run on the N8N server and can be accessed through the N8N web interface. The primary mode is suitable for testing and small deployments.
Own mode
On the other hand, the own mode allows you to run N8N on your own server or cloud infrastructure. In this mode, workflows run on your server and can be accessed through an API. The own mode is suitable for larger deployments and requires more configuration and technical knowledge.
The primary mode is generally more accessible to set up and use, while the own mode offers more flexibility and scalability. It depends on your needs and technical skills to decide which method to use.
We can configure it by adding the following parameter inside the environment variables section of our service in the Docker Compose configuration.
environment:
– EXECUTIONS_PROCESS=main
environment:
– EXECUTIONS_PROCESS=own
Queues in n8n
In N8N, a queue is a feature that allows data or tasks to be temporarily stored before being processed. This can be useful when the data input rate is higher than the processing rate or when you want to ensure that data is processed in order.
To configure a queue in N8N, you must follow the steps below:
- Create a workflow in N8N and configure the input node to receive the data.
- Adds a queue node in the workflow. This node will temporarily store the received data.
- Configures the queue node to specify the maximum queue capacity and behavior in case of overload.
- Connects the input node to the queue node to store the data in the queue.
- Adds more nodes after the queue node to process the data stored in the queue.
- It uses the output node to receive the processed data and send it to its final destination.
Note that in addition to this basic configuration, there are other advanced settings and configurations that you can make in the queue node, such as limiting the number of tasks per second limiting the number of simultaneous tasks, among others.
As with the operation configuration, we can also set this option by adding the corresponding parameter in the environment variables section.
environment:
– EXECUTIONS_MODE=queue
How to configure and activate Workers in N8N
What are the Workers in N8N?
The workers in n8n are processes responsible for executing tasks in a workflow. The primary purpose of workers is to improve system performance and scalability by allowing multiple tasks to run simultaneously instead of waiting for one task to complete before starting the next.
The primary use of workers in N8N is to improve the processing capacity and scalability of the system by allowing several tasks to run simultaneously instead of waiting for one task to be completed before starting the next. This is especially useful when large volumes of data need to be processed or when fast response time is desired.
In addition to increasing performance, workers can also help distribute the load in a cluster, which helps reduce the overhead on a single node and increase system availability.
Examples of worker configurations in N8N using Docker Compose
Below are two examples of worker configuration in N8N using Docker Compose:
- By environment variable
Add an environment variable section to configure the node’s work mode. For example, to enable worker mode, you must set the environment variable N8N_WORKER=true.
version: "3.8".
services:
  n8n:
    image: n8nio/n8n
environment:
     - N8N_WORKER=true
     - N8N_HTTP_PORT=5678
ports:
  - "5678:5678"
volumes:
     - ./n8n-data:/root/.n8n
- By command
The following is an example using the n8n worker start command to start an N8N worker node:
version: "3.8".
services:
  n8n:
    image: n8nio/n8n
    command: ["n8n", "worker", "start"]
    environment:
      - N8N_HTTP_PORT=5678
    ports:
      - "5678:5678"
    volumes:
      - ./n8n-data:/root/.n8n
It is worth mentioning that in some cases, it is advisable to use a queue to store the tasks before they are processed temporarily; this helps to regulate the load and ensure an orderly processing of the tasks.
How to connect N8N to Redis in a Docker environment
Redis is a highly scalable NoSQL database that stores and manages large amounts of real-time data.
Connecting N8N with Redis allows data to be stored and managed in a real-time database to improve system performance and scalability.
Basic configuration of a Redis and N8N service-connected in Docker Compose
To connect N8N to Redis in a Docker environment, you must follow the steps below:
- Add a Redis service in your docker-compose.yml file.
- Sets the environment variables to connect to the Redis database. For example, set the environment variable N8N_REDIS_HOST to the Redis hostname.
- Ensure the N8N service has access to the Redis service network by adding the corresponding network in the N8N service network section.
- Start the services with the command docker-compose up -d.
Below is an example of a basic configuration of a Redis and N8N service-connected in Docker Compose:
version: "3.8".
services:
  redis:
    image: redis:alpine
    ports:
      - "6379:6379"
  n8n:
    image: n8nio/n8n
    environment:
      - QUEUE_TYPE=redis
      - QUEUE_BULL_REDIS_HOST=redis
      - QUEUE_BULL_REDIS_PORT=6379
      - QUEUE_BULL_REDIS_DB=0
    networks:
      - redis-network
    ports:
      - "5678:5678"
    volumes:
      - ./n8n-data:/root/.n8n
networks:
  redis-network:
    external: true
- QUEUE_TYPE: This environment variable is used to specify the type of job queue to be used in N8N. In this case, setting the value to “redis” indicates that Redis is being used as the job queue.
- QUEUE_BULL_REDIS_HOST: This environment variable specifies the IP address or hostname of the Redis server to store and manage queue jobs.
- QUEUE_BULL_REDIS_PORT: This environment variable is used to specify the port on which the Redis server is located. The default value is 6379.
- QUEUE_BULL_REDIS_DB: This environment variable is used to specify the database number in Redis in which the queue jobs will be stored. The default value is 0.
It is important to remember to add these variables in the main and worker nodes to guarantee a correct configuration and connection with the job queue in Redis.
Example Workflow
In this section, we will build a sample workflow to observe how the processing is distributed among the worker nodes of n8n with the previously established configuration.
To reproduce this workflow, you can export it as a JSON file and then import it into another instance of N8N, allowing you to share your configuration with other users easily.
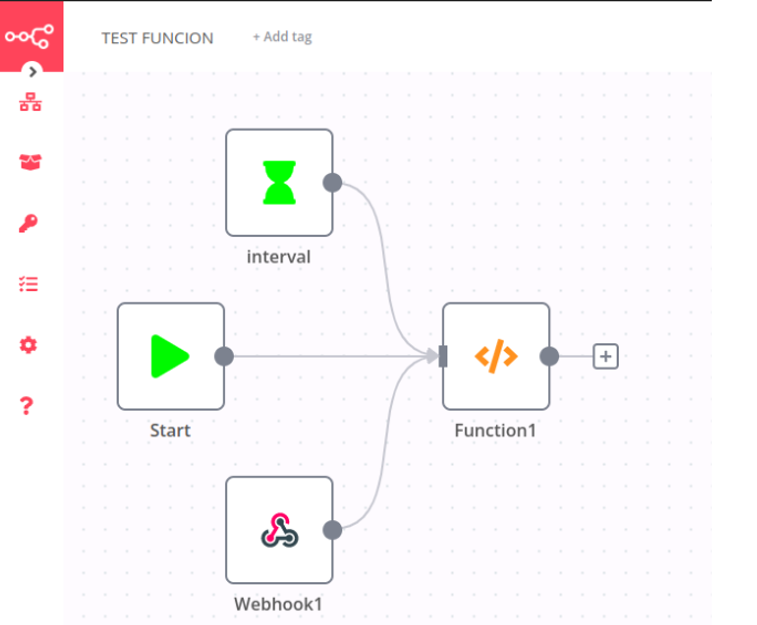
Image: We add the workflow to n8n.
Interval
In n8n, an “interval” is a function that allows a workflow to be executed at a specific time interval. This means that the workflow will run automatically every particular time without the need to be triggered manually.
For example, if an interval of 15 minutes is set, the workflow will automatically run every 15 minutes.
In this way, the interval in an n8n workflow allows us to schedule tasks in an automated manner and execute them at a specific time without manually executing them.
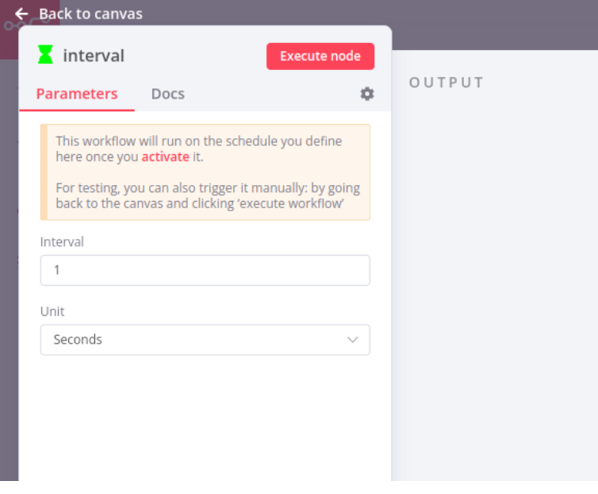
Image: Window for setting time intervals.
Webhook
In N8N tasks, a webhook is a node used to receive and process data from an external source, such as an API or web application. The webhook is configured to “listen” for certain actions or events at a specific URL and when triggered, sends the received data to the next node in the workflow for processing. Webhooks are useful for automating tasks or workflows in N8N, allowing integration with different services and external systems.
Function
In n8n, a “Function” is a particular node that allows custom code to be executed in a workflow. The function will enable users to write their code in programming languages such as JavaScript, Python, etc., and use it within a workflow.
In the case of adding a script to show in which node the process has been executed, what you would be doing is creating a function that, when completed, shows in which node the process is being performed, allowing you to have better control and monitoring of the processes that are running in the workflow. This can be very useful to debug problems and ensure the workflow works correctly.
We will see an example script showing how to execute the message “Execution is working!” in the node that executes the task.
console.log('Execution is working!');
return [
 {json: {name: 'Omar', age: 34, city: 'Berlin'}}}
];
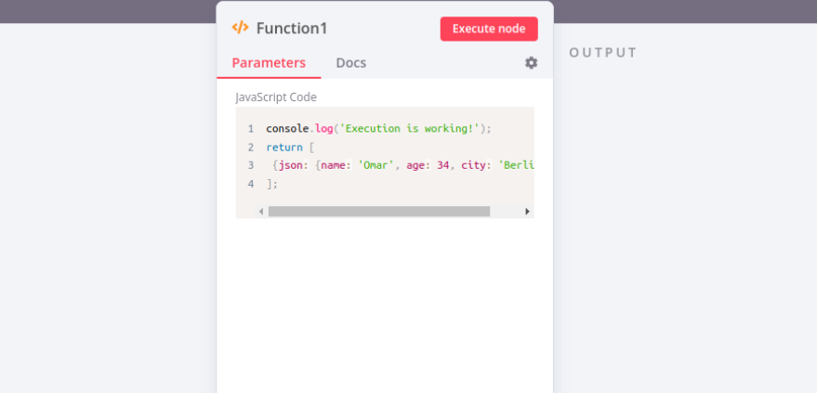
Image: Window with a script to test the operation.
Steps to switch the webhook to production
To move a webhook from pre-production to production, there are several steps to follow:
- Test and validate the webhook in a pre-production environment. Ensure the webhook is working properly and receiving and processing data correctly.
- Copy the webhook and related data to your production environment. This can include webhook configuration, authentication credentials, etc.
- Configure the webhook in your production environment. Make sure that the webhook is using the same authentication and configuration credentials that it used in pre-production.
- Do a final test of the webhook in production. Ensure the webhook is working properly and receiving and processing data correctly.
- Disables or removes the webhook in pre-production. Once the webhook is working correctly in production, it is no longer necessary to keep it in pre-production.
To enable the production environment, we can activate it using the switch on the right side of the user interface.
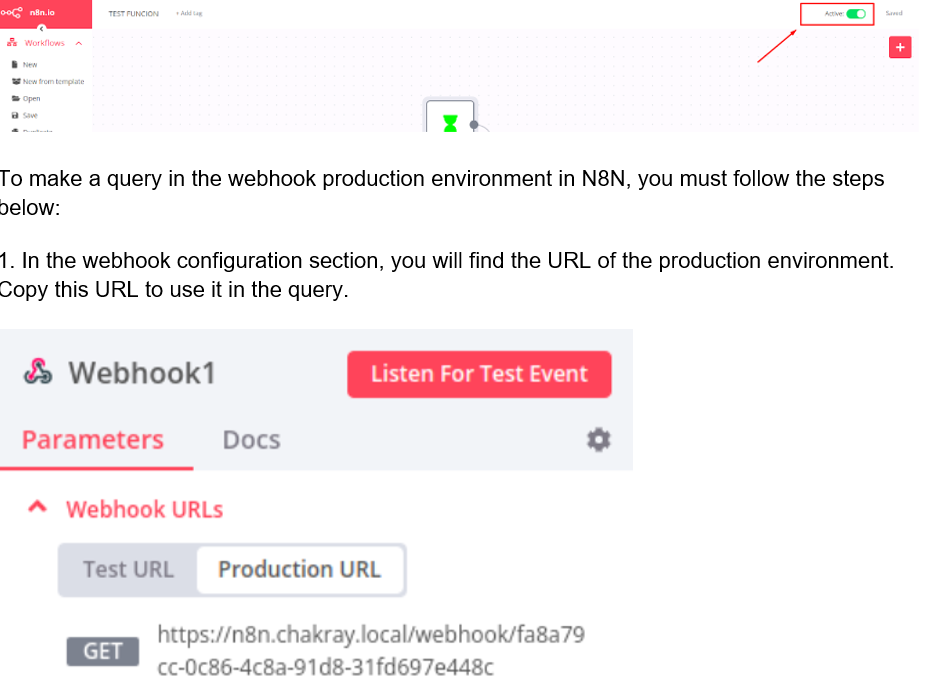
Image: Window where we obtain the URL of the production environment.
- Use the production environment URL in your application or query tool. Be sure to include the necessary authentication credentials if required.
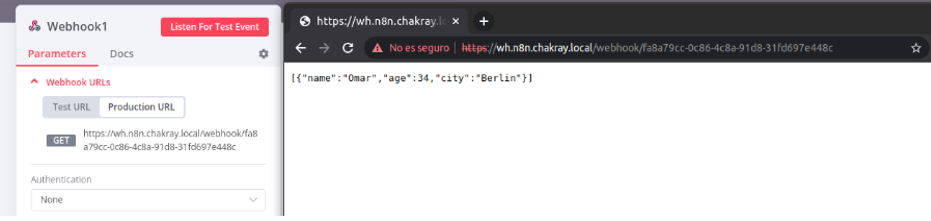
- Perform the query and verify the response. Ensure that the data received are as expected and that the webhook processes the data correctly.

Image: Output of the web consultation.
It is important to remember that before moving the webhook from pre-production to production in a real scenario, you must do extensive testing to ensure that it is working correctly and ready to handle a production workload.
Scenario resolution
As we can see, each time a query is launched, it is processed simultaneously and interleaved in each of the n8n workers, significantly improving the system’s performance and scalability.
devops@chakray:~$ docker-compose logs -f n8n-worker
Attaching to n8n-worker
n8n-worker | Starting n8n worker...
n8n-worker |
n8n-worker | n8n worker is now ready
n8n-worker | * Version: 0.192.2
n8n-worker | * Concurrency: 10
n8n-worker |
n8n-worker |
n8n-worker | n8n worker health check via, port 5678
n8n-worker | Execution is working!
n8n-worker | Execution is working!
n8n-worker | Execution is working!


devops@chakray:~$ docker-compose logs -f n8n-worker-2
Attaching to n8n-worker-2
n8n-worker-2 | Starting n8n worker...
n8n-worker-2 |
n8n-worker-2 | n8n worker is now ready
n8n-worker-2 | * Version: 0.192.2
n8n-worker-2 | * Concurrency: 10
n8n-worker-2 |
n8n-worker-2 |
n8n-worker-2 | n8n worker health check via, port 5678
n8n-worker-2 | Execution is working!
n8n-worker-2 | Execution is working!
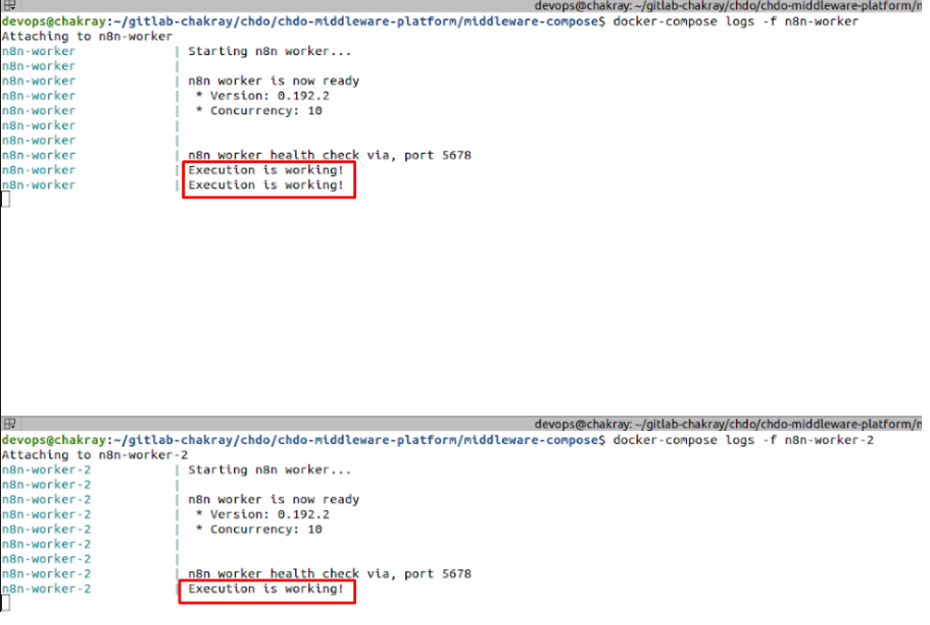
Image: Log output of the container after performing a query.
n8n Webhook configuration
We will start the workers in n8n webhook application, which is responsible for listening for incoming requests from different applications or services and executing the corresponding tasks.
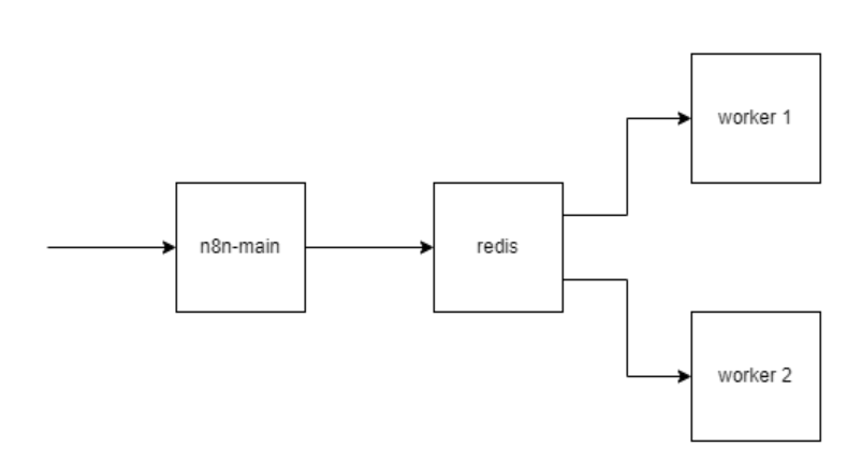
Next, we will see a graphical example of how the webhook services will be configured. Using the previous example, we will add two more services.
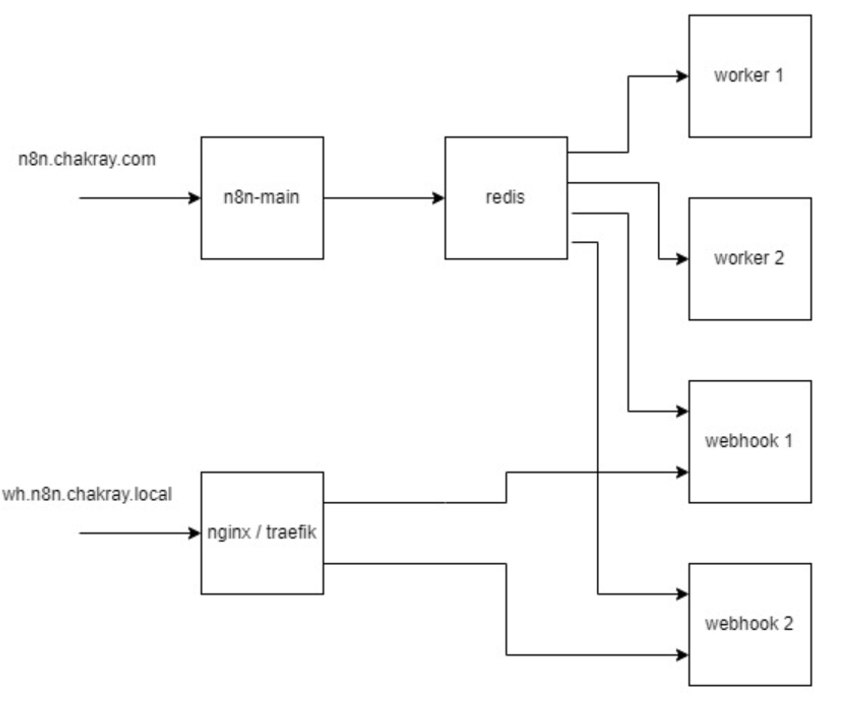
Image: Graphical example of webhook configuration.
Load balancer
Setting up a load balancer with Nginx for two services is pretty straightforward. Two server configuration blocks must be created in the Nginx configuration file pointing to each service.
Below is a straightforward example of how the configuration would be done.
http {
    upstream myservices {
        server service1:8080;
        server service2:8080;
    }
    server {
        listen 80;
        location / {
            proxy_pass http://myservices;
        }
    }
}
This configuration will use the nginx container as a load balancer. Incoming requests will be distributed equally between the webhook “service1” and “service2” containers.
Changes in the compose
We have now configured our URL to point to the two webhook services. Next, we will modify some variables and add a new service in the docker-compose.yml file to update the configuration.
We will modify the access URL to reflect the new configuration.
– WEBHOOK_URL=https://wh.n8n.chakray.local/
We added two new webhook services. Here’s an example of what an n8n webhook service configuration might look like in a docker-compose.yml file:
version: '3
services:
  n8n:
    image: n8nio/n8n
    ports:
      - 5680:5678
    environment:
      - N8N_WEBHOOK_URL=https://wh.n8n.chakray.local/
    volumes:
      - ./n8n-data:/root/.n8n
    command: /bin/sh -c "n8n webhook
Most notable is the line command: /bin/sh -c “n8n webhook” telling Docker to run the n8n webhook command on the container using the /bin/sh shell. In addition, we are setting an environment variable N8N_WEBHOOK_URL to tell n8n the URL of our webhook service.
We will restart our environment to validate the correct operation of the changes made.
$ docker-compose up -d
We notice that in the webhook, the URL has been updated to point to the redirection configuration to our webhook service, which will allow a balance between the two available services.
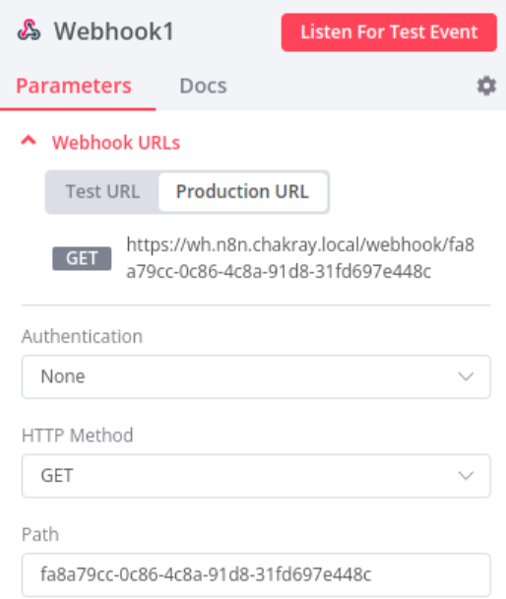
Image: Updated URL for load balancing test.
We make a request to the URL provided by the webhook, in this case, to the production URL.
In reviewing the logs of the webhook services, we notice that one of them has received the request while the other has not yet received any. This is because only one query has been made.
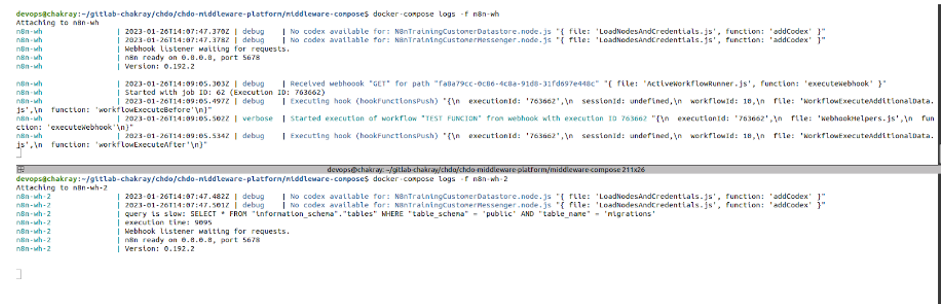
Image: Logs output from the container after the query.
We then make the request again and observe that the second request is received by our second service, which confirms that our load balancer is working correctly.
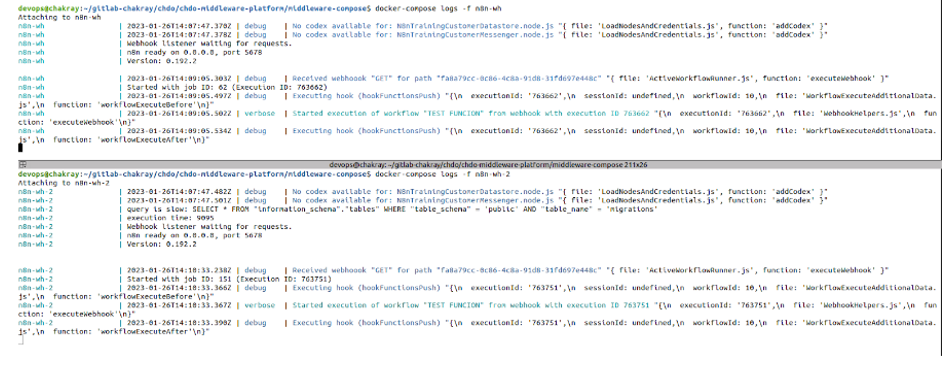
Image: Log output to check load balancing.
“hey” command: Performance testing
The “hey” command is a command line tool used to perform server or web application performance testing. It can be used to simulate many concurrent requests to a specific URL and measure the server’s response time, throughput, and processing capacity.
To use “hey” to perform performance tests on a server or web application, you must follow the steps below:
- Install “hey” on your system. You can do this using a package manager such as apt.
- Create a configuration file to specify the test details, such as the number of concurrent requests, the number of threads, and the test duration time, among others.
- Execute the “hey” command using the configuration file and your web server or application URL.
Analyze the test results. “hey” will provide detailed information on performance, including average response time, number of requests per second, and number of errors, among others.
Note that sometimes, it is necessary to perform more than one test to get an accurate picture of the performance of a system, as they may vary depending on load conditions.
$ hey -n 5000 -c 200 <URL> <URL>

Summary:
  Total: 72.8614 secs
  Slowest: 4.5465 secs
  Fastest: 0.6673 secs
  Average: 2.8851 secs
  Requests/sec: 68.6234
Response time histogram:
  0.667 [1] |
  1.055 [0] |
  1.443 [2] |
  1.831 [8] |
  2.219 [0] |
  2.607 [741] |■■■■■■■■■■
  2.995 [3040] |■■■■■■■■■■■■■■■■■■■■■■■■■■■■■■■■■■■■■■■■
  3.383 [845] |■■■■■■■■■■■
  3.771 [158] |■■
  4.159 [154] |■■
  4.547 [51] |■
Latency distribution:
  10% in 2.5671 secs
  25% in 2.6769 secs
  50% in 2.8226 secs
  75% in 2.9878 secs
  90% in 3.2604 secs
  95% in 3.6558 secs
  99% in 4.1676 secs
Details (average, fastest, slowest):

  DNS+dialup: 0.0152 secs, 0.6673 secs, 4.5465 secs

  DNS-lookup: 0.0006 secs, 0.0000 secs, 0.0514 secs

  req write: 0.0001 secs, 0.0000 secs, 0.0378 secs

  resp wait: 2.8683 secs, 0.5386 secs, 4.3079 secs

  resp read: 0.0012 secs, 0.0001 secs, 0.0853 secs
Status code distribution:

  [200] 5000 responses
Conclusion
In summary, using workers in N8N is a powerful and easy-to-use job automation tool that offers a wealth of possibilities to automate tasks and improve efficiency in your work. With its easy-to-use visual interface, integration with a wide variety of applications, and scalability, N8N is a good choice for anyone looking to automate tasks in their business.
Using workers in N8N with a cluster of workers and Redis as a job queue is an excellent option to improve the performance and scalability of workflows in an application. Setting up a group of workers in n8n allows the workload to be distributed among several nodes, resulting in better performance and greater capacity to handle large amounts of data. Using Redis as a job queue allows real-time data to be stored and managed efficiently.
However, it is important to ensure that the services and environment variables are configured correctly to ensure proper connection and operation of the cluster. If you need more information, please do not hesitate to contact us. We will be happy to assist you in your implementation and configuration process.


Talk to our experts!
Contact our team and discover the cutting-edge technologies that will empower your business.
contact us