In modern web development, we cannot be satisfied with just having a set of microservices. In the case where we are using them to develop for the web, we need to use WebSockets. These will allow us to have open communication between client and server, allowing us shorter response times and a much greater sense of fluidity. A clear example would be a chat, which we will see next how to do it.
WebSockets: Definition & Importance
WebSockets is a technology that allows us to establish bidirectional communication over a single TCP connection. In other words, it allows us to establish a stable and persistent communication, completely eliminating interconnection times.
With this approach we can create truly dynamic websites, in which the client and the server can communicate in real time, creating a more interactive and therefore satisfactory web experience.
-This might interest you: WSO2 MSF4J Tutorial “Advanced features to create microservices”-
How to use WebSockets
To begin with, we must create the microservice that will exercise control over the WebSocket.
To do this, we will use the annotation ‘@ServerEndpoint’ and through its attribute ‘value’ we will be able to indicate which URL we should request to be able to establish that bidirectional TCP connection.
@ServerEndpoint(value = "/groupChat/{group}/{user}")
public class GroupChatWebSocket
The annotation ‘@ServerEndpoint’ has more attributes that will allow us to have tighter control over the format of incoming and outgoing messages, and even make an implementation of the endpoint itself.
Based on the path configured for the WebSocket, anyone accessing the following URLs would be in the same chat ‘room’, as they would all meet the given pattern:
- ws://{server}:{port}/groupChat/chakray/admin
- ws://{server}:{port}/groupChat/wso2/user
- ws://{server}:{port}/groupChat/java/developer
The WebSocket will interact based on 4 possible actions/methods, configured through their corresponding annotations, which are:
- OnOpen: Action to be performed when a connection is created between a client and the server
- OnMessage: Operation that will take place when the client sends a message to the server.
- OnClose: Action that will occur when an existing connection is closed.
- OnError: Operation to be carried out when a certain error occurs.
@OnError
public void onError(final Throwable throwable) {
     LOGGER.info("Ooops, we had an error: " + throwable.getMessage());
     LOGGER.error(throwable.getMessage(), throwable);
}
All actions have their own input parameters, but in all of them, we can also include optional input parameters, depending on whether it is useful or not. These are:
- @PathParam: Parameter of the URL the client connects to. In our example, it would be ‘group’ or ‘user’.
- Session: The session established after the client’s connection to the server and which identifies that connection.
Different types of messages can be sent through WebSockets, not just text messages. Depending on what type of message we receive, the ‘OnMessage’ method will have some input parameters or another. These would be the different types:
- Text: Allows text strings to be sent via a ‘String’ variable
- Binary: Enables sending binary data such as images through the array, bytes, or a ‘ByteBuffer’ variable.
- Ping-Pong: Allows to receive a message from the client in response to a connection check by the server through a variable ‘PongMessage’.
@OnMessage
public void onTextMessage(@PathParam("group") final String group, @PathParam("user") final String user, final String text,
         final Session session) throws IOException {
     String message = String.format(SAYS, user, text);
     LOGGER.info(message);
     broadcast(message, group);
}
And now it’s time for that message to be ‘displayed’ on the channel being shared through the WebSocket.
-Don’t miss: WSO2 MSF4J Tutorial “Connection to IS and OAuth 2.0”-
To do this, we will use the entity ‘session’ which is the representation of that communication between server and client. This entity will have the relevant methods to send text, audio or other messages.
@OnOpen
public void opening(@PathParam("group") final String group, @PathParam("user") final String user, final Session session) {
     addUserCount(group);
     String message = String.format(WELCOME_MESSAGE, group, user, counters.get(group));
     LOGGER.info(message);
     try {
         session.getBasicRemote().sendText(message);
     } catch (IOException except) {
         LOGGER.error(except.getMessage(), except);
     }
     broadcast(String.format(HAS_JOINED, user), group);
     sessions.add(session);
}
Everything explained throughout the post basically refers to the information we need to be able to create a chat in a web application through microservices and MSF4J.
Now we only need to configure our WebSocket and test it through a client. Carrying out the configuration would be very similar to the process followed for microservices but using the ‘deployWebSocketEndpoint’ method.
-Have a look at: WSO2 API IS Tutorial “How to use JWT Tokens to exchange data”-
public static void main(final String[] args) {
     System.setProperty(AUTH_SERVER_URL_S, AUTH_SERVER_URL);

     EntityManagerFactory emf = Persistence.createEntityManagerFactory("com.chakray.msf4j.example.jpa.unit");
     MetricsInterceptor mInterceptor = new MetricsInterceptor();
     new MicroservicesRunner().addInterceptor(mInterceptor)

      .addExceptionMapper(new ServiceExceptionMapper())
      .deploy(getDeployService(emf))

      .deployWebSocketEndpoint(new GroupChatWebSocket()).start();
}
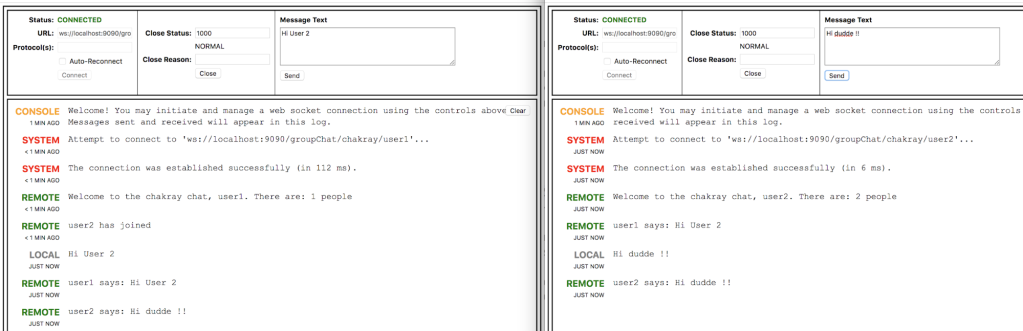
In the following image, we can see an example simulating a chat between two users:
Now that you know the value of WebSockets, it is the perfect time to get down to work with the development of your website by using them.
In case you need extra help, our team of consultants will always be willing to do so. In this case, you only have to fill in this form.