JWT Tokens is an open standard for sharing data in a JSON object format. This object will contain user information and privileges, also known as claims. The standard establishes mechanisms that allow us to secure and authenticate the sent data.
What you should know about JWT Tokens
The JWT token is divided into three parts:
- Header: Where the algorithm with which the token has been encoded is indicated.
{"typ": "JWT", "alg": "none"}
- Payload: Where claims associated with the user are included, each represented as a key/value pair.
{
  "http://wso2.org/claims/role": [
    "admin"
  ],
  ...
  "http://wso2.org/claims/subscriber": "userJwt",
  "http://wso2.org/claims/tier": "Unlimited",
  "http://wso2.org/claims/applicationid": "6",
  "http://wso2.org/claims/usertype": "APPLICATION",
  "http://wso2.org/claims/apicontext": "/contextName/v1"
}
- Signature: Where the concatenated content of the previous sections is encoded with HMAC-256, generating a hash that allows us to confirm the authenticity of the content and therefore its reliability.
Features of JWT Token
JWT has two main features, which will tell us when we should use it:
- Authorization: JWT tokens can be used as access tokens between applications, including user privileges. These will be included in each call, once the user is authenticated. This one is usually the most used feature.
- Data Exchange: Through the claims included in its payload.
-Don’t miss: WSO2 MSF4J Tutorial “Advanced features to create microservices”-
JWT Token practical example
In our example, we will use OAuth2 access tokens to authorize calls to the API and JWT tokens to transfer user data between the API and the backend.
In this way, we can exchange confidential information between the API Manager and the backend (usually an Enterprise Integrator), in an automated and secure way.
To do this, we will use an API Manager and an Identity Server as a central core, where we will also configure the Identity Server as Key Manager, from now on IS-KM. This way, we will have centralized users management and authorization tasks in the IS-KM.
Thus, we will be able to define a practical example in which we make a generic call to the API, passing the user access token as the only identifier. Once there, the IS-KM will validate the token and provide the backend with the user’s claims, thus allowing a personalized response for the user.
1.Communication between API Manager and Identity Server
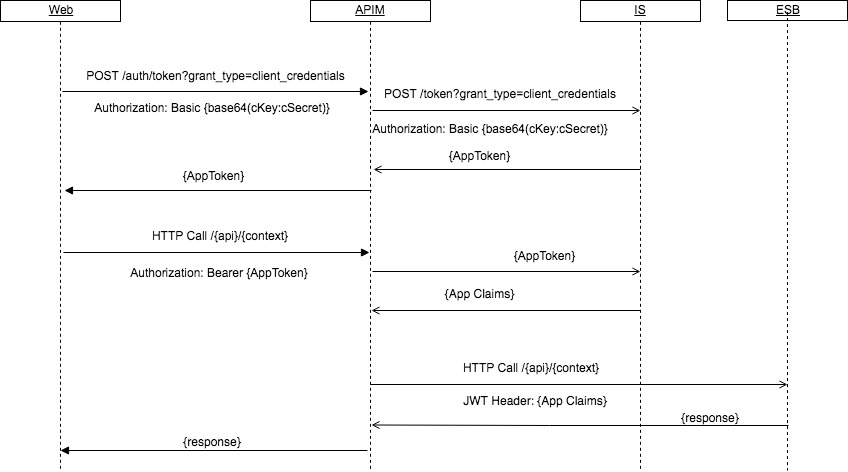
Communication will be carried out as follows:
- User token retrieval
- The user will subscribe to an existing API through the API Store.
- The API Store will delegate control to the API Gateway, which will connect to the IS-KM and get an access token.
- System call with the user token
- The user will call a specific API resource with the retrieved access token.
- The Gateway API will check for the access token in question and redirect the call to the IS-KM for validation. This call will be made through web services, as we will see later.
- The IS-KM will validate the access token and pass to the API Gateway the control and claims associated with the user who made the call in JWT format.
- The Gateway API will redirect the call to the backend associated with the API, adding an ‘X-JWT-Assertion’ type header with the JWT encoded in Base64.
-Keep reading: WSO2 MSF4J Tutorial “Connection to IS and OAuth 2.0”-
2. Data exchange between API Manager and Identity Server
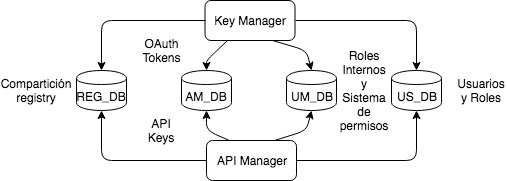
The first step is to identify and create the different schemes we need in this case. The schemes that must be shared by both products are the following:
- WSO2REG_DB: this scheme will store registry information to share internal configurations between WSO2 products. In our case, we will keep the H2 by default, although one should be used for both products.
- WSO2UM_DB: here, the information about permissions and user roles will be agglutinated.
- WSO2US_DB: this scheme will store information related to users.
- WSO2AM_DB: this scheme gathers information about OAuth tokens, subscriptions, etc.
With respect to database scripts, these are included in the ‘dbscripts’ folder in each of the WSO2 products. In our example, we will use a single schema for WSO2UM_DB and WSO2US_DB, named: WSO2UM_DB.
We will have to make the following changes in both products:
- Modify the file ‘/repository/conf/datasources/master-datasources.xml’, to create a data source with each one of our connections to the database and thus have a better performance.
<datasource>
 <name>WSO2UM_DB</name>
 <description>The data source used for registry and user  mngr</description>
 <jndiConfig>
   <name>jdbc/WSO2UM_DB</name>
 </jndiConfig>
 <definition type="RDBMS">
  <configuration>
   <url>jdbc:mysql://localhost:3306/JWT_UM_DB</url>
   <username>root</username>
   <password>CHANGE_ME</password>
   <driverClassName>com.mysql.jdbc.Driver</driverClassName>
   <maxActive>50</maxActive>
   <maxWait>60000</maxWait>
   <testOnBorrow>true</testOnBorrow>
   <validationQuery>SELECT 1</validationQuery>
   <validationInterval>30000</validationInterval>
   <defaultAutoCommit>false</defaultAutoCommit>
  </configuration>
 </definition>
</datasource>
<datasource>
 <name>WSO2AM_DB</name>
 <description>The datasource for token and API information</description>
 <jndiConfig>
  <name>jdbc/WSO2AM_DB</name>
 </jndiConfig>
 <definition type="RDBMS">
  ...
 </definition>
</datasource>
- Include the library with the database drivers in case we are not using the H2 that is configured by default and which is not recommended for production environments. The file must be included in the path ‘/repository/components/lib/’.
- We need to change the file ‘/repository/conf/user-mgnt.xml’ to indicate the following:
- We indicate in the property ‘/UserManager/Realm/Configuration/Property/@dataSource’ the data source that will contain the basic user configuration of the system
<Configuration>
 <AddAdmin>true</AddAdmin>
 <AdminRole>admin</AdminRole>
 <AdminUser>
  <UserName>admin</UserName>
  <Password>CHANGE_ME</Password>
 </AdminUser>
 <EveryOneRoleName>everyone</EveryOneRoleName>
 <Property name="isCascadeDeleteEnabled">true</Property>
 <Property name="initializeNewClaimManager">true</Property>
 <Property name="dataSource">jdbc/WSO2UM_DB</Property>
</Configuration>
- Delete the default configuration it uses as the main user store, where users and their data will be stored, LDAP.
- Configure the main user store with our database. In this case, it will not be useful to indicate only the name of the data source configured.
<UserStoreManager class="org.wso2.carbon.user.core.jdbc.JDBCUserStoreManager">
<Property name="TenantManager">org.wso2.carbon.user.core.tenant.JDBCTenantManager</Property>
<Property name="url">jdbc:mysql://localhost:3306/JWT_UM_DB</Property>
<Property name="userName">root</Property>
<Property encrypted="false" name="password">CHANGE_ME</Property>
<Property name="driverName">com.mysql.jdbc.Driver</Property>
...
</UserStoreManager>
- We indicate in the property ‘/UserManager/Realm/Configuration/Property/@dataSource’ the data source that will contain the basic user configuration of the system
- Modify the file ‘/repository/conf/identity/embedded-ldap.xml’ to disable the LDAP configured by default. We will have to write ‘false’ in the value of the property ‘/EmbeddedLDAPConfig/EmbeddedLDAP/Property/@enable’.
- Modify the file ‘/repository/conf/identity/identity.xml’ and configure the database that will contain information about tokens and/or subscriptions.
<Server xmlns="http://wso2.org/projects/carbon/carbon.xml">
 <JDBCPersistenceManager>
  <DataSource>
   <Name>jdbc/WSO2AM_DB</Name>
  </DataSource>
  ....
 </JDBCPersistenceManager>
</Server>
3. Configuring Manager and Identity Server APIs to use JWT
The next step will be to configure both products so that they communicate correctly with each other and allow, on the one hand, to obtain the IS-KM access tokens, and on the other hand, the passage of claims from the API to the backend.
In both products, we need to configure:
- Change the file ‘/repository/conf/api-manager.xml’ and uncomment the variables that we indicate next, this way we will enable the use of JWT in the product.
- ClaimsRetrieverImplClass. The class that allows us to obtain user claims
- ConsumerDialectURI. Dialect associated with claims.
- SignatureAlgorithm. Security algorithm with which to encrypt claims. We will indicate ‘NONE’ for the example, for more security indicate ‘SHA256withRSA’.
The configuration for the IS-KM will be as follows:
- Change the file ‘/repository/conf/carbon.xml’ to indicate another offset in case we have both products displayed on the same machine.
The configuration for the API Manager must be: - Change the file ‘/repository/conf/api-manager.xml’
- To specify the authentication manager through the ‘AuthManager’ properties. As we mentioned before, this management will be done through the administration web services of the IS-KM itself, and that will be the URL we must indicate. Watch out for the change of offset in the IS-KM!
<AuthManager> <ServerURL>https://localhost:9444${carbon.context}services/</ServerURL> <Username>CHANGE_ME</Username> <Password>CHANGE_ME</Password> <CheckPermissionsRemotely>false</CheckPermissionsRemotely> </AuthManager> - Modify the property ‘APIKeyValidator’ with the previous data and indicate that the validation will be done through web service and not with the Thrift server.
<APIKeyValidator>
 <ServerURL>https://localhost:9444${carbon.context}services/</ServerURL>
 <Username>CHANGE_ME</Username>
 <Password>CHANGE_ME</Password>
 <KeyValidatorClientType>WSClient</KeyValidatorClientType>
 <ThriftClientConnectionTimeOut>10000</ThriftClientConnectionTimeOut>
 <EnableThriftServer>false</EnableThriftServer>
 <ThriftServerHost>localhost</ThriftServerHost>
<KeyValidationHandlerClassName>org.wso2.carbon.apimgt.keymgt.handlers.DefaultKeyValidationHandler</KeyValidationHandlerClassName>
</APIKeyValidator>
- To specify the authentication manager through the ‘AuthManager’ properties. As we mentioned before, this management will be done through the administration web services of the IS-KM itself, and that will be the URL we must indicate. Watch out for the change of offset in the IS-KM!
4. The example between API Manager and Identity Server
After all that has been explained before, we would have both products correctly configured and we would only have to run them to start the test.
The steps to be taken to obtain the results of the example could be the following:
- Create an API through the API Publisher
- Associate to this API an Enterprise Integrator (EI) in the backend or some mock that allows us to see the headers in the call to this backend.
- Create a user and give it permissions to subscribe to APIs through the administration console (we can use the IS or APIM since we have the same database).
- Log in to the API Store with the created user, create an application and subscribe to the test API created in point 1.
- Get the token for the created user’s application.
- Call the API with the access token.
If we are ‘logging’ correctly in the backend or using a mock for it, we will be able to see the information of the headers in the call to it. The information we obtain will be similar to this one:
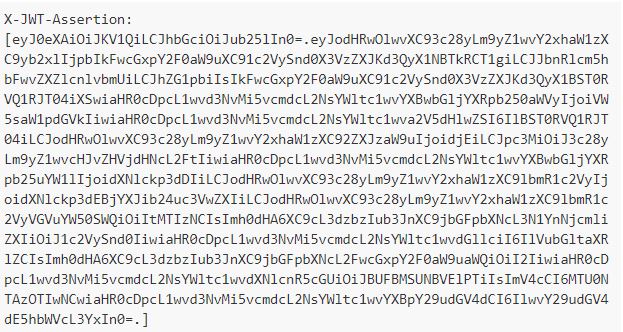
Although we decided not to encrypt the JWT token, it will have at least one Base64 encoding. However, if we want to see its content correctly we can use websites such as: https://jwt.io/.
After this tutorial, you’re sure to be a little more prepared to exploit more features of WSO2 Identity Server and API Manager.
We’ll be waiting for you in the next post!