Welcome to one more post-tutorial on WSO2 MSF4J! On this occasion, we are going to learn about the advanced features needed to perform microservices efficiently.
-Don’t miss: Basic notions about the MSF4J module-
It is important to note that WSO2 MSF4J is a perfect framework for creating microservices quickly and uncomplicatedly.
This WSO2 service offers many advantages when generating REST APIs, as well as being the ideal support for Swagger.
MSF4J features to create microservices
Metrics
This is one of the best features to use with MSF4J since it offers us the possibility of being able to collect data and metrics of the use we make of our microservice. This means that it gives us the possibility of being able to exploit these data and have greater control over the use of our microservices.
In addition, we can also send and monitor this information through the DAS although in this case, we will see a ‘standalone’ example.
To begin with, we must include ‘msf4j-analytics’ as a dependency in the pom.xml file. This library will give us the possibility to activate metrics.
Important! We should remember that the core of an MSF4J application is the class where we create an instance of ‘MicroservicesRunner’, through which we configure our microservice.
public static void main(final String[] args) {
 MetricsInterceptor mInterceptor = new MetricsInterceptor();
 new MicroservicesRunner()
            .addGlobalRequestInterceptor(mInterceptor)
            .addGlobalResponseInterceptor(mInterceptor)
            .addExceptionMapper(new ServiceExceptionMapper())
            .deploy(new BookServiceImpl()).start();

}
After that, we must use some of the different annotations that WSO2 makes available to us. Through them, we can easily compile certain metrics in each of the API methods individually; together if we put the annotation at the class level. These annotations can be:
- Counted: It allows us to measure the number of invocations made to the method that is being executed at the same time we are observing the metric. If we want to see the total number of invocations, we will have to indicate the monotonic property”.
- Metered: This allows us to measure the ratio of invocations performed and the total number of invocations performed.
- Timed: It keeps a histogram of the invocations duration and also gathers the information of the other annotations (the ratio and the total number of invocations).
@Override
 @GET
 @Path("/{bookId}")
 @Timed
 public Book getBookById(@PathParam("bookId") final Integer bookId) {
 return list.get(bookId);
 }

 @Override
 @GET
 @Path("/list")
 @Counted(name = "getList", monotonic = true)
 public List<Book> getList(@Context final Request request) {
 return list;
 }
The last step would be to configure the output of that metric through a configuration file ‘metric.yaml’. Don’t worry, there is one included in the jar org.wso2.carbon.metrics.core, which is also enabled by default’, so we can use that or create our own.
The really important thing is produced at the moment of running the application, since we will have to indicate to the virtual machine, by means of a parameter, where this file is, for example:
-Dmsf4j.conf=src/main/resources/metrics.yaml
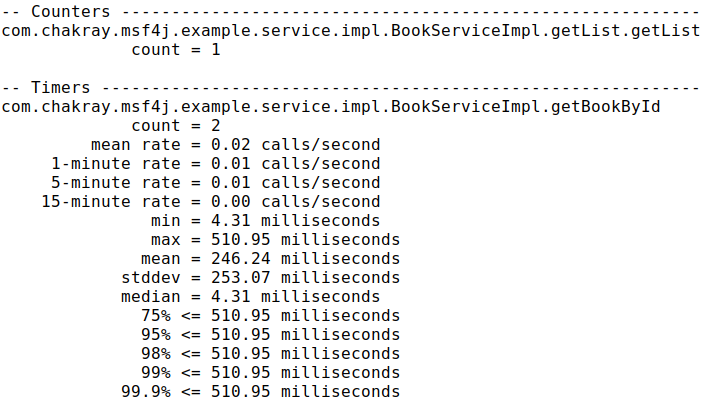
To be able to observe the statistics, we will be able to see them in the console from which we launch the application. We would observe something similar to this:
Java Persistence API (JPA)
Now is the time to learn how to associate JPA and a DB to our service, in order to obtain a more realistic model and similar to a common development environment.
To do this, we must include the ‘hibernate-core’ and ‘hibernate-entitymanager’ libraries that will contain the implementation of Java Persistence API, and as a database, we will use one that works in memory as H2.
Like any other JPA application, you will need the file ‘persistence.xml’ with the relevant configuration of the DB and the identifier of that persistence unit. We will also create a class structure following the DAO pattern, in order to access the DB data.

As for those that have to do with our microservice, we will have to modify the core of the application. To do this, we must access the persistence unit through its identifier and send it to our service.
public static void main(final String[] args) {
 MetricsInterceptor mInterceptor = new MetricsInterceptor();
 new MicroservicesRunner().addInterceptor(mInterceptor)

         .addExceptionMapper(new ServiceExceptionMapper())
    .deploy(new BookServiceImpl(new BookDaoImpl(Persistence

         .createEntityManagerFactory(

         "com.chakray.msf4j.example.jpa.unit")))).start();
}
Authentication
Finally, we will see how to implement a little authentication in our microservice. Although for our example we will make authentication of type BASIC, we must bear in mind that through WSO2 and the Identity Server we will also be able to make it of type OAuth2.
To begin with our example and since we have implemented the use of a DB, we will create a table that stores the information of users and their respective access classes in the application.
The second step will be to create an interceptor that extends from ‘AbstractBasicAuthSecurityInterceptor’. In this interceptor, we will receive the username and password entered by the user and we must validate them against the system to see if they are correct or not.
public class UsernamePasswordSecurityInterceptor extends AbstractBasicAuthSecurityInterceptor {
 UserDao dao;
 public UsernamePasswordSecurityInterceptor(final UserDao userDao) {
 dao = userDao;
 }
 @Override
 protected boolean authenticate(final String username, final String password) {
 String pwdEconded = Base64.getEncoder().encodeToString(password.getBytes());
 User result = dao.findByNameAndPassword(username, pwdEconded);
 if (result != null) {
 return true;
 }
 return false;
 }

}
The next step will be to configure the interceptor in the core of our application to authenticate requests to our microservice.
public class Application {
 private static UsernamePasswordSecurityInterceptor getBasicInterceptor(final EntityManagerFactory emf) {
 return new UsernamePasswordSecurityInterceptor(new UserDaoImpl(emf));
 }
 public static void main(final String[] args) {
 EntityManagerFactory emf = Persistence.createEntityManagerFactory("com.chakray.msf4j.example.jpa.unit");
 MetricsInterceptor mInterceptor = new MetricsInterceptor();
 new MicroservicesRunner().addInterceptor(mInterceptor)

            .addGlobalRequestInterceptor(getBasicInterceptor(emf))
 .addExceptionMapper(new ServiceExceptionMapper())

            .deploy(getBookService(emf)).start();
 }
 private static BookServiceImpl getBookService(EntityManagerFactory emf) {
 return new BookServiceImpl(new BookDaoImpl(emf));
 }

}
Once we run the application and try to access one of our methods, the web browser will ask for a username and password to continue with the operation.
As you can see, there are many features that MSF4J offers for the creation of microservices. If you want to continue learning about this module, you should not miss the next post.