This tutorial will guide you through integrating PayPal as a billing engine using WSO2 API Manager 3.0, the necessary steps for monetizing an API, and how to disable API monetization.
In order to do so, we will follow the index below:
1. What is Monetization?
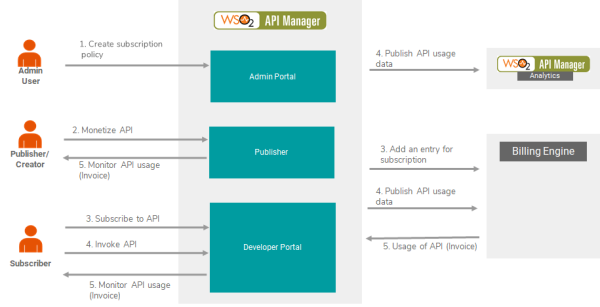
Through APIs, companies can offer external or internal services to clients or within the company. They can then obtain revenue by charging for their use in different ways.
Each API is offered at different levels of use. These levels of use are called levels. Each level has different access constraints. Levels can be free or billable (commercial).
A single API may have a combination of levels, at which the API can be used free of charge for evaluation, and then customers can upgrade to a billable level when required. When an editor offers an API at different levels, the customer can select their level of choice when subscribing to the API according to their requirements, budget, uses, etc.
An API customer is billed according to the levels used by their applications.
In the official documentation of WSO2, the steps are based on the Stripe billing engine. If you wish to work with another billing engine, you first need to create a custom implementation which extends the monetization interface.
2. Requirements
2.1 Set up PayPal
The steps to set up PayPal are as follows:
- You must have a PayPal Business Account. If you don’t, you must create one.
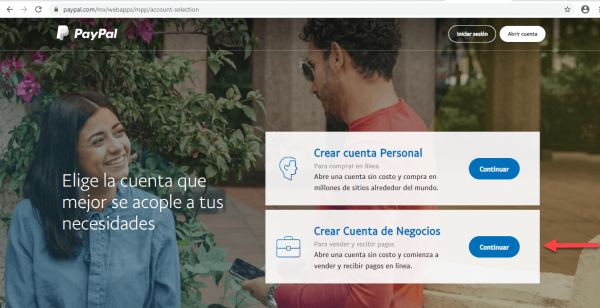
- Once created, you must access the Developer Dashboard using the following URL: https://developer.paypal.com/developer/applications
- Click the Log in to Dashboard button.

- Enter your PayPal access credentials.
- Once on the Dashboard, in the My Apps & Credentials section, select the Sandbox option.
- Then, click the Default Application App.
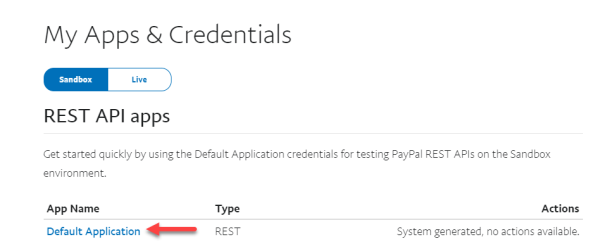
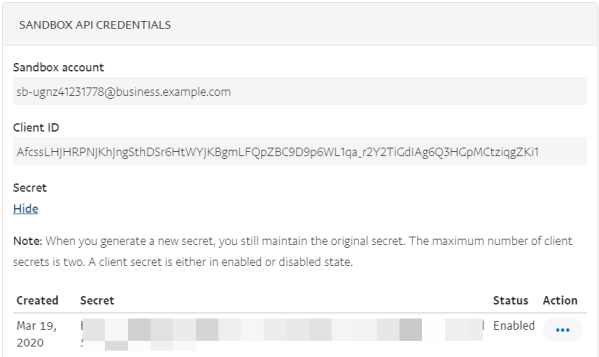
- In the next window we can obtain the Client ID and Client Secret. This data will allow us to use PayPal’s API and integrate it with WSO2 API Manager.
2.2 Set up APIM Analytics
1. Activate WSO2 API Manager Analytics
Download the APIM_MONETIZATION_SUMMARY.siddhi file and copy it into the following directory: <API-M-ANALYTICS_HOME>/wso2/worker/deployment/siddhi-files
- You may optionally keep the API usage data table required in WSO2 API Manager Analytics.
This must be done to ensure that this data is not deleted from WSO2 API-M Analytics before these details are published in the billing engine.
Edit the following file:
<API-M-ANALYTICS_HOME>/wso2/worker/deployment/siddhi-files/APIM_MONETIZATION_SUMMARY.siddhi
Increase the data elimination period according to the monetization granularity period and the frequency with which you publish API usage data in the billing engine.
@purge(enable='true', interval='60 min', @retentionPeriod(sec='7 days', min='1 month', hours='1 month', days='2 month', months='2 years'))
3. Run the WSO2 API Manager Analytics server.
Access the <API-M_ANALYTICS_HOME>/bin directory in your console or terminal and run one of the following commands, depending on your operating system.
- Windows:
worker.bat --run
- Linux / Mac OS:
sh worker.sh
4. You have the option to change the granularity of the API usage data if necessary.
This defines the depth of the information regarding the API usage details that you wish to publish in the billing engine. The default value is
days
Edit the following file:
<API-M_HOME>/repository/conf/deployment.toml
Add the following configuration to the TOML file:
[apim.monetization]
granularity = "seconds"
- <time-period>- This is the period used for the granularity of the API usage data. You can use any of the following parameters according to your needs: seconds, minutes, days, months, years.
5. When you call the publishing API, it publishes all data between the current period and the last time that the usage was successfully published.
However, when you call the API for the first time, there will be no last-published data. Therefore, you can configure the period to reduce it from the current period to derive the last time of publication. This configuration is given in days and the default value is one day.
[apim.monetization]
publish_duration = "1"
2.3 Set up API Manager
1. Connect WSO2 API Manager to the billing engine
1.1 You must create the implementation of the corresponding monetization interface and add the JAR to the following directory:
<API-M_HOME>/repository/components/lib
1.2 Define the implementation of monetization in WSO2 API Manager.
Add the packet name to the following file:
<API-M_HOME>/repository/conf/deployment.toml
in the following way:
[apim.monetization]
monetization_impl = "org.wso2.apim.monetization.impl.PayPalMonetizationImpl"
2. Set up the data base
2.1 Download and copy the DB driver in the following directory:
<APIM_HOME/repository/components/lib
For this example, a MySQL database is used. Download and copy the MySQL driver in the <APIM_HOME/repository/components/lib directory.
2.2 Set up the WSO2 API Manager datasource.
Add the following configuration to the <API-M_HOME>/repository/conf/deployment.toml en la seccióndatabase.apim_db file.
[database.apim_db]
type = "mysql"
url = "jdbc:mysql://<DBHost>:<Port>/<DBName>?autoReconnect=true"
username = "xxx"
password = "yyy"
defaultAutoCommit = "false"
driverClassName = "com.mysql.jdbc.Driver"
maxActive = "50"
maxWait = "60000"
testOnBorrow = "true"
validationQuery = "SELECT 1"
validationInterval = "30000"
2.3 Go the the <API-M_HOME>/dbscripts/apimgt/ directory to select the database script you are going to use. For this example, a MySQL database is used, so the script which must be run is mysql.sql to create the WSO2AM_DB database.
2.4 Then, run the following script in the WSO2AM_DB to create the monetization tables:
CREATE TABLE IF NOT EXISTS AM_MONETIZATION (
    API_ID INTEGER NOT NULL,
    TIER_NAME VARCHAR(512),
    STRIPE_PRODUCT_ID VARCHAR(512),
    STRIPE_PLAN_ID VARCHAR(512),
    FOREIGN KEY (API_ID) REFERENCES AM_API (API_ID) ON DELETE CASCADE
) ENGINE=InnoDB;


CREATE TABLE IF NOT EXISTS AM_POLICY_PLAN_MAPPING (
        POLICY_UUID VARCHAR(256),
        PRODUCT_ID VARCHAR(512),
        PLAN_ID VARCHAR(512),
        FOREIGN KEY (POLICY_UUID) REFERENCES AM_POLICY_SUBSCRIPTION(UUID)
) ENGINE=InnoDB;


CREATE TABLE IF NOT EXISTS AM_MONETIZATION_PLATFORM_CUSTOMERS (
    ID INTEGER NOT NULL AUTO_INCREMENT,
    SUBSCRIBER_ID INTEGER NOT NULL,
    TENANT_ID INTEGER NOT NULL,
    CUSTOMER_ID VARCHAR(256) NOT NULL,
    PRIMARY KEY (ID),
    FOREIGN KEY (SUBSCRIBER_ID) REFERENCES AM_SUBSCRIBER(SUBSCRIBER_ID) ON DELETE CASCADE
) ENGINE=InnoDB;


CREATE TABLE IF NOT EXISTS AM_MONETIZATION_SHARED_CUSTOMERS (
    ID INTEGER NOT NULL AUTO_INCREMENT,
    APPLICATION_ID INTEGER NOT NULL,
    API_PROVIDER VARCHAR(256) NOT NULL,
    TENANT_ID INTEGER NOT NULL,
    SHARED_CUSTOMER_ID VARCHAR(256) NOT NULL,
    PARENT_CUSTOMER_ID INTEGER NOT NULL,
    PRIMARY KEY (ID),
    FOREIGN KEY (APPLICATION_ID) REFERENCES AM_APPLICATION(APPLICATION_ID) ON DELETE CASCADE,
    FOREIGN KEY (PARENT_CUSTOMER_ID) REFERENCES AM_MONETIZATION_PLATFORM_CUSTOMERS(ID) ON DELETE CASCADE
)ENGINE=INNODB;


CREATE TABLE IF NOT EXISTS AM_MONETIZATION_SUBSCRIPTIONS (
    ID INTEGER NOT NULL AUTO_INCREMENT,
    SUBSCRIBED_APPLICATION_ID INTEGER NOT NULL,
    SUBSCRIBED_API_ID INTEGER NOT NULL,
    TENANT_ID INTEGER NOT NULL,
    SUBSCRIPTION_ID VARCHAR(256) NOT NULL,
    SHARED_CUSTOMER_ID INTEGER NOT NULL,
    PRIMARY KEY (ID),
    FOREIGN KEY (SUBSCRIBED_APPLICATION_ID) REFERENCES AM_APPLICATION(APPLICATION_ID) ON DELETE CASCADE,
    FOREIGN KEY (SUBSCRIBED_API_ID) REFERENCES AM_API(API_ID) ON DELETE CASCADE,
    FOREIGN KEY (SHARED_CUSTOMER_ID) REFERENCES AM_MONETIZATION_SHARED_CUSTOMERS(ID) ON DELETE CASCADE
)ENGINE INNODB;
3. Set up the additional monetization properties which are specific to the billing engine in WSO2 API Manager.
Add the following configuration to the <API-M_HOME>/repository/conf/deployment.toml
[[apim.monetization.additional_attributes]]
name = "ConnectedClientID"
display_name = "ConnectedClientID"
required = "true"
description = "connected client id of the publisher"
4. Set up the Tenant Admin in WSO2 API Manager
4.1 Run the WSO2 API Manager server.
4.2 Log in to the WSO2 API-M admin console.
https://<hostname>:9443/carbon
4.3 Click Main, Resources, and then click Browse.
4.4 Input the following route on Location and click Go:
/_system/config/apimgt/applicationdata/tenant-conf.json
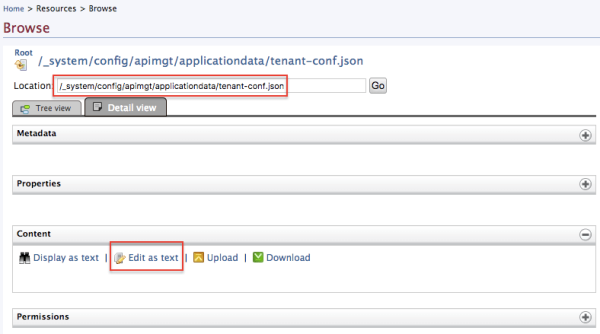
4.5 Then, click the Edit as text button and add the following configuration to the archivotenant-conf.json file:
"MonetizationInfo": {
    "BillingEnginePlatformAccountKey": "<Encoded-Base64-CLIENT_ID:CLIENT_SECRET>"
}
Where <Encoded-Base64-CLIENT_ID:CLIENT_SECRET>- is the value generated from the codification in Base64 of the Client_ID and Client_Secret
5. Set up the workflows
This must be done to ensure that the correct workflows are activated when a subscription is added or deleted.
5.1 Log in to the WSO2 API-M admin console.
https://<hostname>:9443/carbon
5.2 Click Main, Resources, and click Browse.
5.3 Input the following route on Location and click Go:
/_system/governance/apimgt/applicationdata/workflow-extensions.xml
5.4 Then, click the Edit as text button and edit the workflow executions in the workflow-extensions.xml file.
<SubscriptionCreation executor="org.wso2.apim.monetization.impl.workflow.PayPalSubscriptionCreationWorkflowExecutor"/>
<SubscriptionDeletion executor="org.wso2.apim.monetization.impl.workflow.PayPalSubscriptionDeletionWorkflowExecutor"/>
3. Steps for monetizing an API
Step 2 – Create a subscription policy
- Go to the WSO2 API Manager admin panel.
https://<API-M_host>:<port>/admin
- Create a subscription policy.
Specify the data relative to your subscription policy according to your monetization objectives. For further information, read Adding a new subscription-level throttling policy.

Step 2 – Activate monetization
- In order to activate monetization, you must log in to the API Publisher.
https://<hostname>:9443/publisher
- Select the API you wish to monetize.
- Click the Monetization option to see the Monetization configuration.
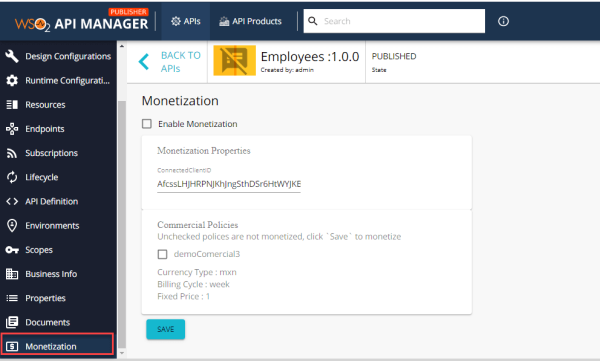
- Activate the Enable Monetization
- Input the ClientID from the PayPal account into the ConnectedClientID field and then click Save.
Step 3 – Subscribe to a monetized API
- To activate monetization you must log in to the API Publisher.
https://<hostname>:9443/devportal
- Select the API you wish to subscribe to.
- Select the commercial plan and click SUBSCRIBE.
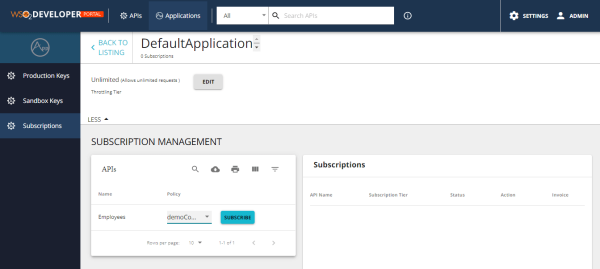
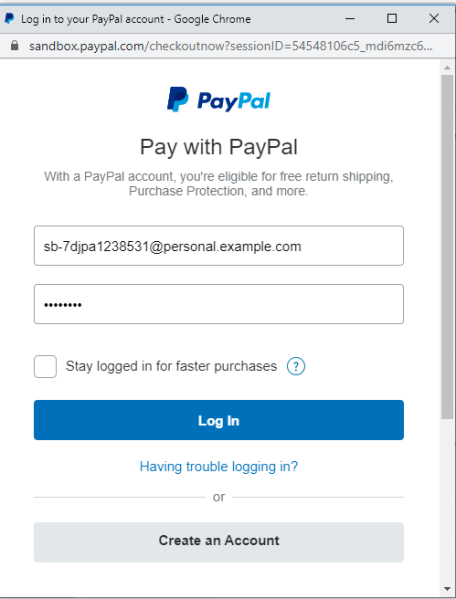
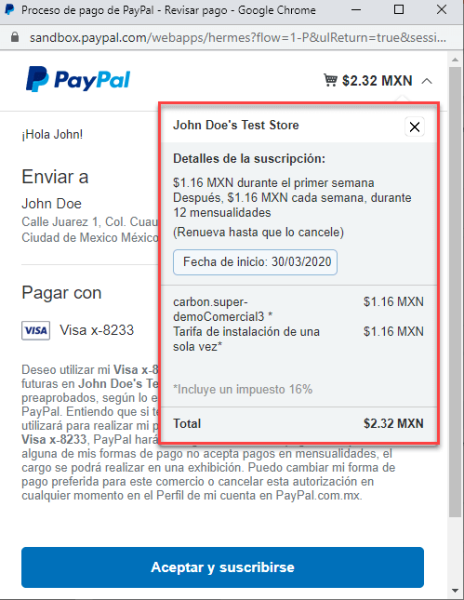
When subscribing to an API, you will be simultaneously redirected to PayPal to subscribe to the selected plan.
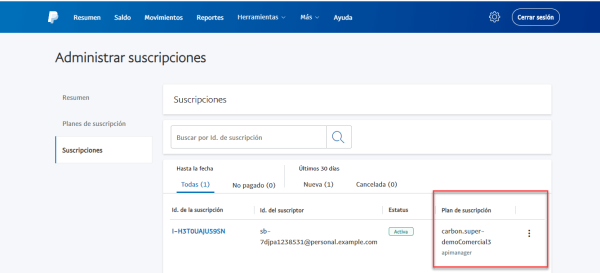
In your PayPal account, you can see the recently created subscription under the Subscriptions menu.
4. How to disable API monetization
In order to disable API monetization you must follow the following procedure:
- Log in to API Publisher.
https://<hostname>:9443/publisher
- Click on the monetized API.
- Click on the Monetization option to see the monetization configuration.
- Click on Enable Monetization to disable monetization.
- Input the Client_ID as the connected account password.
- Click Save.
The plan is deactivated on the PayPal billing engine according to the business plan on the API.
5. Conclusions
WSO2 API Manager provides a scalable interface which allows developers to create custom implementations with any third-party billing engine, in order to monetize APIs based on commercial plans.
In the official documentation you can see an example of integration of WSO2 API Manager with Stripe as its billing engine to handle payments for the monetization of the API, however, as you can see in this post, you can use any custom implementation using your billing engine of choice.