
Azure Integration Services comprises a series of products and services which are heavily used for building automated workflows to integrate different heterogeneous systems. One of the common use cases for this type of integration is exposing internal Azure Logic App workflows as REST-based APIs to consumer applications with added authentication and other quality-of-service factors. It inherits the advantages of using REST APIs for the consumer applications to automate the execution of internal workflows through a secure and reliable communication channel which can be easily implemented using standard development technologies within a short period of time.
Azure Logic Apps and API Management: Quick overview
We refer to two main services that lie within the Azure Integration Services stack, to demonstrate the use case here. Those are Azure API Management and Azure Logic Apps. Logic apps are categorized into two types i.e. Standard and Consumption. We use examples from Consumption Logic Apps in this article.
Azure Logic Apps
Azure Logic Apps is the workflow automation service provided by Azure, with different triggers and actions suitable for building complex transformation and orchestration flows between heterogeneous systems. User friendly low code implementation provided within the Azure Portal for Logic Apps gives the flexibility to faster implementation time with minimum coding expertise. The logic app workflows can be triggered either using an event such as HTTP request, message in the Azure Service Bus, event from the Azure Event Grid or a file placed in a designated SFTP location or Storage account.
Azure API Management
Azure API Management enables the exposure of internal services over managed and secured standard set of APIs to the consumer applications. It also provides the sandbox for the API developers to discover, subscribe and implement applications by consuming APIs published in Azure API Management Developer Portal. Rate limiting, fine grained control and comprehensive API analytics are the other main features of Azure API Management platform.
Use case: Azure Logic App workflow is fronted by an API in Azure API Manager
The implementation steps in the next section follows this simple use case where Azure Logic App workflow is fronted by an API in Azure API Manager.

Image 1: Azure Logic App communicating with an API in Azure API Manager
Access to the logic app is restricted using inbound IP restrictions, to allow requests only from API Manager. Also the API is secured with API Subscription Key. We used CURL as the API client to demonstrate sample requests to the API.
Steps to securely expose an Azure Logic App workflow as a REST API with Azure API Management
The step by step implementation of the above use case is described here. It includes configurations, sample requests and responses to the API which help to try out the scenario.
Build the Logic App Workflow
For simplicity, in this article we take a simple flow with HTTP trigger and respond with a static payload. It can be enhanced with any complex logic within the flow in the actual implementation.
Step 1: First create the Consumption Logic App with name logic-http-mock-response.

Image 2: Creation of a consumption Logic App.
Step 2: Then create a simple workflow using the Logic app designer with following;
- HTTP Trigger – Receives the following HTTP request
{

  "request": {

    "name": "Paul Stewart"

  }

}
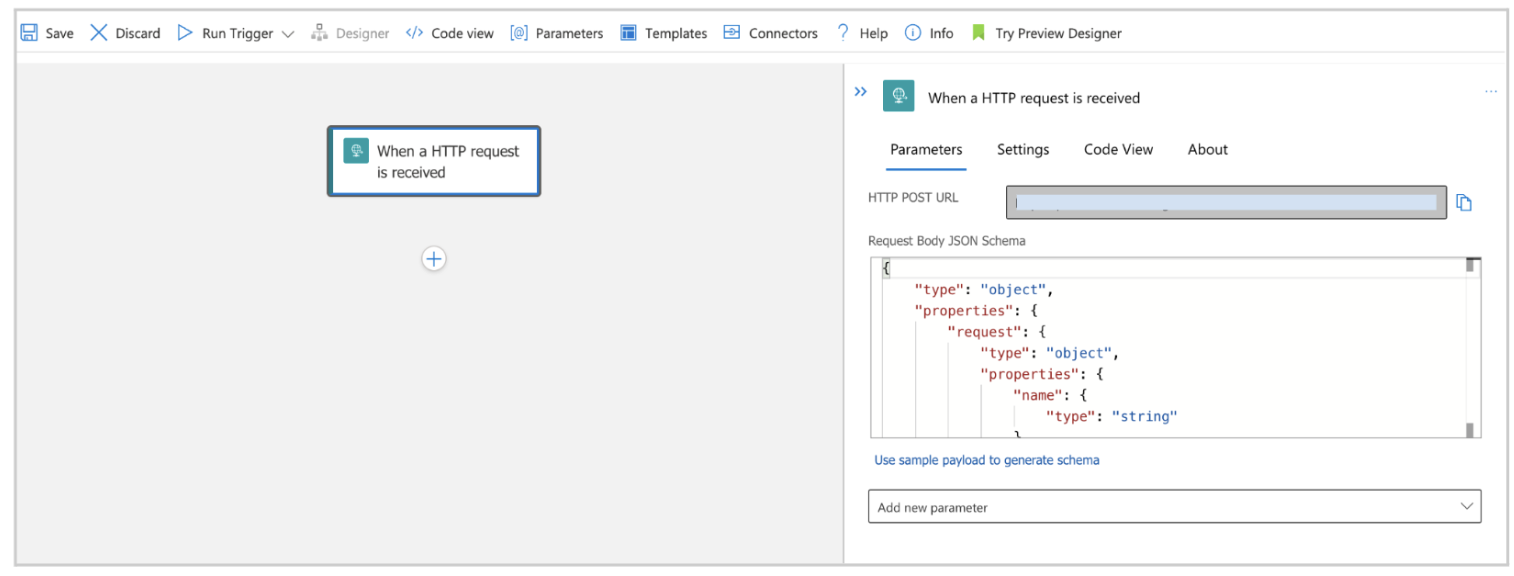
Image 3: Simple workflow using the Logic app designer
- Compose Action – Prepares a JSON response with the “name” from input request.
{

  "response": "Hello Paul Stewart"

}
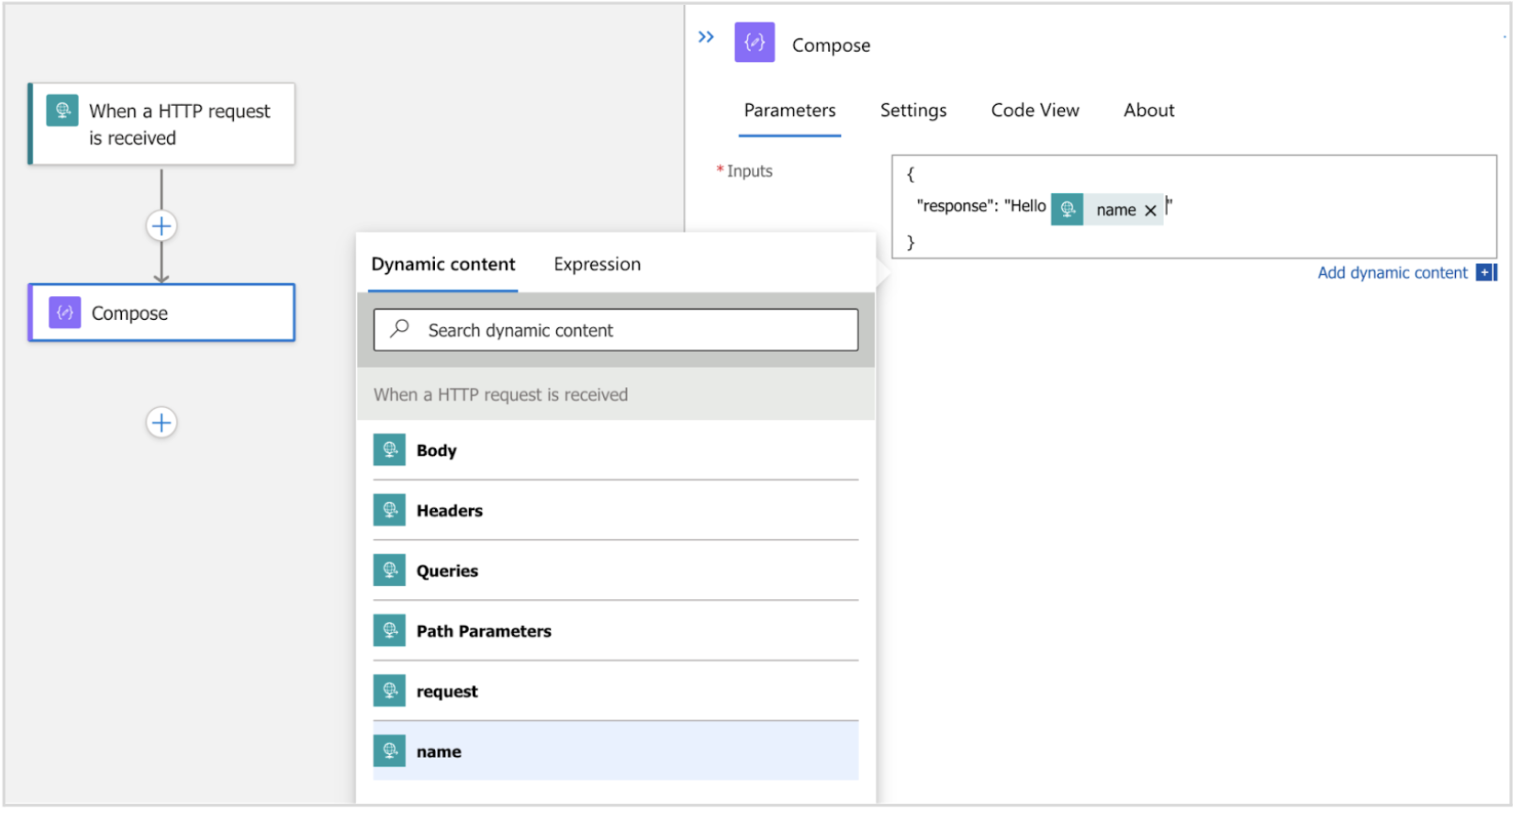
Image 4: Prepares a JSON response
- Response Action – Sends the response created in Compose action, back to the caller
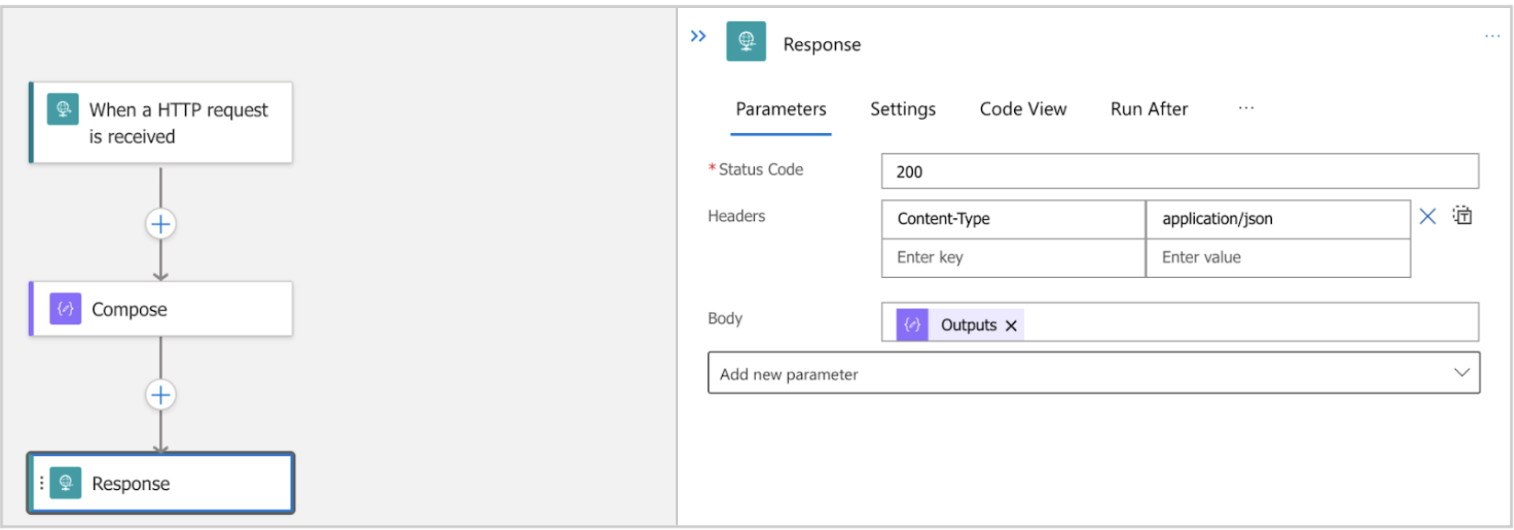
Image 5: Compose action
Step 3: Save the logic app and test it using CURL like below, to make sure it returns the expected response.
Here the URL can be taken from the Logic App Overview page under “Workflow URL”.
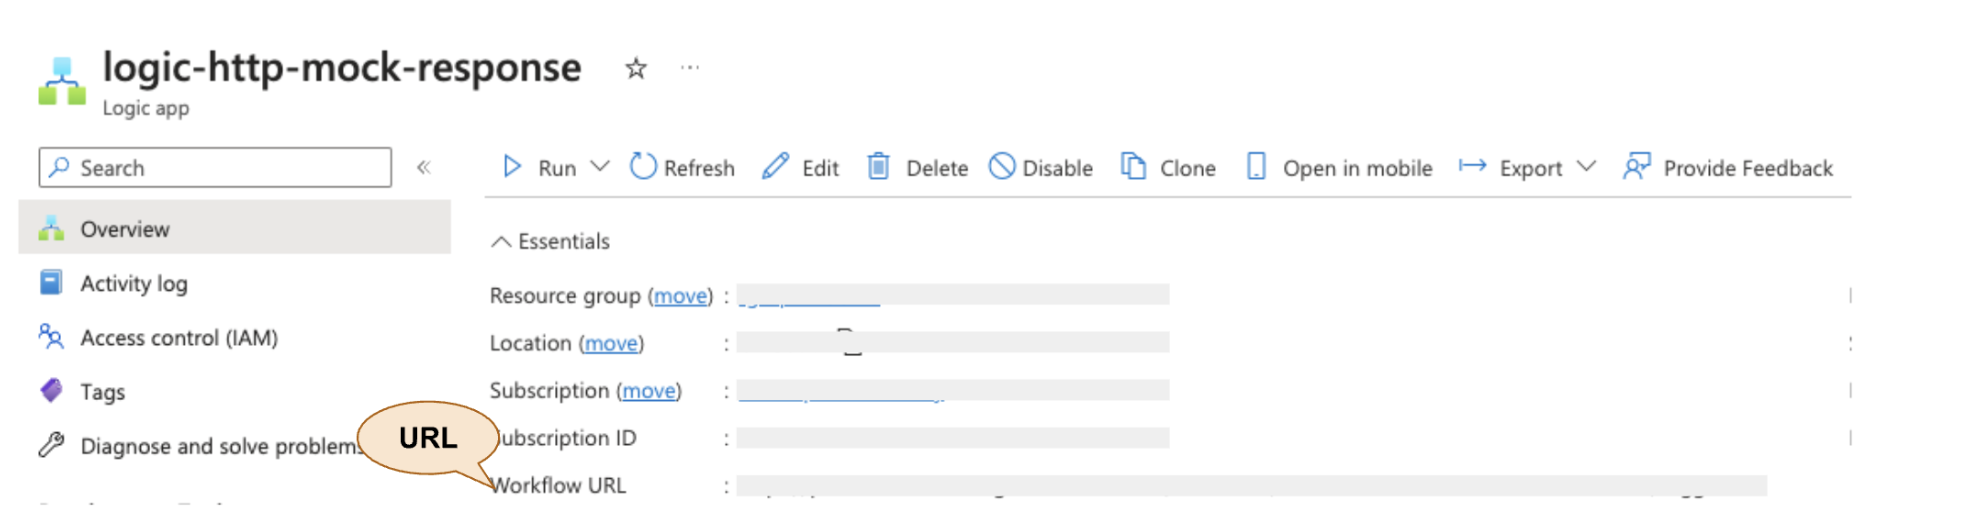
Image 6: Testing using CURL
curl -X POST '<URL from the logic app overview page>' \
--header 'Content-Type: application/json' \
--data '{"request": {
   "name": "Paul Stewart"
}}'
It will return the following response as expected.
{"response":"Hello Paul Stewart"}

Image 7: CURL response
Create the API
Lets take the above Logic App as the back-end for the API which will be built next.
Go to the API Management instance in Azure. If it is not created, the detailed guide on how to create an API Management instance using Azure Portal can be found in this article : https://learn.microsoft.com/en-us/azure/api-management/get-started-create-service-instance
Step 4: Go to “APIs” from the left menu, under “Add API”, select “Logic App from Create from Azure resource”.
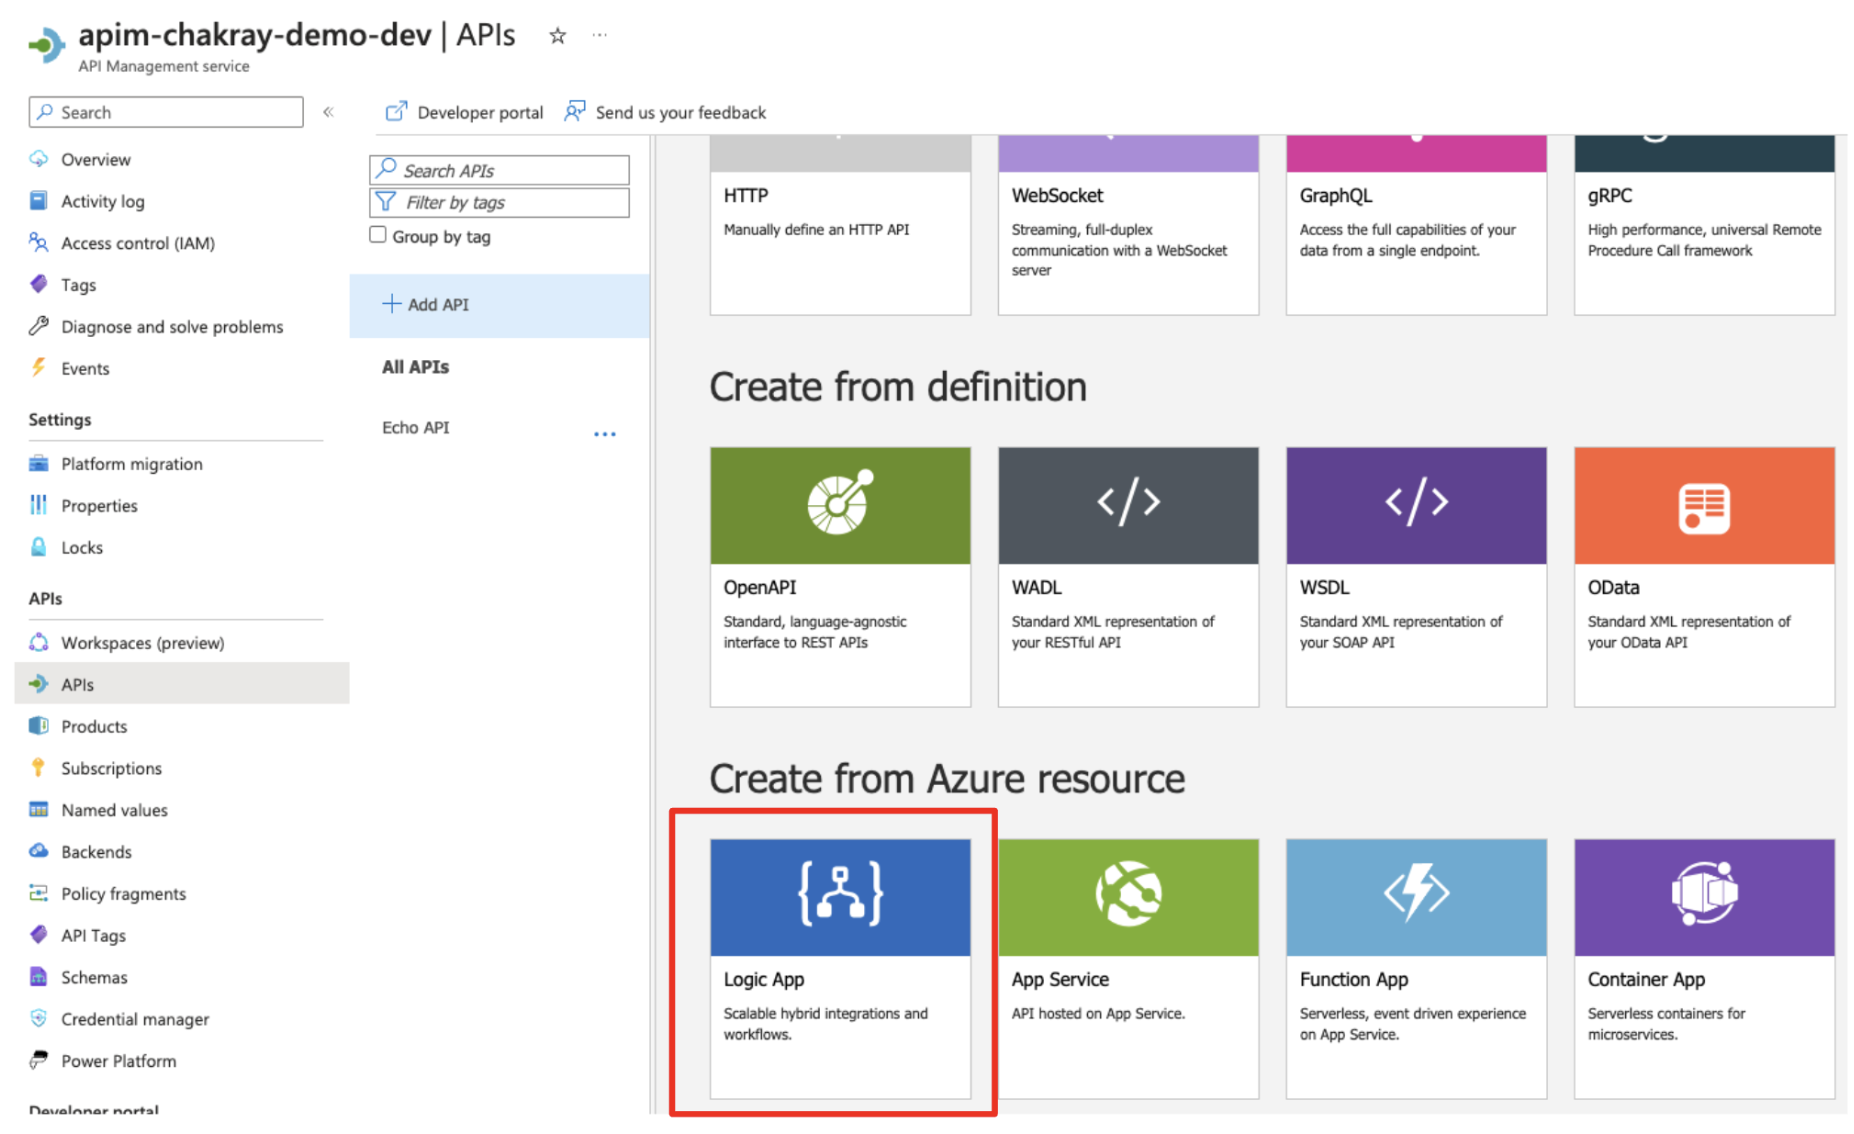
Image 8: Create Logic App under Create from Azure resource
It opens the dialog box to fill the details for the API and Logic app.
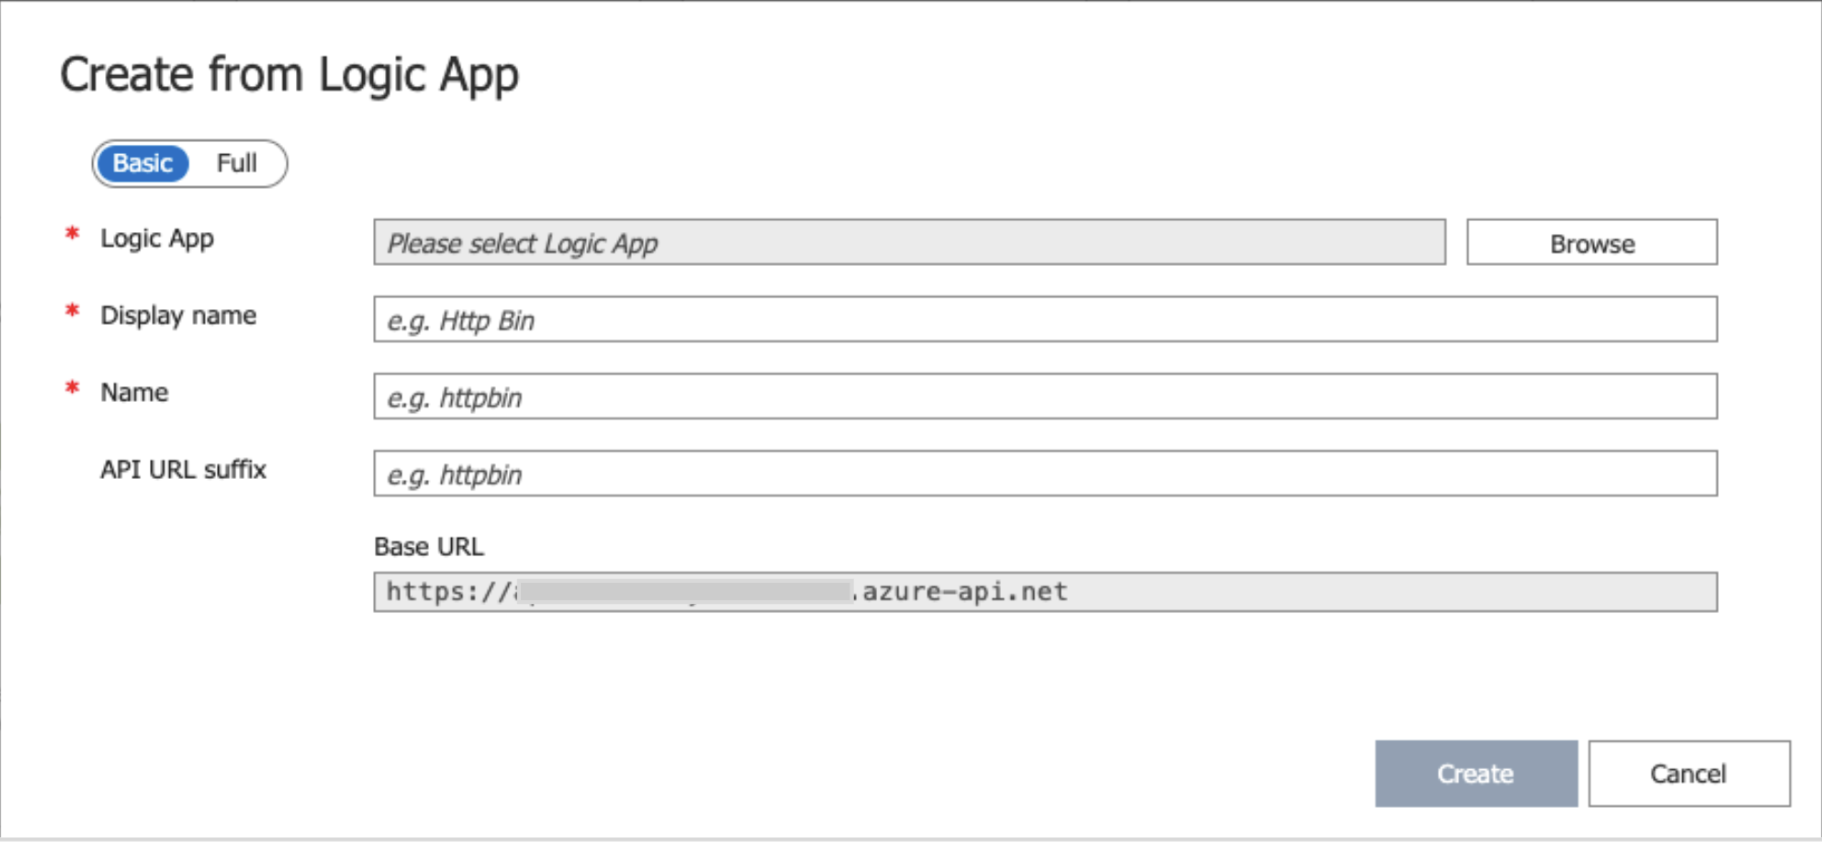
Image 9: API and Logic app dialog box
- Logic App – Click on browse and select the already created logic app “logic-http-mock-response”.
- Display Name – Set “APIM Demo API”
- Name – This will be automatically filled based on Display Name. Keep as is.
- API URL Suffix – Set “demo”. This will be added to the Base URL to make the complete URL of the API.
Once all details are filled, it looks like this;
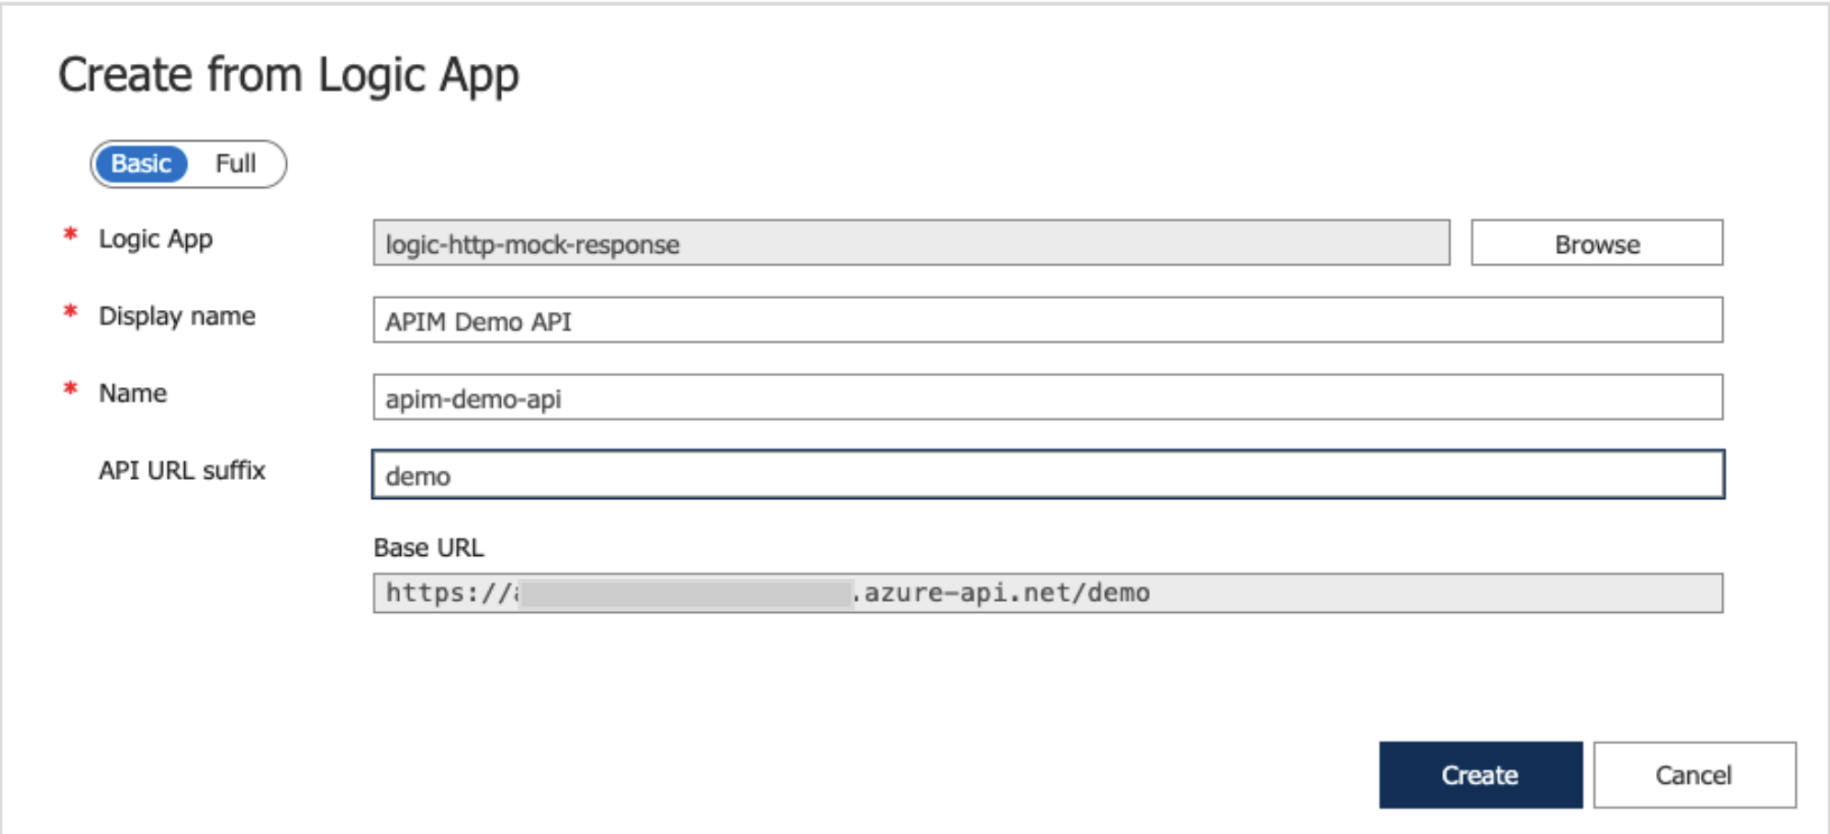
Image 10: API and Logic app dialog box with details filled
If you click on “Full” in the toggle button at the top, it will show a few more fields, but for the moment keep those with default values.
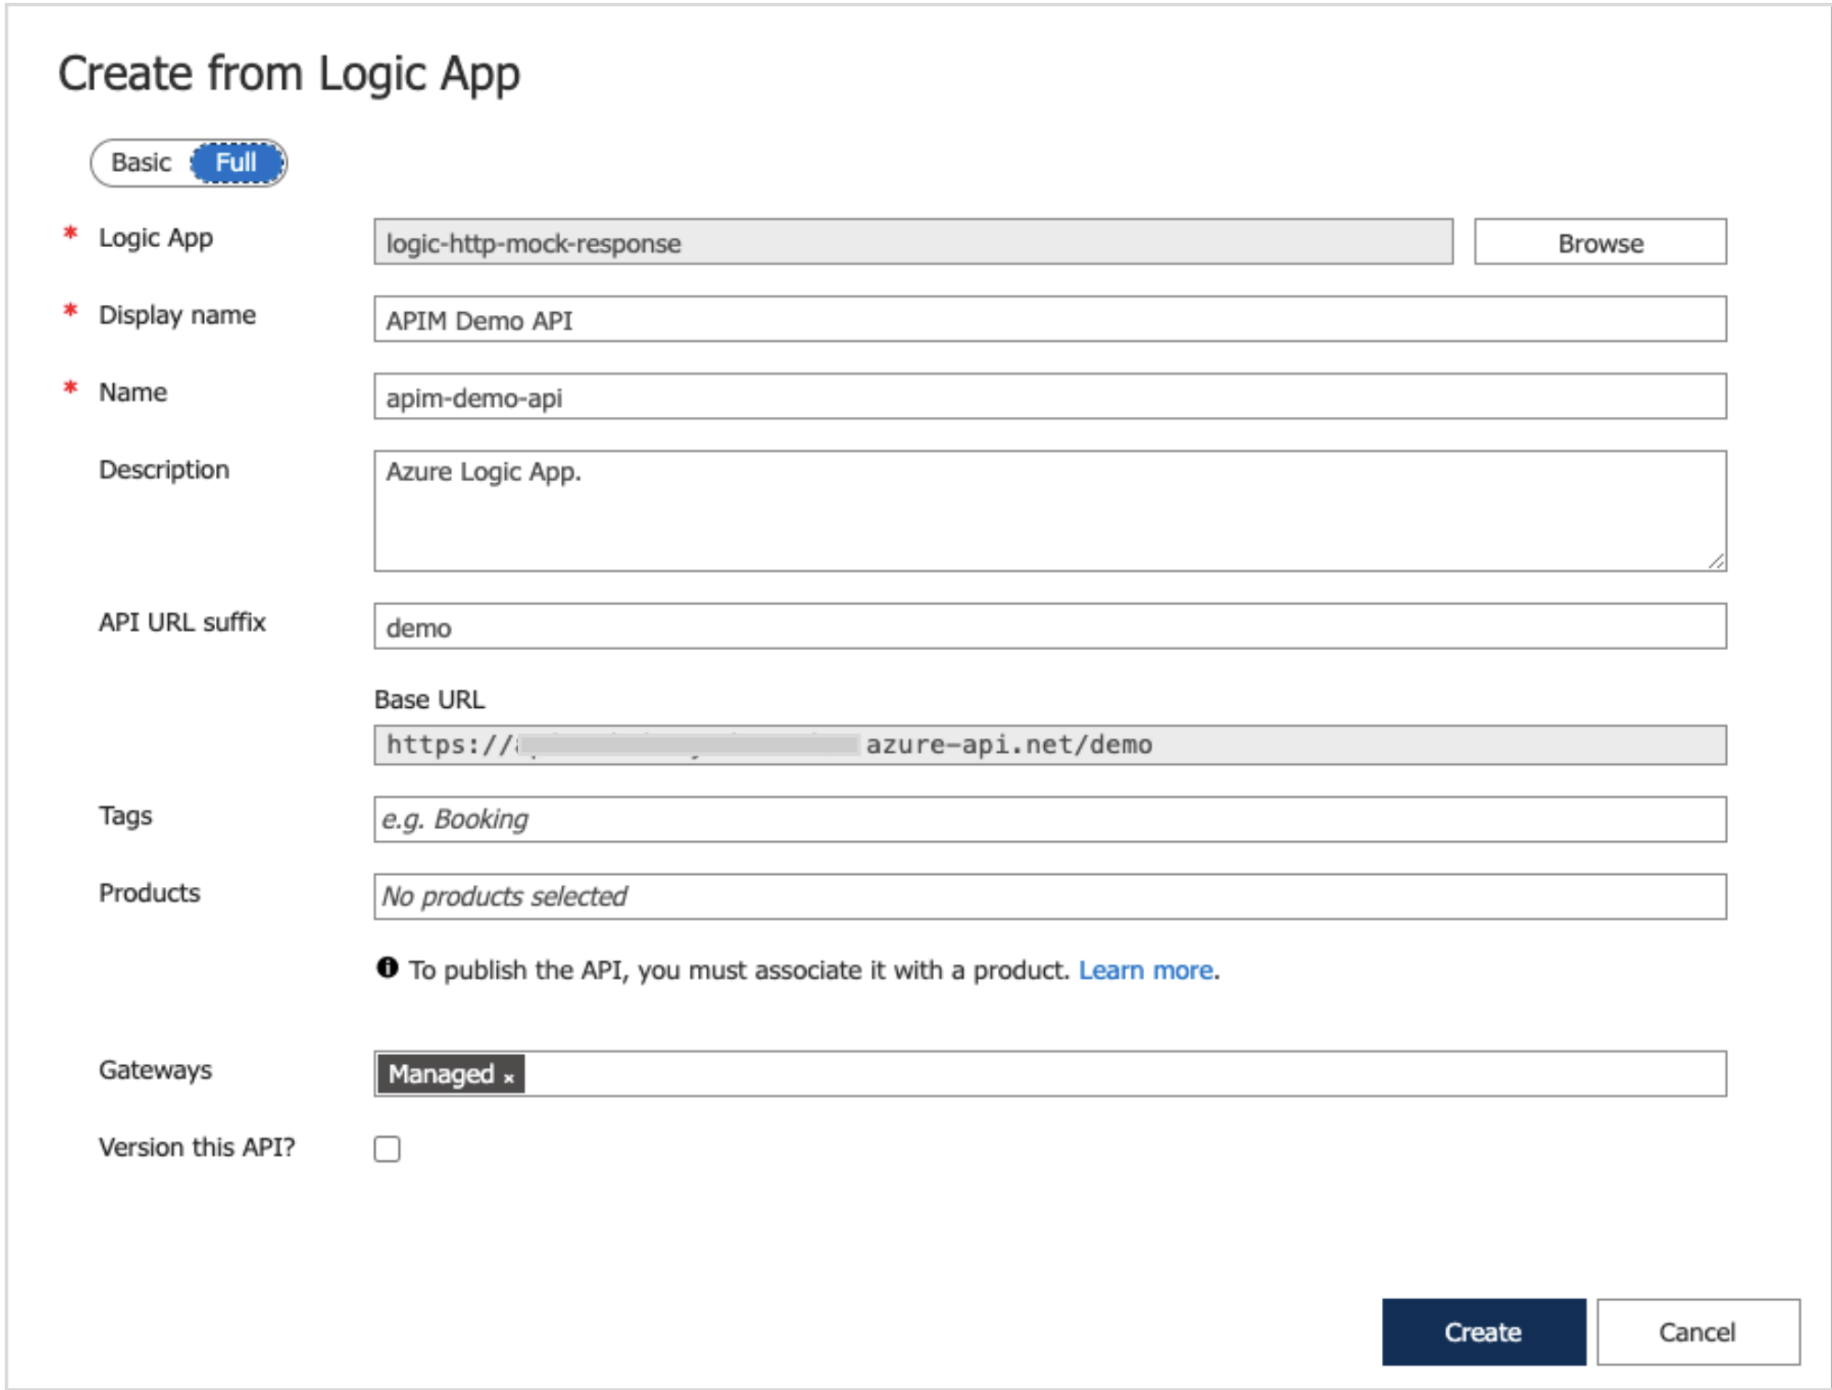
Image 11: API and Logic app dialog box (Full tab)
Step 5: Click on “Create”, then it will create the API using the logic app “logic-http-mock-response” as the backend.
Step 6: Once the API is created, click on the edit button in the “Frontend” section to update the resource path.
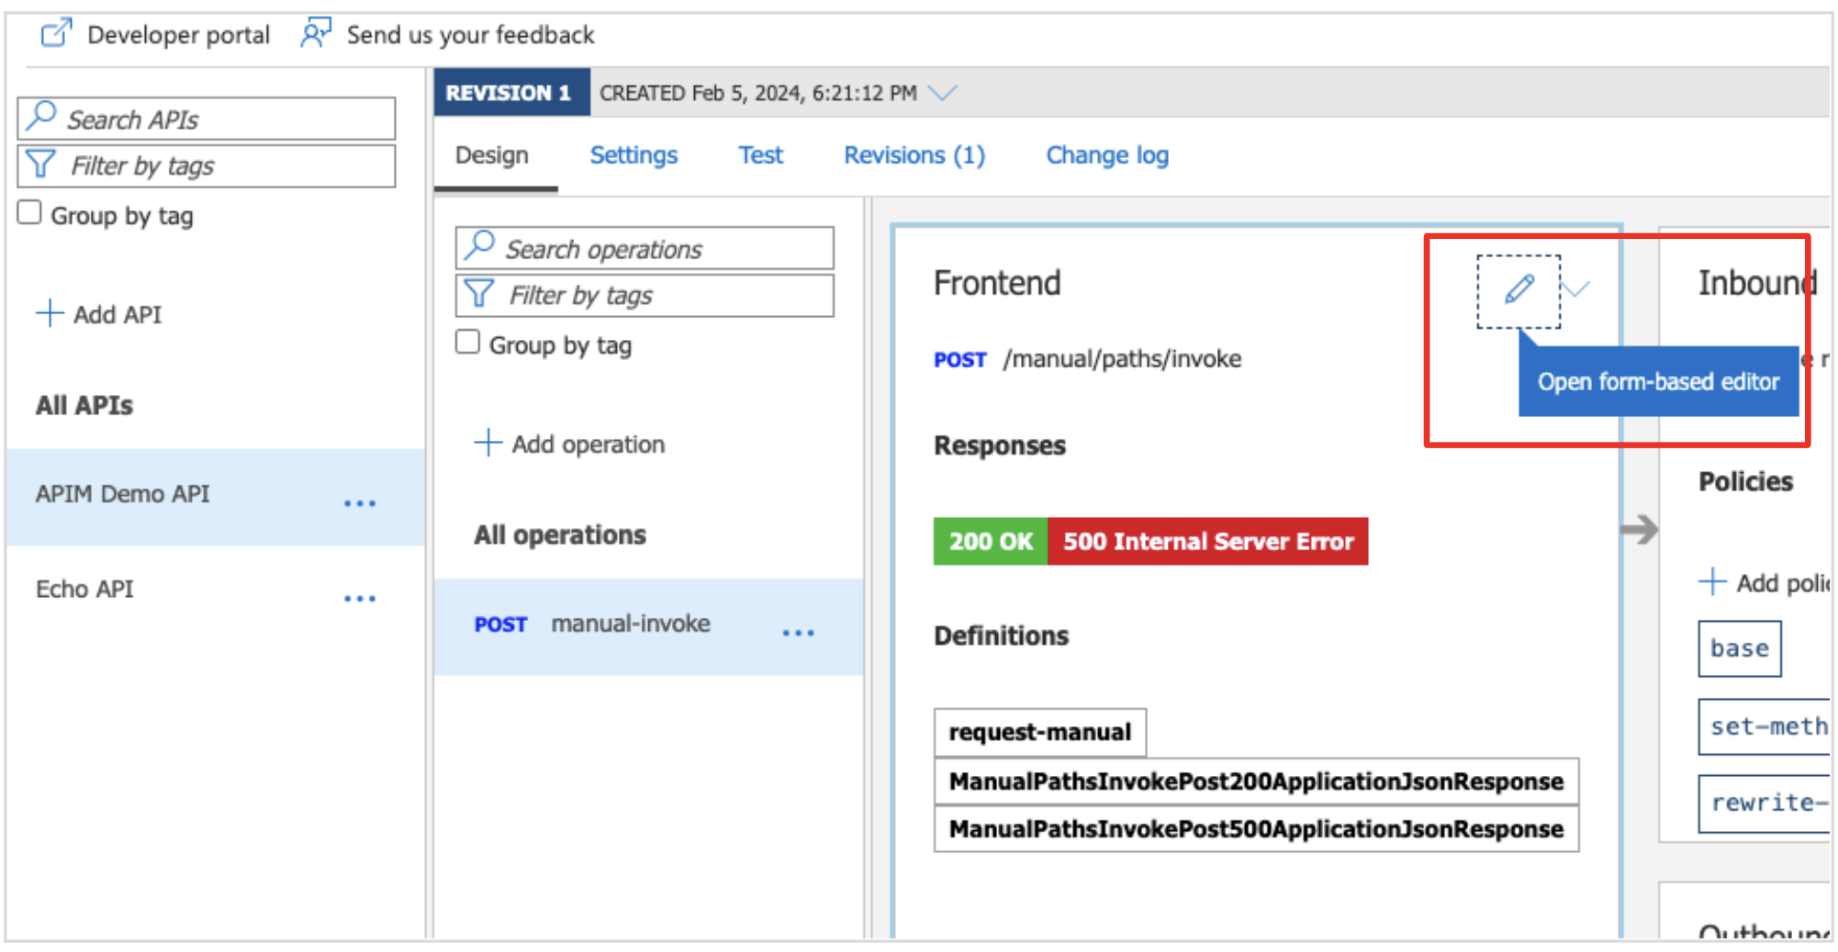
Image 12: Edit button in the “Frontend” section
Step 7: In the next window, update the details as follows, which will change the default resource path given according to our requirement. Then click on “Save” to apply the changes.
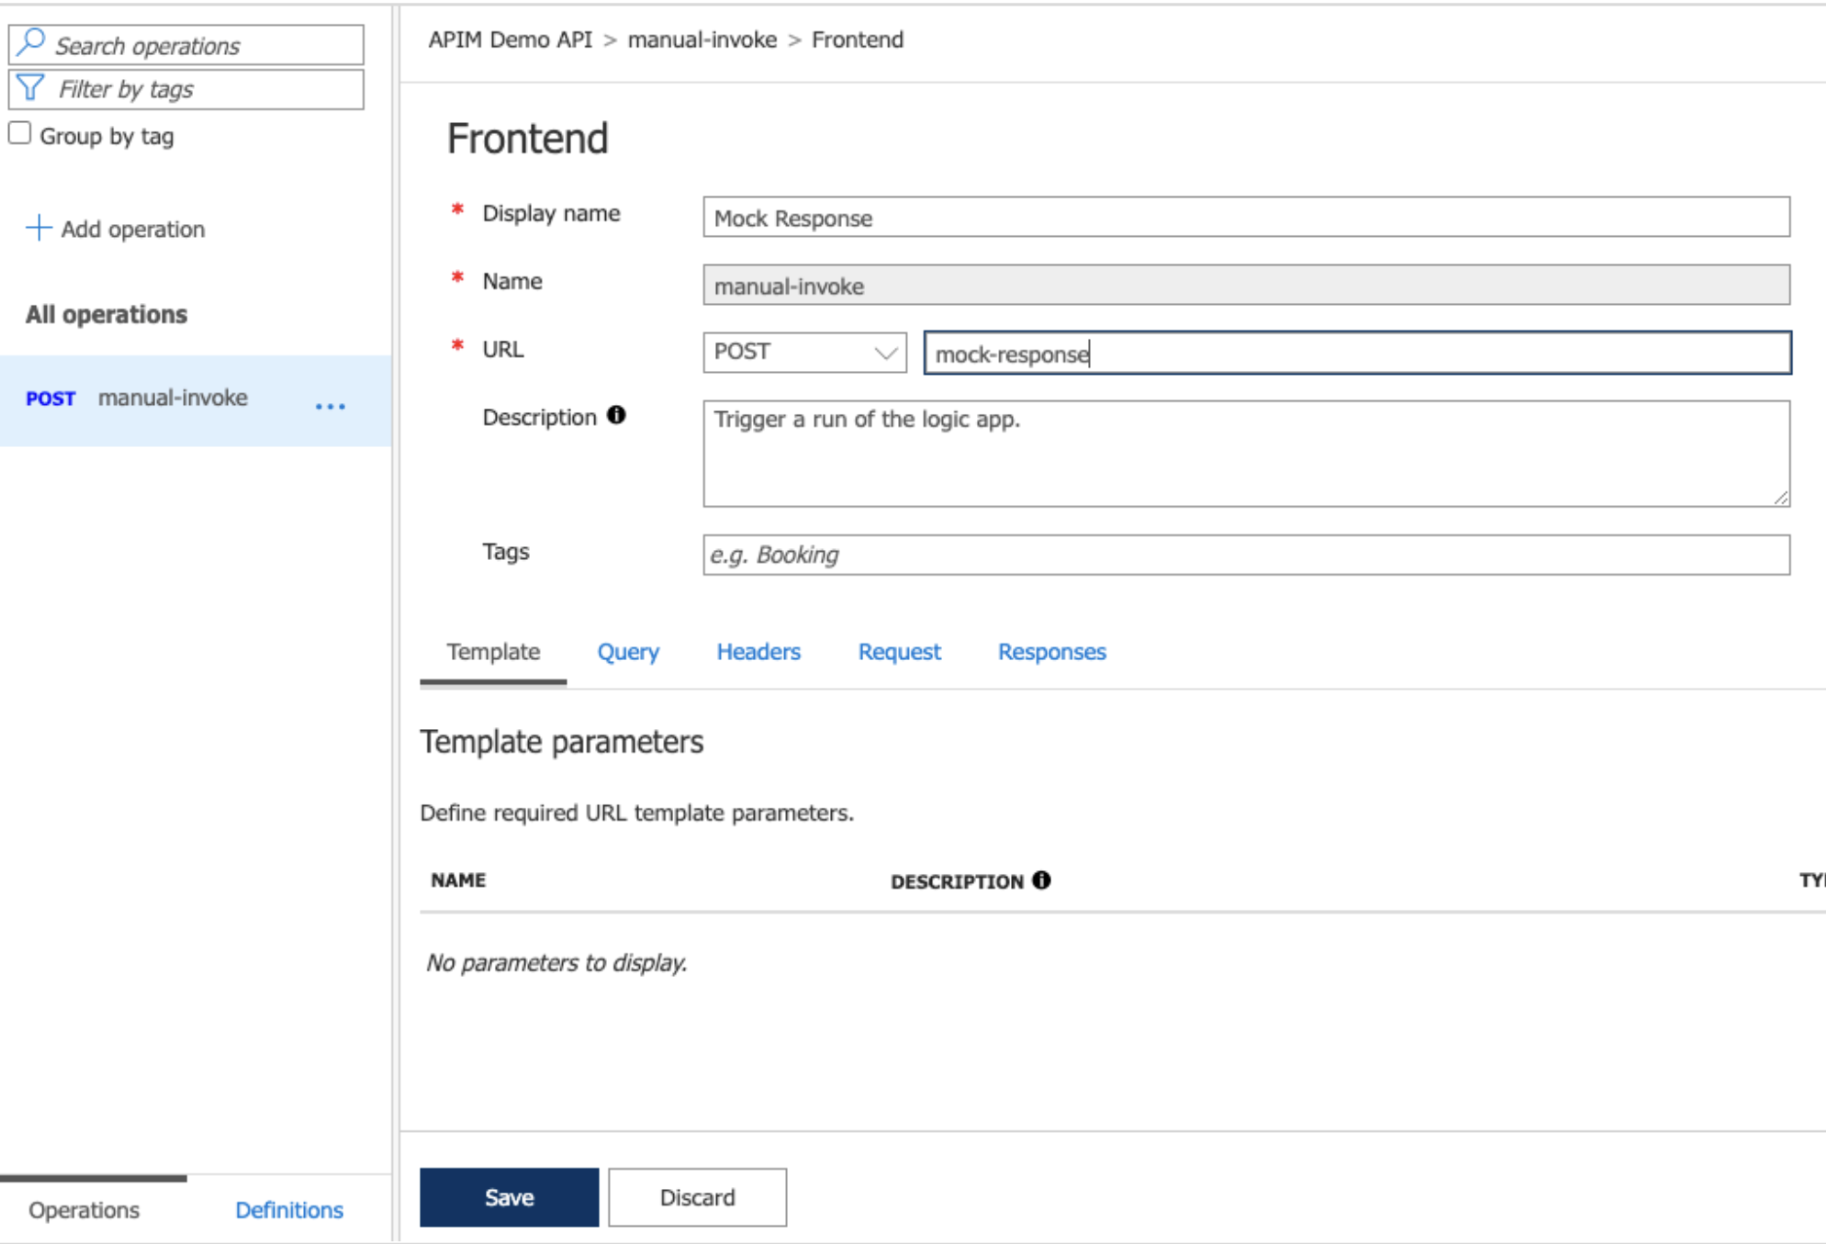
Image 13: Update the details in the “Frontend” section
It will update the resource name and the resource URL as per the below image.
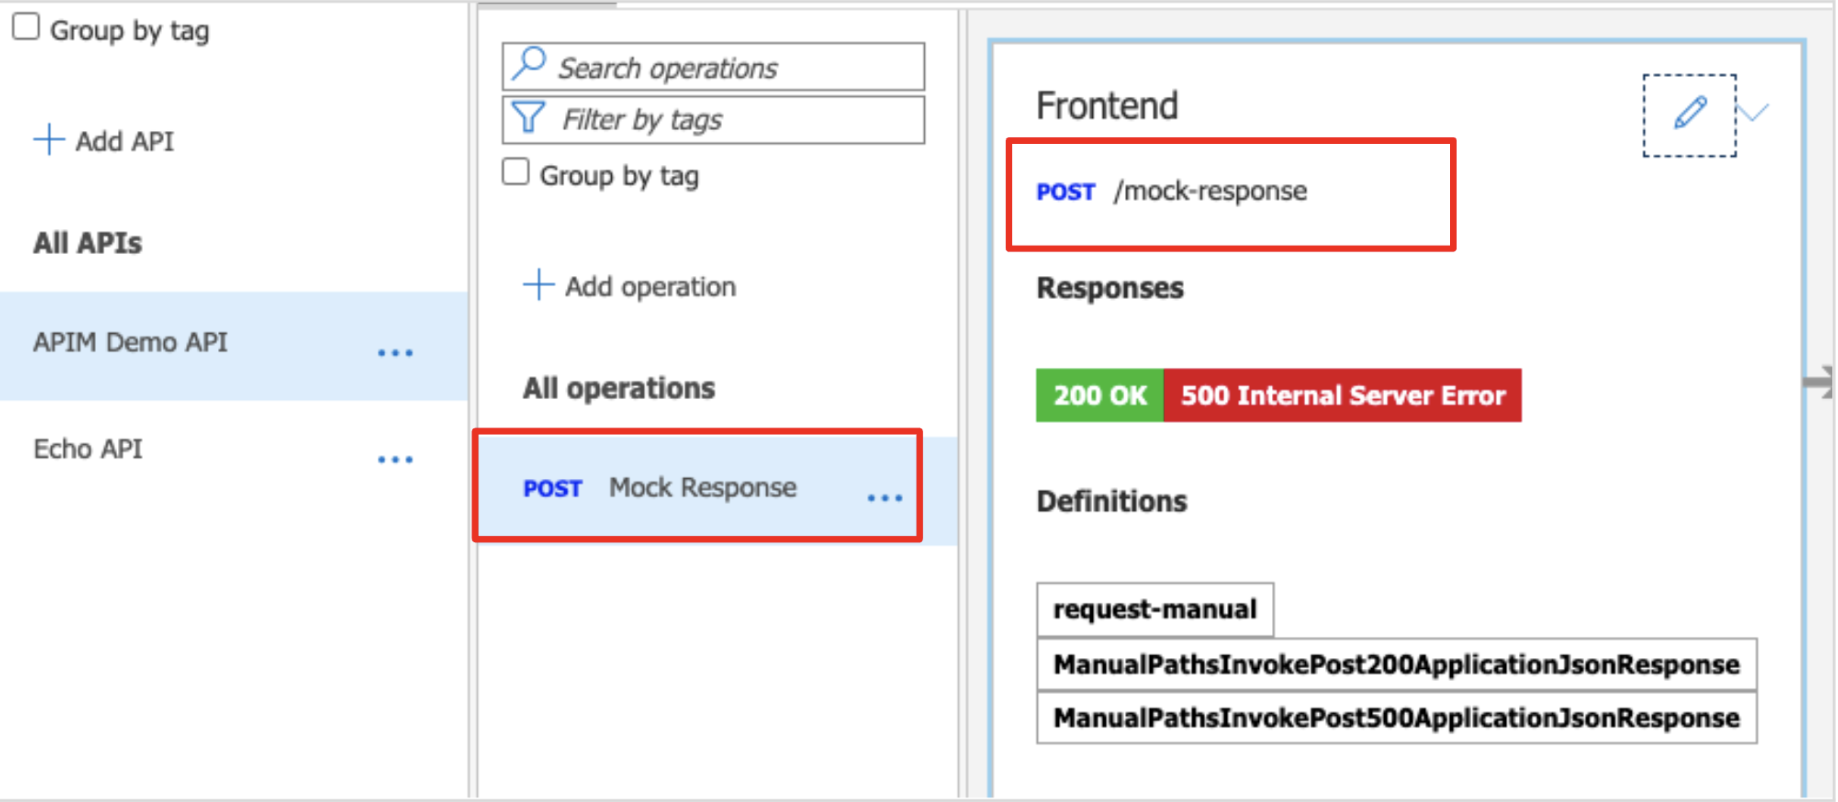
Image 14: Updating the resource name and the resource URL
Configure the API Subscription
In order to invoke the API, a subscription key is required. It will be included in the API request within the “Ocp-Apim-Subscription-Key” header.
Step 8: To create the subscription key in the API Manager, go to “Subscriptions” on the left menu and then “Add subscription” link. Here we will create a subscription key only for this API. It can also be created for “All APIs” or for a “Product” as well. More details on API Subscriptions can be found in this documentation https://learn.microsoft.com/en-us/azure/api-management/api-management-subscriptions
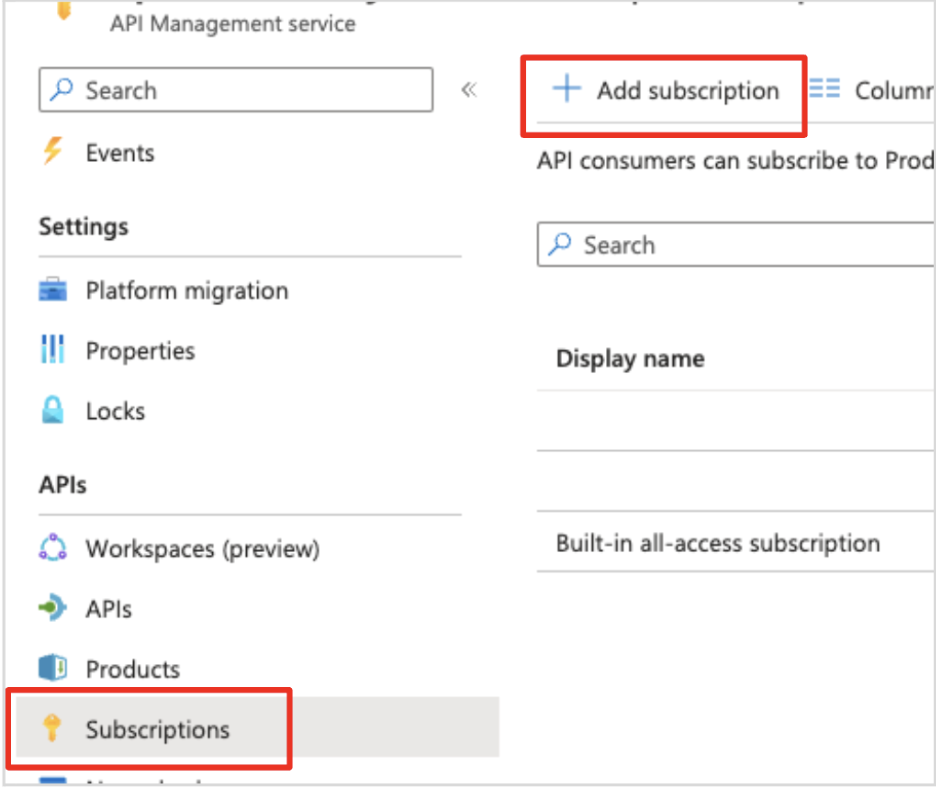
Image 15: Creating a subscription key in API Manager
Step 9: In the New Subscription window, fill the details to create a subscription for the “APIM Demo API” and respective keys.
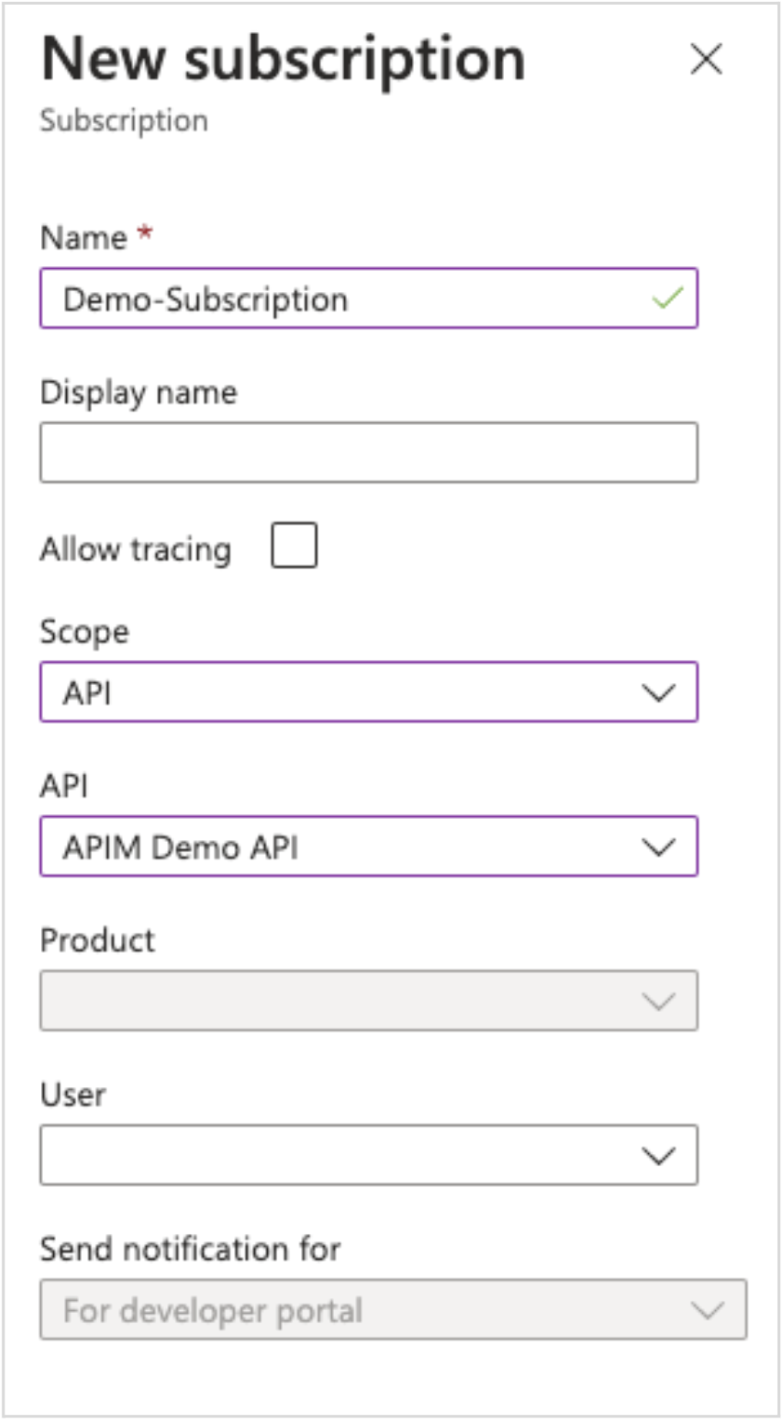
Image 16: Filling out New Subscription details
Once created, copy the “Primary key” for the subscription “Demo-Subscription”, which can be used in the API request.

Image 17: Copying primary key
Invoke the API
Step 10: To invoke the API, we need the API URL. It can be found in the “Test” tab in the API configuration window.
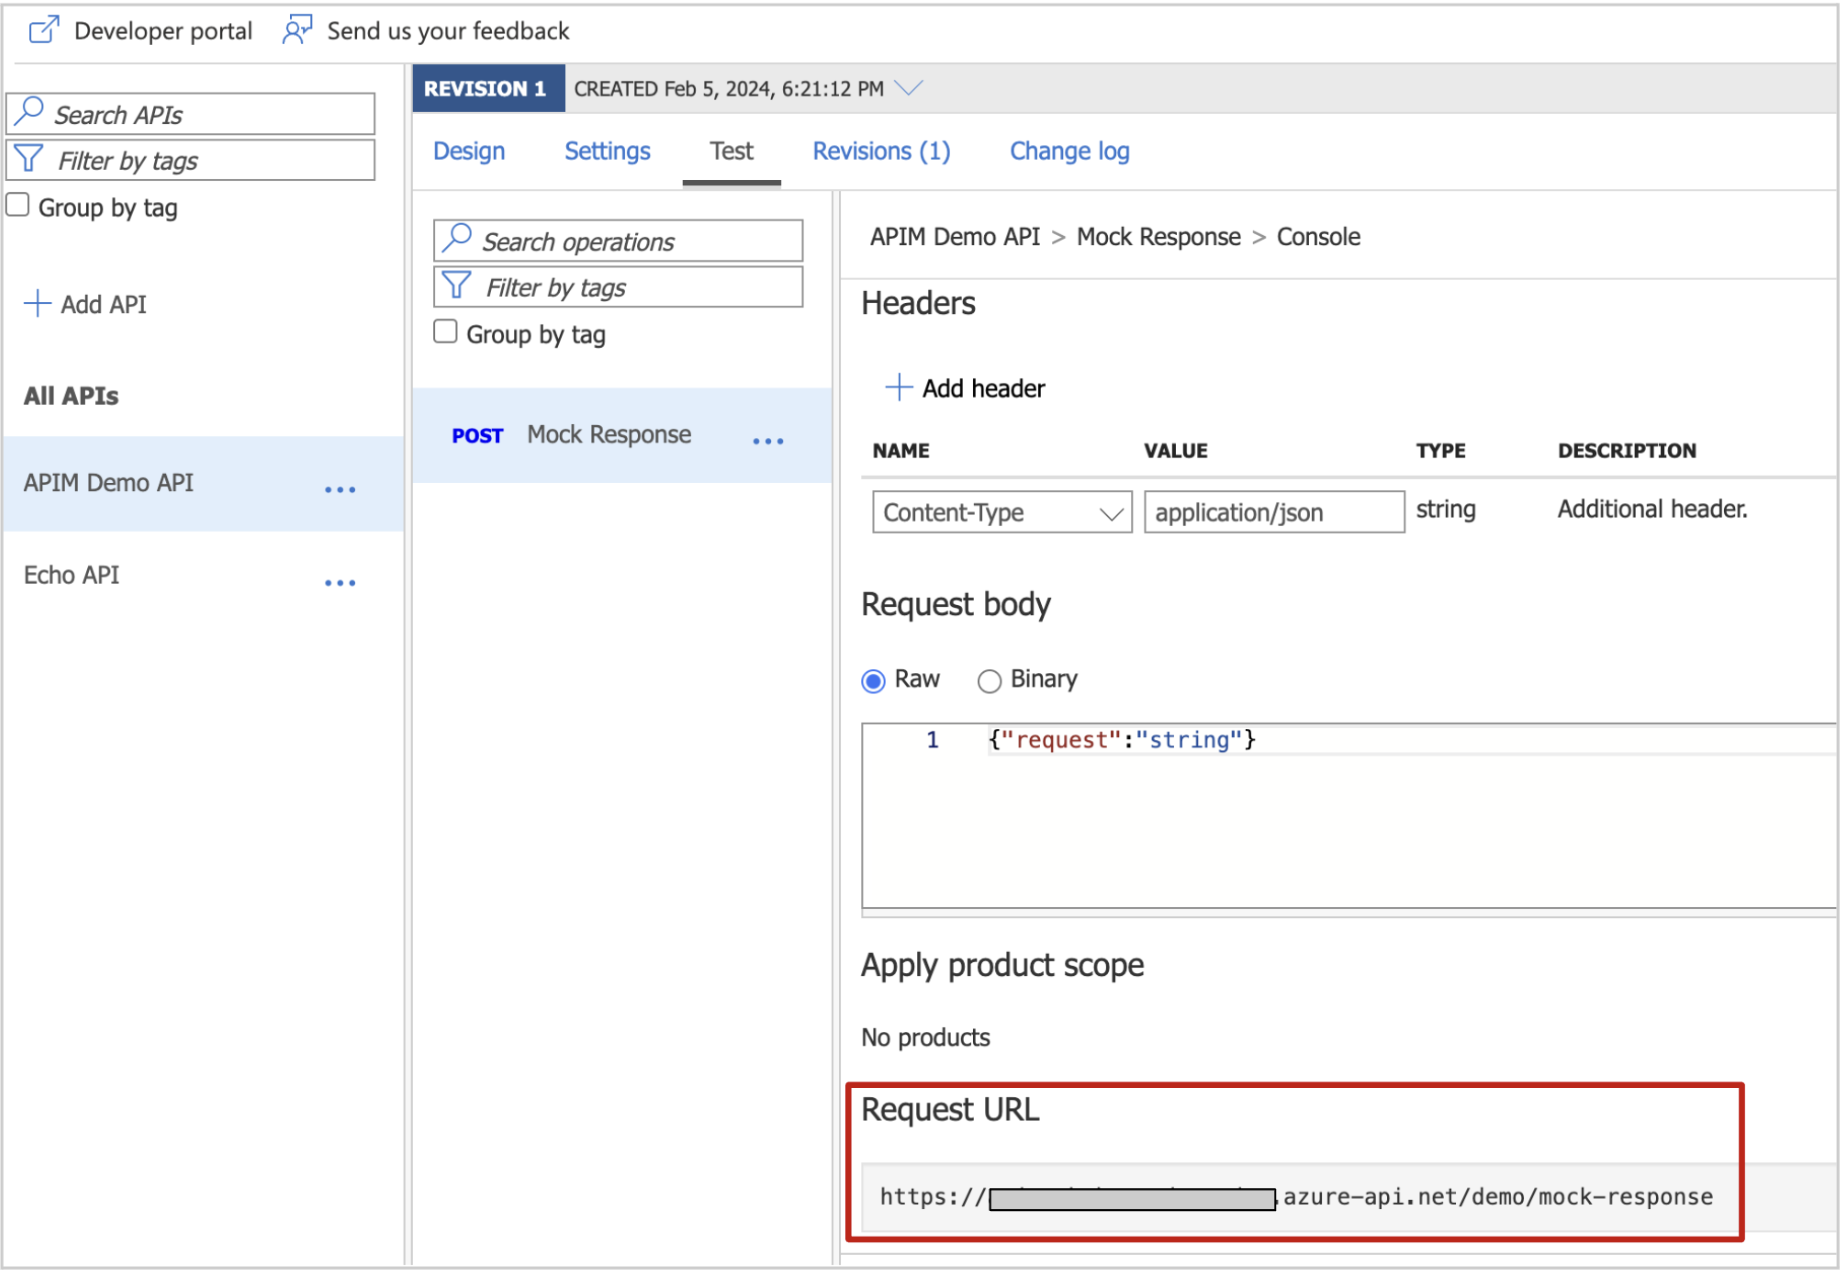
Image 18: Test tab in API configuration window
Use the same curl command used to invoke the Logic App, but with the above URL like below;
curl -X POST 'https://<APIM Host>/demo/mock-response'' \
--header 'Content-Type: application/json' \
--data '{"request": {
   "name": "Paul Stewart"
}}'
This will give the below authentication error.
{ "statusCode": 401, "message": "Access denied due to missing subscription key. Make sure to include subscription key when making requests to an API." }

Image 19: Authentication Error (code snippet)
The reason for the error is we have not passed any subscription key in the request. Then add the subscription key header “Ocp-Apim-Subscription-Key” and the value we obtained in the previous section.
curl -X POST 'https://<APIM Host>/demo/mock-response' \
--header 'Content-Type: application/json' \
--header 'Ocp-Apim-Subscription-Key: <subscription key> \
--data '{"request": {
   "name": "Paul Stewart"
}}'
It gives the correct response which is the same as we got when invoking the Logic App earlier, but with a more secure way through API Manager.
{"response":"Hello Paul Stewart"}

Image 20: Correct response (code snippet)
Restrict access to the Logic App
When the Logic App service is exposed through API Manager with extra security, the access to the Logic App directly should be disabled. So the only way to access the HTTP workflow trigger is through the API Manager which gives more security, control over the access and easier monitoring of requests through API Manager.
Step 11: In order to restrict access in Logic App, go to Logic App “Workflow settings” window and set the following configuration under “Access control configuration” section.
Trigger access option – Specific IP ranges
IP ranges for triggers – Set the public IP of the API Manager. This can be found in the API Manager overview page under “Virtual IP (VIP) addresses”. Set it in the format <public ip>/32.
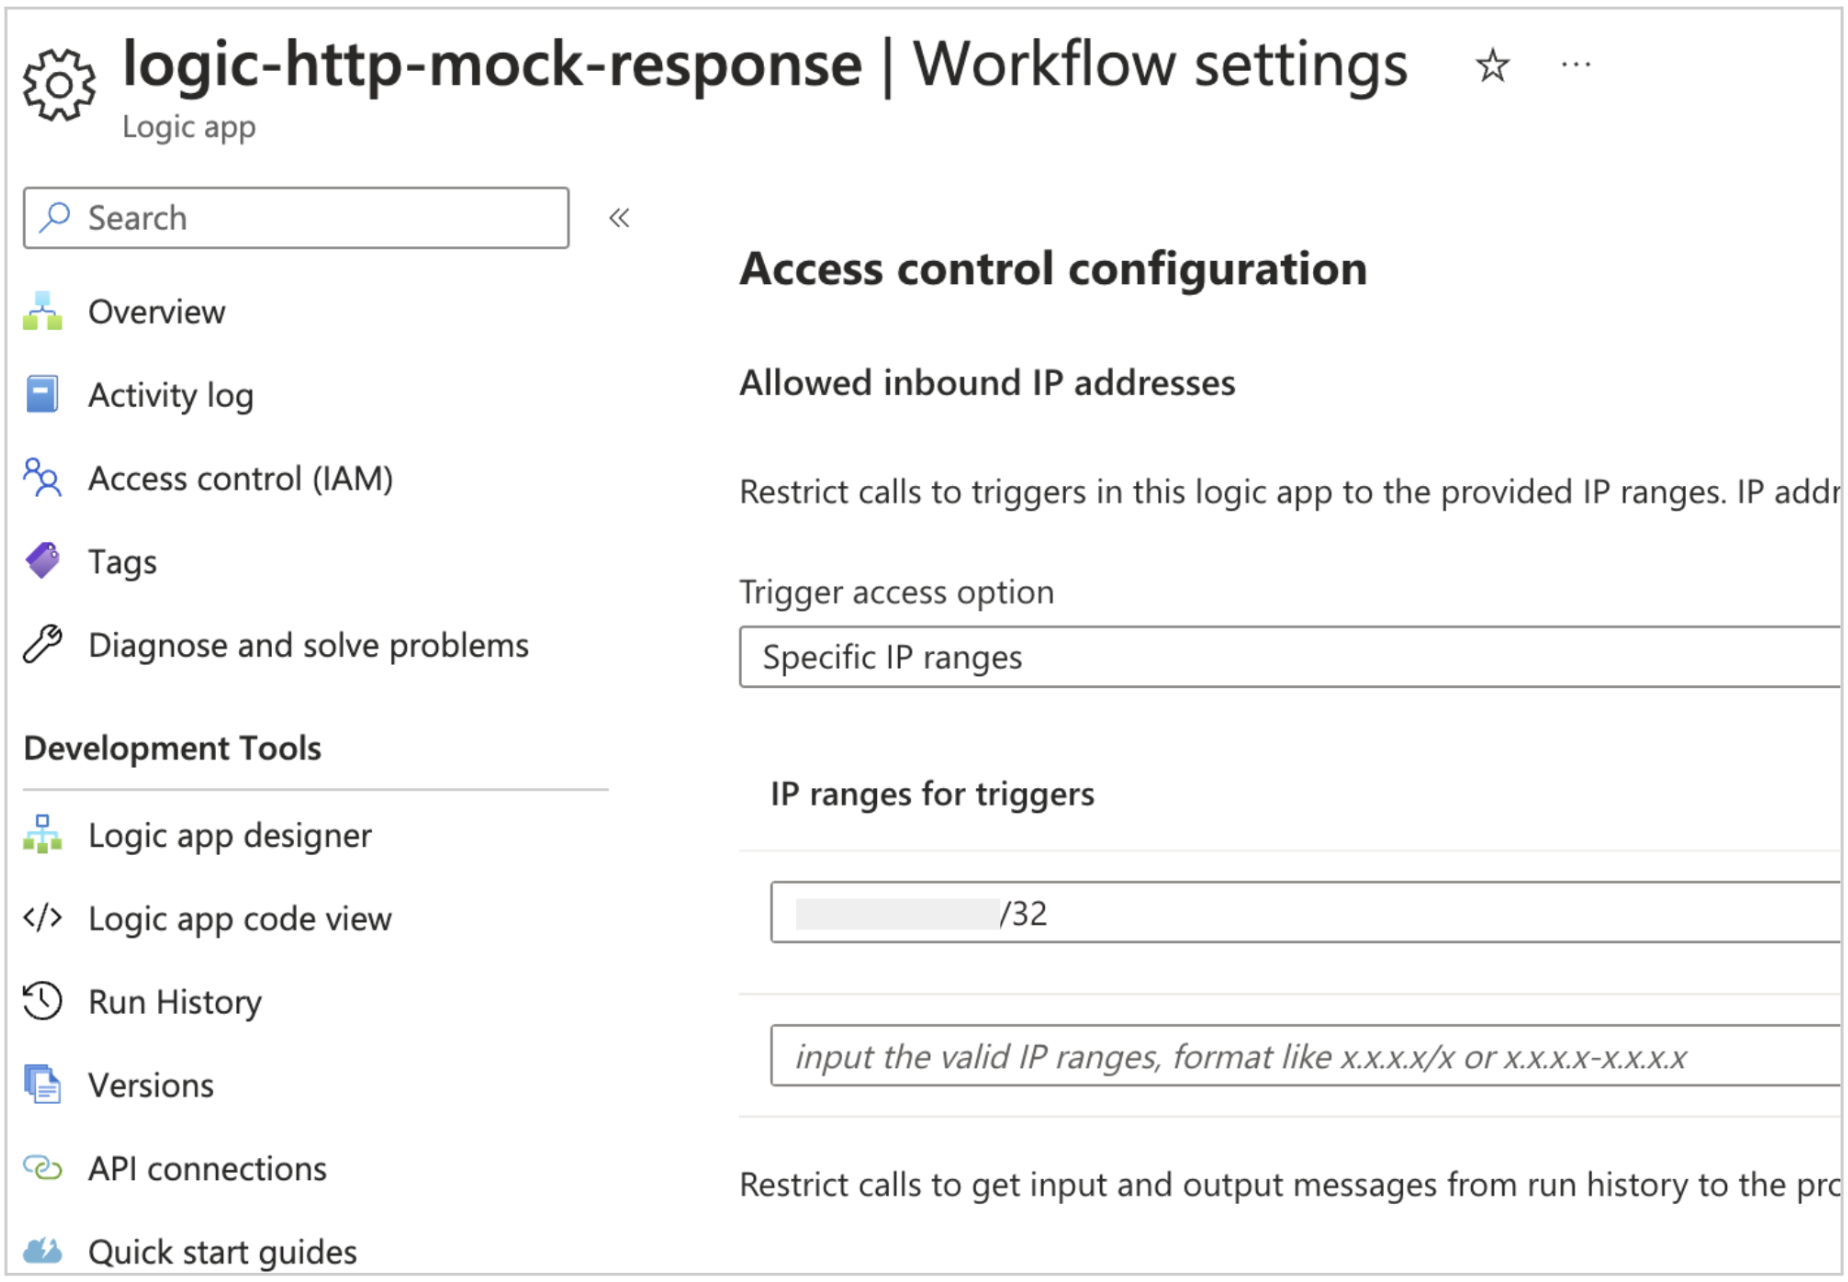
Image 21: Setting access controls
Once it is saved, the logic app URL will not be accessible as earlier, it will give an access error like below.
{"error":{"code":"AuthorizationFailed","message":"The client IP address 'x.x.x.x' is not in the allowed caller IP address ranges specified in the workflow access control configuration."}}
But this is still accessible through the API we exposed in API Manager with a correct subscription key.
Conclusion
Azure Logic Apps are used to implement complex workflows which can be invoked through HTTP requests. In order to make the service more secure and manageable, the HTTP workflow can be exposed as a REST API in Azure API Management. We can use the access restriction features in Azure Logic Apps to disable public access to the workflow and only allow it through the API Manager.
With Chakray as your reliable Azure partner, you can anticipate a significant boost to your business through our innovative implementations tailored to your specific needs. All you need is a strong partnership with Chakray guiding you every step of the way. Feel free to contact us with any inquiries not addressed within this article; we’re here to assist you!
Contact our team and discover the cutting-edge technologies that will empower your business.

Talk to our experts!