
Introduction
System integration tends to be one of the main obstacles for any company, regardless of its size. Services written in various technologies or different languages is one of the issues faced daily by many companies. Rings the bell, doesn’t it?
Fortunately, there are fast solutions that are easy to implement, such as WSO2, which put an end to this complex IT task.
Below we bring you a successful case of system integration carried out with the help of WSO2, at one of the most prestigious automotive companies in the international landscape, with over 35,000 employees.
This challenge ended in a resounding success, which is why the purpose of this eBook is to share the steps taken throughout the process. Get to know firsthand the problems and events that arose during the implementation, the WSO2 modules that were installed, and many other surprises.
It is sure to help you when the time comes to get started with system integration, and will encourage you to implement it in your company. Discover the great advantages that this Open Source platform can offer you and your organization.
Why wait?

The Problem
Before we get into the meat of the matter, it is worth mentioning that integration tools tend to be used to make different system components connect with each other, with the goal of solving a problem.
However, it may so happen that each of these modules may have been written using different technologies or programming languages. When faced with this situation, companies need to study which integration alternatives they have at their disposal, as our client’s company did.
One of the options is buying an integration tool, which is inexpensive. Meanwhile, the other choice would be migrating all components of a framework system, written in the same language, which implies a high cost to the organization.
In this case, the solution was more than obvious, so this automotive company opted for a middleware such as WSO2, which would significantly simplify the interaction between components. Which is great!
It is worth mentioning that we understand that ‘component’ may mean any service or routine that is capable of receiving a request and send a response after performing a process. WSO2’s solution is implemented by following integration standards. In addition, it offers the ability to let components that use different communication protocols interact with each other.
Below you can find an example using the HTTP protocol:

As you can see, the user uses one same request to use both services, which are implemented in different languages, thanks to the middleware. In this way, the request can be enriched with more information, sending the response back to the user.
This solution turned out to be the best, since it provides flexibility to the company, in addition to being cheaper than migrating all services to a single programming language, and services can still be used through a mediator: WSO2 middleware.
If we take the presented example as a reference, their communication takes place through web services over the HTTP protocol.

The Solution
Before we dive deeper into the architecture applied to the client in question, it is worth mentioning that this decision is customizable and orchestrated depending on the integration needs of each company.
In the case of this British client, it was decided to install the entire WSO2 suite, which has several modules that address different issues:
- WSO2API Manager: this module lets the user create and publish APIs for internal (Intranet) or external (Extranet) use. In addition, other users may subscribe to the APIs through applications created in this tool. This is accomplished via the Store, where all previously published APIs can be seen.
- WSO2 Identity Server (IS): this is an identity server. It is used to manage the Single Sign On (SSO) between service providers, and as an access token manager for the APIs (Oauth2 protocol).
- WSO2 API Publisher: these are web tools used to create and publish the APIs and subscribe to the APIs. This module is included in the API Manager.
- WSO2 ESB: it is the proxy that is used to ensure the communication between components. It is worth mentioning that is has more functionalities, since it is an enterprise BUS, such as: enriching messages, redirecting them to different endpoints, load balancing and accessing databases and any services through RESTFul calls. In the case of this client, json was used for formatting messages.
- WSO2 Message Broker: this module is employed to manage the queues created in the ESB. These queues are used to store messages for a while until the endpoint to which they are directed is able to process them.
It is important to mention that, in order to offer the best service, the nginx balancer was used for the API gateways and the ESBs. These balancer distributes the petitions between the workers (nodes) both for the gateway and for the ESB
WSO2 architecture diagram
As can be seen in the image below, the API Publisher and the API Store can be accessed from the Intranet. There are a number of users with publishing “privileges,” which can create and publish the APIs. The other users have access to the Store in order to sign up applications used to subscribe to the APIs.
The APIs that have been created are deployed to the gateways, which receive the requests from the Intranet. It is worth mentioning that this process can also be performed by using the Restful services of the API Manager.

All of the APIs manage their security via the Oauth2 protocol. This protocol’s service has been deployed in the Identity Server: Key Manager. It is this endpoint the one that receives the requests to access the APIs, and the one that sends the access tokens, in case the user and password are correct for each request.
It is worth mentioning that, in order to facilitate the deployment of components on different services, we use the Puppet tool.
Continuing with the integration, the Key Manager has been deployed on the Identity Server (IS), that is originally in the API Manager.
Therefore, there are a series of tables that need to be shared between both components, which are:
- WSO2REG_DB: Contains information about the registration of artifacts, configuration data, policies and API details.
- WSO2UM_DB: this stable stores the permissions and roles of the various users.
- WSO2AM_DB: Stores the API identity and information data, such as the Oauth tokes and the access keys for the APIs.
It is important to highlight that these schemes have been deployed on a cluster that uses MariaDB.
Response types: Json or XML
Another aspect to consider in the WSO2 system integration process was returning the error messages of the API manager in json format. Several files had to be modified to accomplish this:
_auth_failure_handler.xml
<AM_HOME>/repository/deployment/server/synapse-configs/default/sequences/_auth_failure_
handler.xml
<sequence name=”_auth_failure_handler_” xmlns=”http://ws.apache.org/ns/synapse”>
<property name=”error_message_type” value=”application/json”/>
<property name=”TRANSPORT_HEADERS” action=”remove” scope=”axis2”/>
<sequence key=”_cors_request_handler_”/>
</sequence>
In this file the value of the “error_message_type” property has to be changed from “application/xml” to “application/json”.
fault.xml
<AM_HOME>/repository/deployment/server/synapse-configs/default/sequences/fault.xml
<sequence xmlns=”http://ws.apache.org/ns/synapse” name=”fault”>
...
<filter source=”$axis2:HTTP_METHOD” regex=”^(?!.*(POST|PUT)).*$”>
<property name=”messageType” value=”application/json “ scope=”axis2”/>
</filter>
...
</sequence>
Thanks to this modification, the error message generated by the API manager is in json format.
As an example, the error message in json format generated by the API Manager would look as follows:
{
“fault”:{
“code”:900902,
“message”:”Missing Credentials”,
“description”:”Required OAuth credentials not provided. Make sure your API invocation call
has a
header: \”Authorization: Bearer ACCESS_TOKEN\””
}
}
The modifications are performed at the Manager node, and they will be propagated to the rest of the workers thanks to SVN (Subversion).
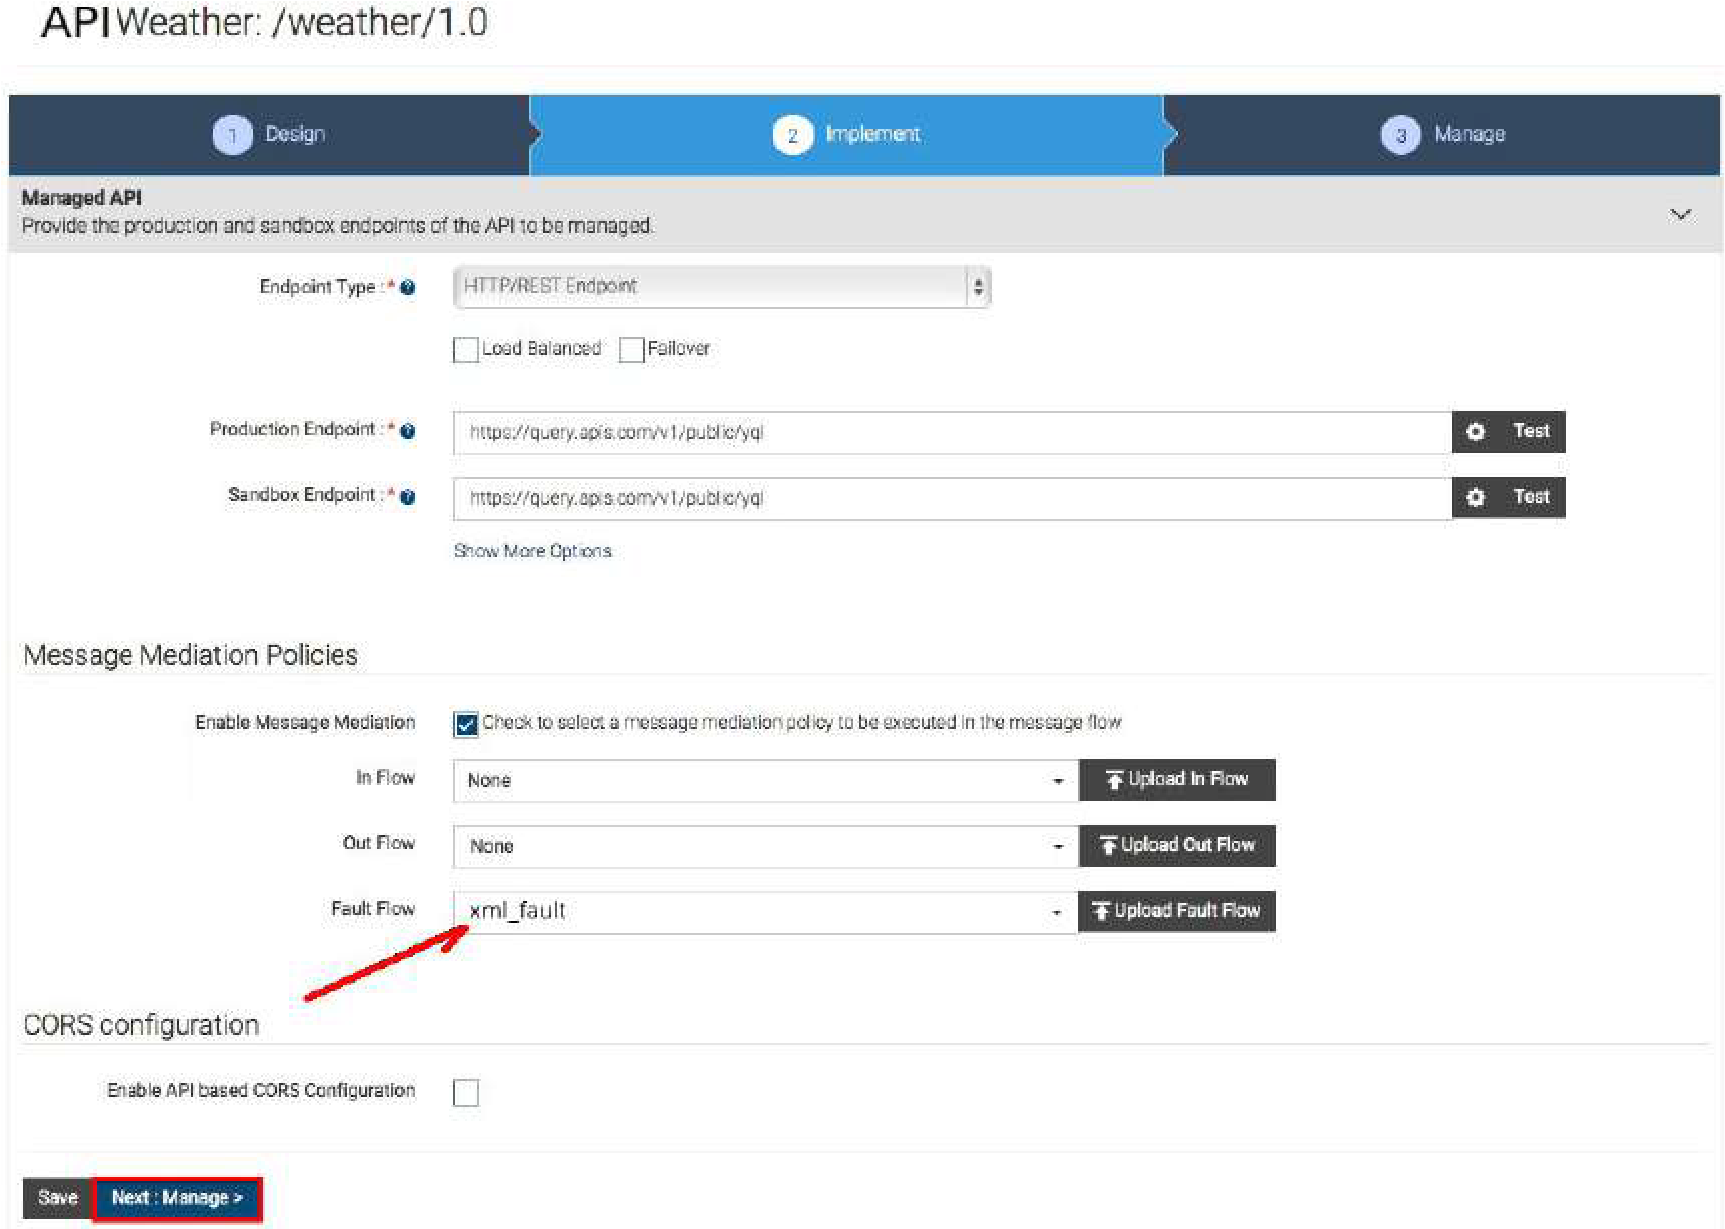
In case any other API wants to send error messages in XML, it will be necessary to create a sequence in the xml_fault file, as follows:
<AM_HOME>/repository/deployment/server/synapse-configs/default/sequences/xml_fault
<?xml version=”1.0” encoding=”ISO-8859-1”?>
<sequence xmlns=”http://ws.apache.org/ns/synapse” name=”xml_fault”>
<log level=”custom”>
<property name=”STATUS” value=”Executing custom ‘fault’ sequence”/>
<property name=”ERROR_CODE” expression=”get-property(‘ERROR_CODE’)”/>
<property name=”ERROR_MESSAGE” expression=”get-property(‘ERROR_MESSAGE’)”/>
</log>
<payloadFactory>
<format>
<am:fault xmlns:am=”http://wso2.org/apimanager”>
<am:code>$1</am:code>
<am:type>Status report</am:type>
<am:message>Runtime Error</am:message>
<am:description>$2</am:description>
</am:fault>
</format>
<args>
www.chakray.com 11
<arg expression=”$ctx:ERROR_CODE”/>
<arg expression=”$ctx:ERROR_MESSAGE”/>
</args>
</payloadFactory>
<filter xpath=”$ctx:CUSTOM_HTTP_SC”>
<then>
<property name=”HTTP_SC” expression=”$ctx:CUSTOM_HTTP_SC” scope=”axis2”/>
</then>
<else>
<property name=”HTTP_SC” value=”500” scope=”axis2”/>
</else>
</filter>
<class name=”org.wso2.carbon.apimgt.usage.publisher.APIMgtFaultHandler”/>
<property name=”RESPONSE” value=”true”/>
<header name=”To” action=”remove”/>
<property name=”NO_ENTITY_BODY” scope=”axis2” action=”remove”/>
<property name=”ContentType” scope=”axis2” action=”remove”/>
<property name=”Authorization” scope=”transport” action=”remove”/>
<property name=”Host” scope=”transport” action=”remove”/>
<property name=”Accept” scope=”transport” action=”remove”/>
<property name=”X-JWT-Assertion” scope=”transport” action=”remove”/>
<property name=”messageType” value=”application/xml” scope=”axis2”/>
<send/>
<drop/>
</sequence>
It is important to note that SVN (Subversion) does not act on this directory, which makes it necessary to manually perform this change in the manager and the workers. Lastly, the server needs to be restarted.
When creating an API or while in edit mode, the sequence to be executed when an error takes place can be selected, which means we can select xml_fault to get the error message in XML.

Development Environment
Due to the characteristics of this specific client, we opted to employ Wire-mock as an HTTP API simulator, while the development team worked on the API backend. This meant that work on developing the APIs on the API Manager and the ESB could be done in parallel.
In case the Wiremock server needed to be executed by listening to port 8081, showing the log files on-screen, the command would be: java -jar wiremock-1.57-standalone.jar –port 8081 –verbose.
Since we know the best way to understand things is by using examples, below we show you the configuration of an API in the WireMock tool:
{
“priority”: 1,
“request”: {
“method”: “GET”,
“urlPathPattern”: “/Parties/Parties/[A-Za-z0-9]*”,
“queryParameters” : {
“lang”: {
“equalTo” : “en”
},
“brand”: {
“equalTo” : “any”
}
}
},
“response”: {
“status”: 200,
“bodyFileName”: “../__files/JsonFiles/cp-Parties-en.json”,
“headers”: {
“Content-Type”: “application/json”,
“charset”: “utf-8”
}
}
}
As you can see in the code, the request sent to the mock server uses the GET method. Meanwhile, the url has to respond to the “/Parties/Parties/[A-Za-z0-9]*” pattern, and lang=en and brand=any is expected for the parameters.
The resulting response is a message or payload in json format; it is stored in the cp-Parties-en.json file.
Once this is done, if you want to test the API, you can use the url command as shown in the example below:
curl -X POST http://host-wiremock-0:8081/apiexample/1/item?lang=en
In addition to this command, another one that may come in handy for this tool’s log file would be:
tail -f /var/log/wiremock.log
If you thought you had seen it all with Wiremock, it still has many advantages in store, since it can also map the call’s url and send the payload in xml or json format directly. In this case, the backend does not exist; it is only a mock server.
Another example of an API call through the API Gateway would be:
curl --header "Accept: application/json" --header "Authorization: Bearer b642d7d1a04971badd31a97607b6dd8" "https://apigateway.com/v1/ReferenceData/ReferenceDataItems?lang=en"
The access token appears there, which will be validated in the Identity Server (IS). If correct, the call is redirected to the ESB, and from this one to the backend where it will be processed. The returned response is in json format.
Unprotected API Resource: OAuth2 Protocol
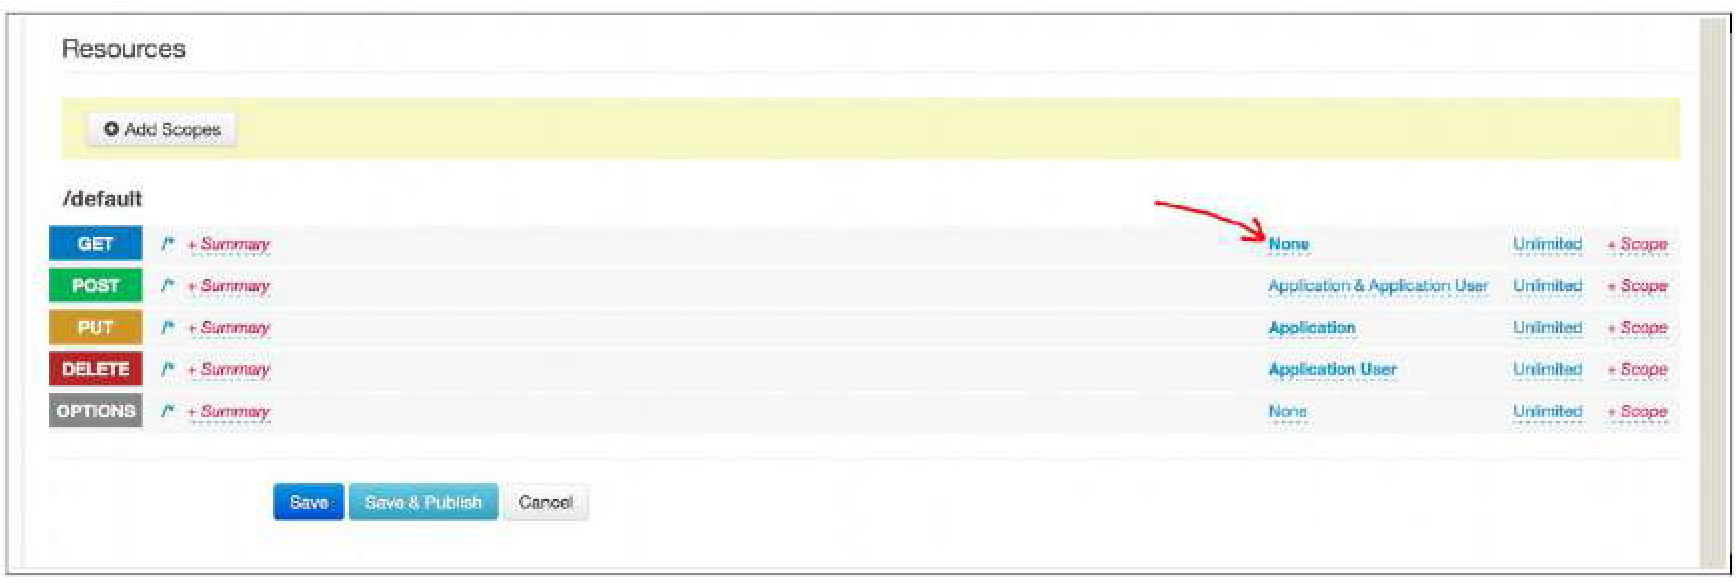
In the WSO2 implementation process, one of the resources of one of the APIs had to be unprotected to work on it, without the protection of Oauth2. The problem we stumbled upon consisted on Gigya (SAP’s Identity Server) being unable to send notification messages in response to events using this protocol.
Unprotecting a resource in the API Manager is quite simple. You just need to click on the Manager section.
The following picture shows a list of API resources. The default type of authentication is “Application & Application User”. If we select this value, a list with possible options appears, from which we need to select “None.” Since the type of authentication is now “None,” the user will be able to call the API resource without the need to use the Oauth token. Since we know the best way to understand things is by using examples, below we show you the configuration of an API in the WireMock tool:
Conclusion
Inexpensively integrating systems in different languages in a company is no longer impossible! WSO2 API Manager is the best Open Source tool to manage APIs at a corporate level.
Another one of its advantages is that it is very easy to install and use. In addition, its operation can be modified to tailor it as much as possible to the client’s needs. This is accomplished through the configuration or by using extension points as interfaces.
API management is based on roles with different permissions. If we focus specifically on this success story, we have also included the Identity Server (IS), which manages the authorization and authentication, and the WSO2 ESB, which receives the requests from the API Gateway in order to apply an extra processing to the messages, providing greater flexibility to the tool.