We’ve already been looking at how to make a microservice easily with Ballerina and Micro Gateway, which you can see again here. In it, we emphasize the importance of new technologies and the use of them to make an agile development and to allow easily the scalability. Today we will do something similar but focusing on development with the Micro Integrator.
Micro Integrator Features
The Micro Integrator is the product, based on the Enterprise Integrator that will allow us to create APIs, SOAP services or database access services. Through an architecture that allows both native and cloud oriented deployment. But above all it provides us with a really lightweight integration platform.
Below is a list of the most important features, which will help us choose the Micro Integrator as our platform for integration development, even ahead of WSO2’s own products, such as the Enterprise Integrator:
- Very low startup time.
- Minimized memory consumption.
- Immutable services, as opposed to those of the Enterprise Integrator that allow hot deployment.
- Designed for the design of lightweight integrations, and for a deployment of the integrations through containers.
- Clustering through orchestration between containers
- Kubernetes native support.
- Configuration based on TOML file.
- Use of the registry through system files.
Example of API deployment with Micro Integrator
As we did in the other post, we will make again a very simple API, but with which we can see in more detail the potential of the Micro Integrator. And above all, how can we make this deployment through containers.
We should clarify that this is a practical example and not applicable to productive environments. In case we would like to do so, we should complement the example with another tool that allows us to couple security and control over this API, such as an API Manager or a WSO2 Micro Gateway.
Development of integrations in Micro Integrator
From WSO2 it is indicated, that the tool for the development of integrations is the Integrator Studio. Which will guide us through the development through modular graphics and allow us to create new components through drag and drop.
However, we are not going to use it for this example. We will show you how to create this integration through direct file editing. And the subsequent deployment, through the execution of commands. A more practical and realistic approach.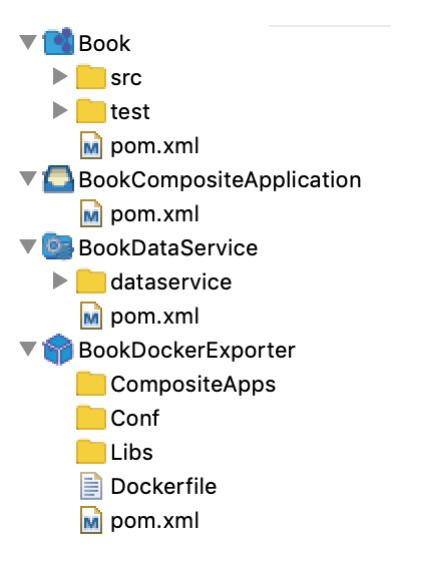
Our integration will be composed of different projects:
- Book: Contains the artifacts of integration.
- BookDataService: Contains the database access service.
- BookCompositeApplication: Contains the artifacts to be deployed from all the projects involved.
- BookDockerExporter: Includes the Dockerfile for creating containers.
We will start by creating a data service that allows access to our database. This service is identical to what we could do at the EI.
<data name="library_dataservice" transports="http https local">
    <config id="LIBRARY_DS">
        <property name="driverClassName">com.mysql.jdbc.Driver</property>
        <property name="url">jdbc:mysql://mysql-server:3306/library_db</property>
        <property name="username">root</property>
        <property name="password">root</property>
    </config>
    <query id="select_id_query" useConfig="LIBRARY_DS">
        <sql>SELECT ID, NAME, AUTHOR, PUBLICATION FROM BOOK WHERE ID = :id</sql>
        <result element="books" rowName="book">
            <element column="ID" name="ID" xsdType="integer"/>
            <element column="NAME" name="NAME" xsdType="string"/>
            <element column="AUTHOR" name="AUTHOR" xsdType="string"/>
            <element column="PUBLICATION" name="PUBLICATION" xsdType="integer"/>
        </result>
        <param name="id" sqlType="INTEGER" />
    </query>
    <resource method="GET" path="/book/{id}">
        <call-query href="select_id_query">
            <with-param name="id" query-param="id"/>
        </call-query>
    </resource>
</data>
On the other hand, we will create the microservice, which allows us to access these data. It will be a very simple API with only one resource and it will call the previous data service.
<api context="/book" name="bookAPI" xmlns="http://ws.apache.org/ns/synapse">
<resource methods="GET" uri-template="/{bookId}">
<inSequence>
<call>
<endpoint>
<http method="get" uri-template="http://localhost:8290/services/library_dataservice/book/{uri.var.bookId}" />
</http>
</endpoint>
</call>
<respond />
</inSequence>
<outSequence />
<faultSequence/>
</resource>
</api>
As in the case of the data service, if we have developed with WSO2, we can see that the integrations continue to be made in the same way. As a differentiating note, there are the ports that are used. Using the 8290 for HTTP and the 8253 for HTTPS.
Finally, we would only have to configure both artifacts in the Composite Application project. Including the dataservice and the API REST.
Creating the container with Docker
In this section we will indicate how to carry out the most innovative part of the development and especially the deployment with containers.
To do this we must configure the Dockerfile of the BookDockerExporter project. The default configuration, is quite basic and does not require much knowledge about Docker either.
On the one hand we indicate the image of the Micro Integrator on which we are going to base ourselves. And on the other hand the volumes of that image. These will allow us to indicate the libraries or configuration files that will modify the original image
FROM wso2/micro-integrator:latest
COPY BookCompositeApplication_1.0.0.car /home/wso2carbon/wso2mi/repository/deployment/server/carbonappsCOPY mysql-connector-java-8.0.16.jar /home/wso2carbon/wso2mi/lib/
Once the Dockerfile is complete, we generate the image with the following Docker command:
docker build -t chakray/book-api-mi .
Deployment and implementation
Now we only have to download the image created in the server where we want to deploy our integration. Executing a single docker command:
docker run -p 8290:8290 -p 9164:9164 chakray/book-api-mi:latest
And to invoke it, we will use the following command
http://localhost:8290/book/1
Here we have seen a small example of how easy and simple it is to create microservices with WSO2 and the new Micro Integrator. Using innovative technologies and facilitating the work of cloud deployment.