
This article outlines the usage of ActiveMQ 5 as the message broker with WSO2 Enterprise Integrator 6.6.0.
Let’s start by talking about what a Message Broker is, according to Wikipedia, A message broker is an intermediary computer program module that translates a message from the formal messaging protocol sender to a formal messaging protocol of the receiver.
Simply a message broker is a program which helps to translate, route, persist and deliver messages which are sent by a source application (producer) to a destination (consumer). It’s more like a messaging middleware. This is very useful when it comes to growing large infrastructure communication applications. There are different types of message brokers like RabbitMQ, IBM MQ, JBoss Messaging, ActiveMQ, etc.
What is ActiveMQ?
ActiveMQ is an open-source message broker provided by Apache written in Java together with a full Java Message Service (JMS) client. It provides different kinds of services for high availability, file sharing, database sharing, etc. You can refer to the link ActiveMQ Classic for information on ActiveMQ.
Configuring ActiveMQ 5 with WSO2 Enterprise Integrator 6.6.0
Let’s get started with configuring ActiveMQ 5 with WSO2 EI 6.6.0. Before moving to configurations, you will need to download the relevant software.
- Download ActiveMQ 5 package (ActiveMQ 5 Download)
- Download WSO2 EI 6.6.0 package (Integration – On-Premise and in the Cloud)
- Install Apache Ant if it is not (Apache Ant – Welcome)
Once you have downloaded the packages, extract them and place them in one folder, so it is easier when making changes to the configurations. Let’s call the AMQ folder as <AMQ_HOME> and EI folder as <EI_HOME>.
1.Copy the following jar files from <AMQ_HOME>/libs to <EI_HOME>/libs
- activemq-broker-5.8.0.jar
- activemq-client-5.8.0.jar
- activemq-kahadb-store-5.8.0.jar
- geronimo-jms_1.1_spec-1.1.1.jar
- geronimo-j2ee-management_1.1_spec-1.0.1.jar
- geronimo-jta_1.0.1B_spec-1.0.1.jar
- hawtbuf-1.9.jar
- slf4j-api-1.6.6.jar
- activeio-core-3.1.4.jar (available in the <ACTIVEMQ_HOME>/lib/optional directory)
2.Now you need to enable the JMS transport listener. To enable, open the axis.xml file in the <EI_HOME>/conf/axis2 directory and uncomment the following configuration.
<!--Uncomment this and configure as appropriate for JMS transport support, after setting up your JMS environment (e.g. ActiveMQ)-->
<transportReceiver name="jms" class="org.apache.axis2.transport.jms.JMSListener">
      <parameter name="myTopicConnectionFactory" locked="false">
          <parameter name="java.naming.factory.initial" locked="false">org.apache.activemq.jndi.ActiveMQInitialContextFactory</parameter>
          <parameter name="java.naming.provider.url" locked="false">tcp://localhost:61616</parameter>
          <parameter name="transport.jms.ConnectionFactoryJNDIName" locked="false">TopicConnectionFactory</parameter>
            <parameter name="transport.jms.ConnectionFactoryType" locked="false">topic</parameter>
      </parameter>

      <parameter name="myQueueConnectionFactory" locked="false">
          <parameter name="java.naming.factory.initial" locked="false">org.apache.activemq.jndi.ActiveMQInitialContextFactory</parameter>
          <parameter name="java.naming.provider.url" locked="false">tcp://localhost:61616</parameter>
          <parameter name="transport.jms.ConnectionFactoryJNDIName" locked="false">QueueConnectionFactory</parameter>
            <parameter name="transport.jms.ConnectionFactoryType" locked="false">queue</parameter>
      </parameter>

      <parameter name="default" locked="false">
          <parameter name="java.naming.factory.initial" locked="false">org.apache.activemq.jndi.ActiveMQInitialContextFactory</parameter>
          <parameter name="java.naming.provider.url" locked="false">tcp://localhost:61616</parameter>
          <parameter name="transport.jms.ConnectionFactoryJNDIName" locked="false">QueueConnectionFactory</parameter>
            <parameter name="transport.jms.ConnectionFactoryType" locked="false">queue</parameter>
      </parameter>
  </transportReceiver>
3.Next enable the JMS transport sender. To do this, uncomment the below configuration in the same file mentioned above.
<transportSender name="jms" class="org.apache.axis2.transport.jms.JMSSender"/>
Now all the configurations are complete.
4.Open a new terminal and redirect to <AMQ_HOME>/bin and execute ./activemq start.
You can check for the AMQ logs from <AMQ_HOME>/data/activemq.log file. Open a terminal and execute command; tail -f <AMQ_HOME>/data/activemq.log.
5.Finally, open a terminal and start the EI server. sh <EI_HOME>/bin/integrator.sh
You can log into AMQ console http://localhost:8161/ using admin as the username and password.
Confirming the connectivity between ActiveMQ 5 and WSO2 EI 6.6.0
I will demonstrate a simple use case scenario, where;
- The client sends requests to a proxy service.
- The proxy service stores the messages to a JMS message store.
- The back-end service is invoked by a message forwarding processor, which picks stored messages in the JMS message store.

Configuring the Broker Service
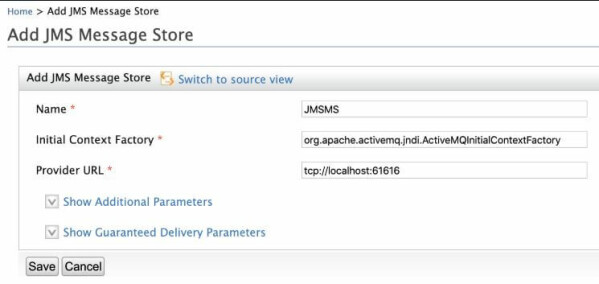
Create a sample JMS Message Store in WSO2 EI. Login to the WSO2 EI management console, under the main tab, service bus → Message store → Add Message Stores → Add JMS Message Store. Provide the below configurations and click save. JMS Message Stores are also used to implement a store and forward pattern that has QoS parameters like in-order delivery and reliability.
- Name: JMSMS
- Initial Context Factory: org.apache.activemq.jndi.ActiveMQInitialContextFactory
- URL: tcp://localhost:61616
Configuring the Backend Service
- Deploy the SimpleStockQuoteService client. For this task, open a new terminal and navigate to <EI_HOME>/samples/axis2Server/src/SimpleStockQuoteService. Then run the command ant. This will build the sample and deploy the service for you.
- WSO2 EI comes with a default Axis2 server, which you can use as the back-end service for this sample. To start the Axis2 server, navigate to <EI_HOME>/samples/axis2server and run axis2Server.sh (on Linux) or axis2Server.bat (on Windows).
- To verify that the service is running, point your browser to http://localhost:9000/services/SimpleStockQuoteService?wsdl
Configuring the ESB
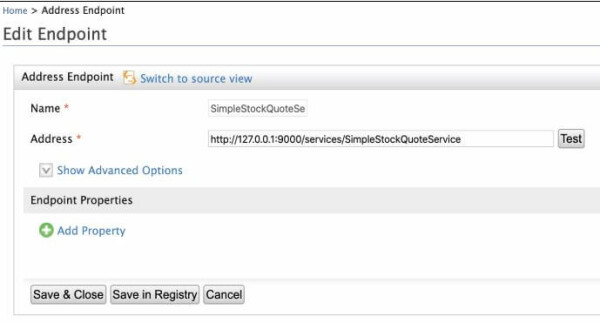
1.Create an HTTP endpoint. To do this, under the main tab, service bus → Endpoints → Add Endpoints → HTTP Endpoint. Provide the configurations mentioned below and click save & close.
- Name: SimpleStockQuoteService
- URI Template: http://127.0.0.1:9000/services/SimpleStockQuoteService
2. Create a proxy service which stores messages to the created Message Store. Now create a proxy to store the messages. To do this, under the main tab, Add → Proxy service → Custom proxy. Switch to the source view and add the configurations below.
<proxy name="Proxy1" xmlns="http://ws.apache.org/ns/synapse" transports="https http" startOnLoad="true" trace="disable">
  <target>
    <inSequence>
        <property name="FORCE_SC_ACCEPTED" value="true" scope="axis2"/>
        <property name="OUT_ONLY" value="true"/>
        <property name="target.endpoint" value="SimpleStockQuoteService"/>
        <log level="full"/>
        <store messageStore="JMSMS"/>
    </inSequence>
  </target>
</proxy>
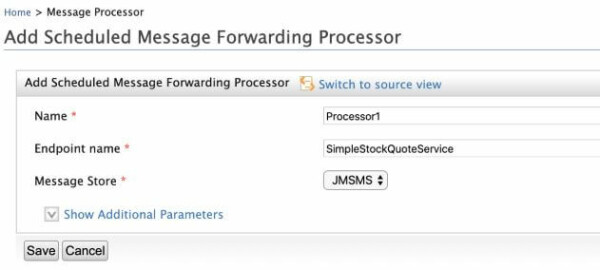
3.Create a message forwarding processor using the configuration below . Message forwarding processor consumes the messages stored in the message store.
- Name: Processor1
- Endpoint name: SimpleStockQuoteService
- Message Store: JMSMS
Executing the Sample
To invoke the proxy service, we use the sample axis2 client shipped with EI. Navigate to the <EI_HOME>/samples/axis2client directory, and execute the following command to invoke the proxy service.
| ant stockquote -Daddurl=http://localhost:8280/services/Proxy1 -Dmode=placeorder |
You will see a log message in the EI server similar to the following log.
INFO {org.apache.synapse.mediators.builtin.LogMediator} - To: http://localhost:8280/services/Proxy1, WSAction: urn:placeOrder, SOAPAction: urn:placeOrder, ReplyTo: http://www.w3.org/2005/08/addressing/none, MessageID: urn:uuid:89efc045-08a2-4689-a5ab-bffba6423bcc, Direction: request, Envelope:

<?xml version='1.0' encoding='utf-8'?>
<soapenv:Envelope xmlns:soapenv="http://schemas.xmlsoap.org/soap/envelope/">
<soapenv:Header xmlns:wsa="http://www.w3.org/2005/08/addressing">
<wsa:To>http://localhost:8280/services/Proxy1</wsa:To>
<wsa:ReplyTo>
<wsa:Address>http://www.w3.org/2005/08/addressing/none</wsa:Address>
</wsa:ReplyTo>
<wsa:MessageID>urn:uuid:89efc045-08a2-4689-a5ab-bffba6423bcc</wsa:MessageID>
<wsa:Action>urn:placeOrder</wsa:Action>
</soapenv:Header>
<soapenv:Body>
<m0:placeOrder xmlns:m0="http://services.samples">
<m0:order>
<m0:price>149.31226495996034</m0:price>
<m0:quantity>18816</m0:quantity>
<m0:symbol>IBM</m0:symbol>
</m0:order>
</m0:placeOrder>
</soapenv:Body>
</soapenv:Envelope>
And a log message in Axis2 server similar to the following message.
samples.services.SimpleStockQuoteService :: Accepted order #1 for : 18816 stocks of IBM at $ 149.31226495996034
If you log into the AMQ server, you will see the JMSMS queue under the tab queue.

This is how to use ActiveMQ 5 as the message broker with WSO2 EI 6.6.0. In a nutshell, we configured ActiveMQ with WSO2 Enterprise Integrator. Then to verify the connectivity between the servers, we created a JMS message store, and then we deployed the back-end service. Next, we defined an endpoint to send messages to the back-end service and a proxy to store messages to the created Message Store. Then the final step was creating a message forwarding processor to consume the messages stored in the message store. Finally invoking the proxy service.