
Welcome to another chapter of the ESB section! In this post we are going to detail a catalog of examples of Synapse with WSO2 ESB.
1.Introduction
In this instalment, we will start by analyzing the examples that come from Synapse, which are the same that appear in WSO2’s online documentation. All examples are categorized:
- Message Mediation.
- Endpoints.
- Addition and removal of Quality of Service with Message Mediation.
- Proxy Services.
- Addition and removal of Quality of Service with Proxy Services.
- Transports.
- Scheduled Tasks.
- Advanced Mediators.
- Events.
- Synapse configuration model.
- Priority-based mediation.
- Message storing and message processors.
- Templates.
- Rest API
- Synapse’s EIP library.
Within each category, there is a wide array of examples that we will closely analyze in this post.
2.Message Mediation
-
Introduction to Synapse (Example 0).
In this basic example, Synapse is configured to log messages that go through this middleware. The following diagram outlines what is performed: [Diagram-1]
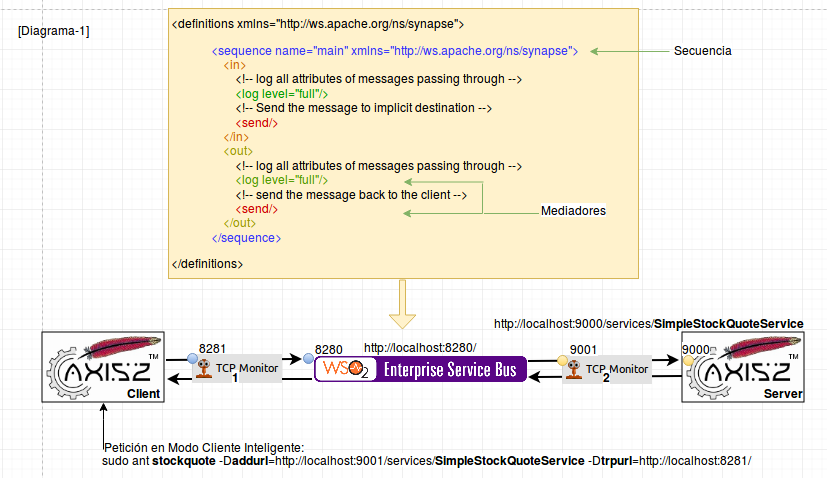
A message is sent from the Axis2 client that heads to the ESB, and from here to Axis2 Server, where it is processed and a response is forwarded. In the sequence there are two main mediators: one is the IN mediator, for processing requests, and the other one is the OUT mediator, to process responses that arrive from the backend. All of this takes place within the same thread so that the variables we add to the input mediator are available in the output mediator.
Another important mediator is SEND, which is used to send the message to its destination, which is the Backend or the Client. The LOG mediator displays the message in the console based on the log4java configuration that we have set up in the ESB.
The sequence may be written using the ESB editor, but as good practices dictate, it is always better to use the development WSO2 environment, or in other words, WSO2 Developer Studio.
WSO2 Developer Studio
In the following link you will be able to download the development environment:
https://wso2.com/products/developer-studio/
You will then be shown a screen that looks like this:
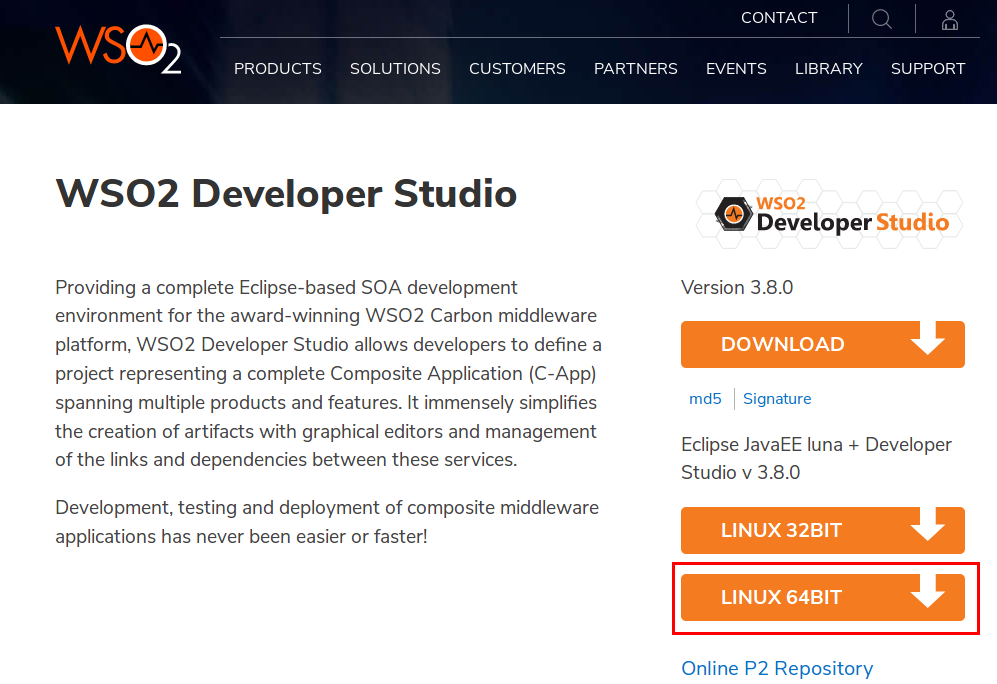
In our case, since we use Ubuntu, we will select LINUX 64BIT, as shown in the highlighted red square.
Next, you download a zip file:
developer-studio-eclipse-jee-luna-linux-gtk-x86_64-3.8.0.zip
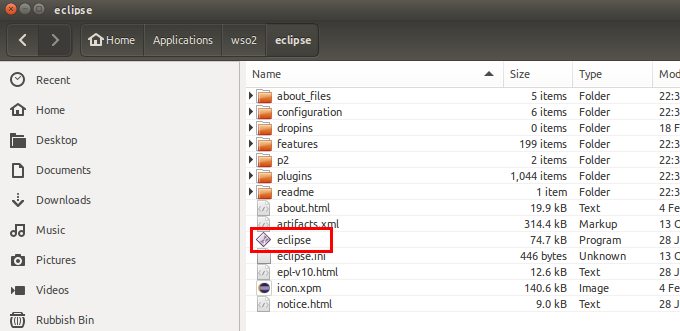
Decompress it into a folder, and inside it, double-click on the file titled “eclipse”.
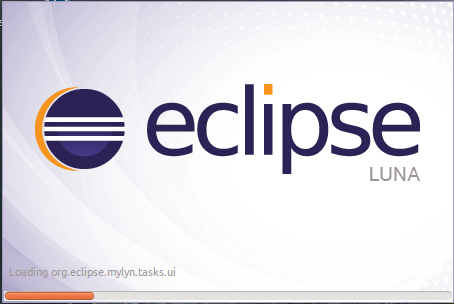
Load Eclipse:
After that, the Eclipse workspace needs to be selected, which is the location where our projects will be stored.
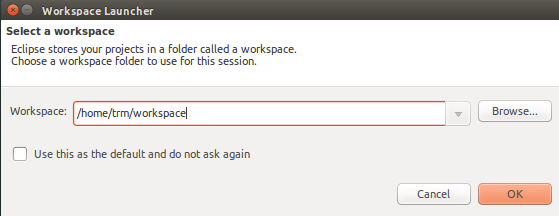
Press OK.
The Eclipse development environment then opens with the required plugins for developing on WSO2’s Carbon platform.
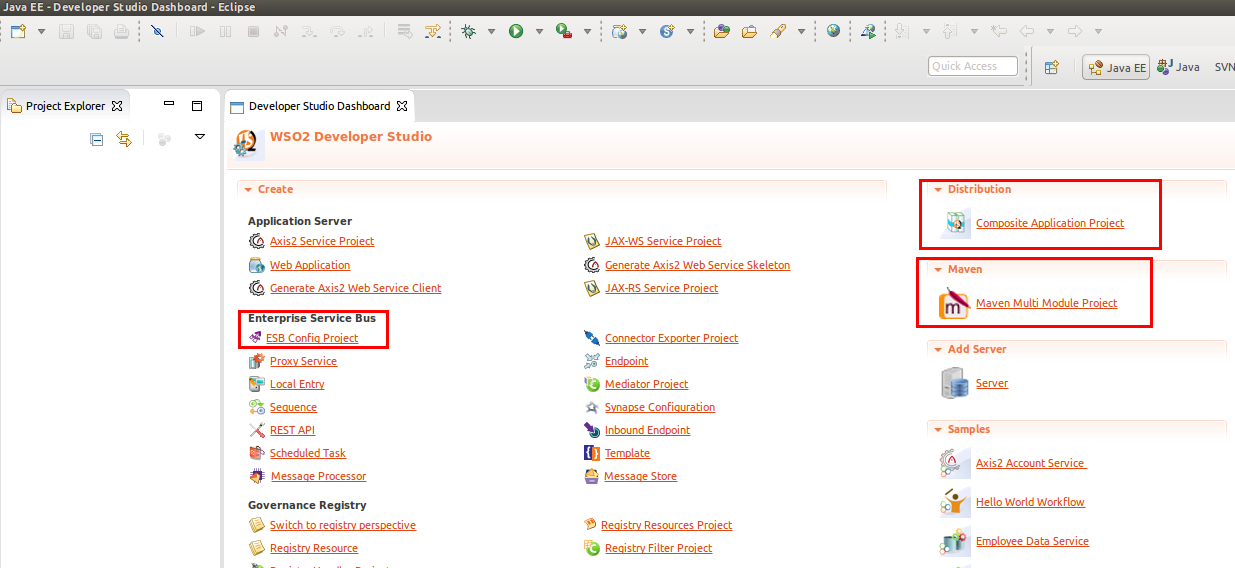
As you can see on the screen, the project types we will use are:
Maven Multi Module Project: This is a Maven project that contains all other projects as if they were modules of the main project.
ESB Config Project: This project is used for writing the ESB’s configuration.
Composite Application Project: This is the project that generates a CAR file, which will be used to deploy the sequences on the ESB server.
In order to do this, we first generate a Multi-Module project:
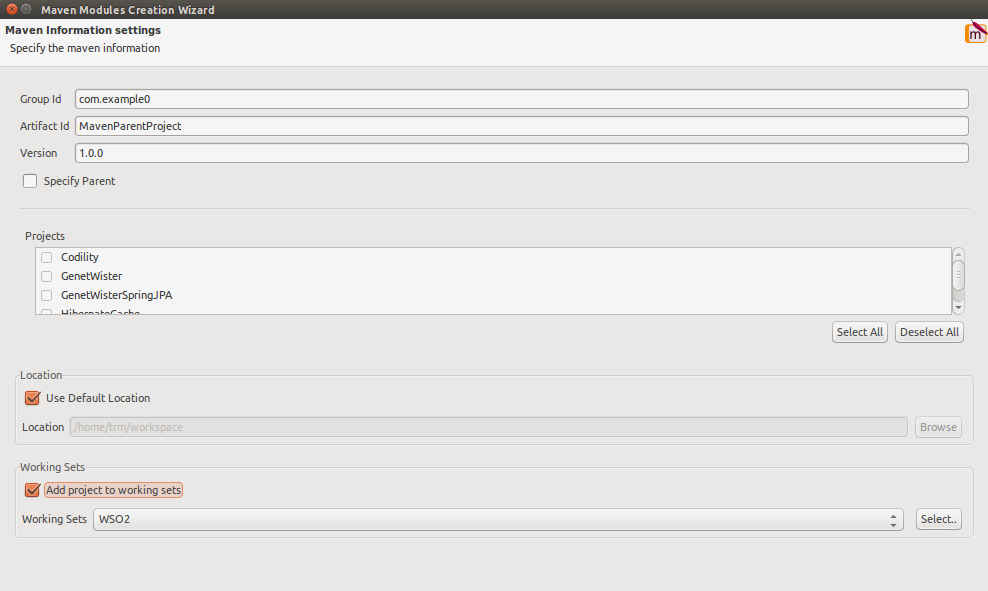
Where the Group Id, the Artifact Id and the Project’s Version is specified. Just like in every Maven project. Press Finish.
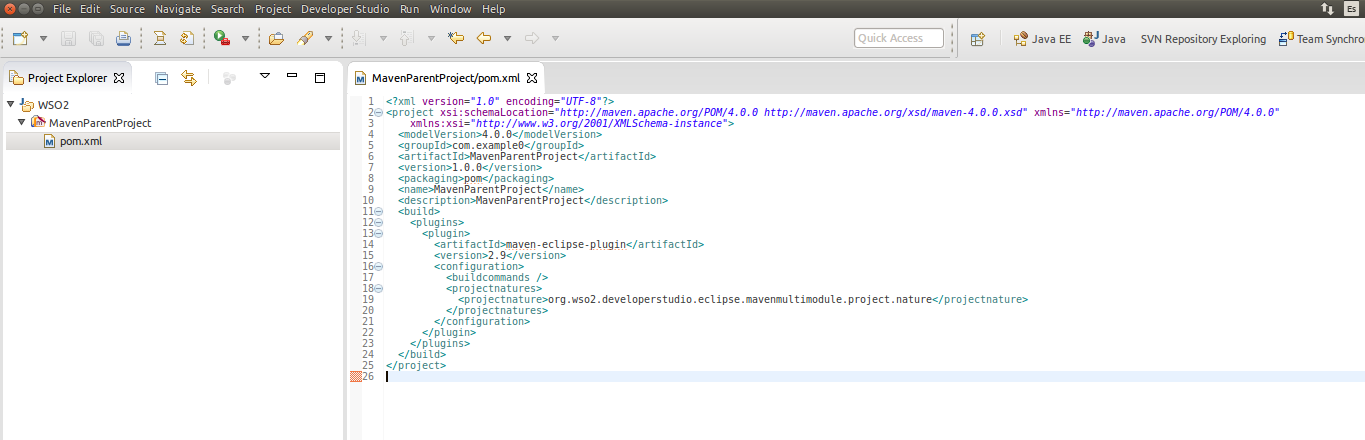
The Multi-Module project has been created with its associated POM file. Within this project, create the ESB project. Select the Multi-Module project, right click and create the ESB Config project.
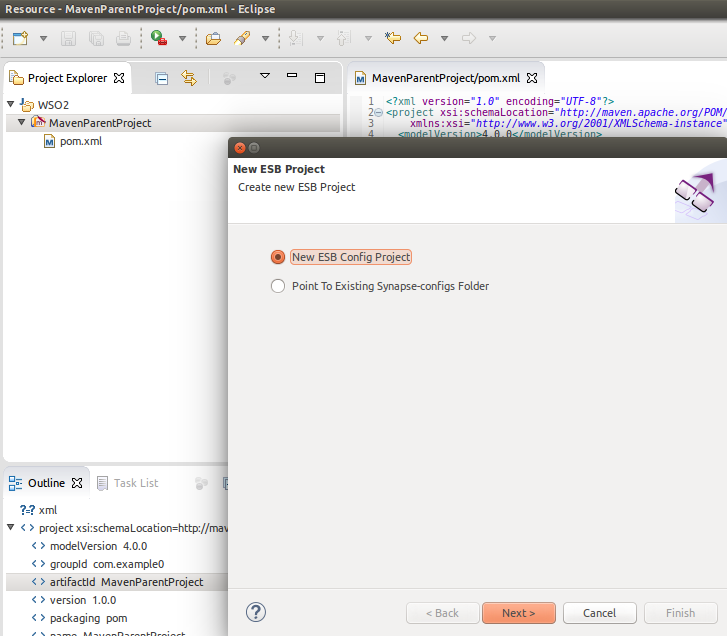
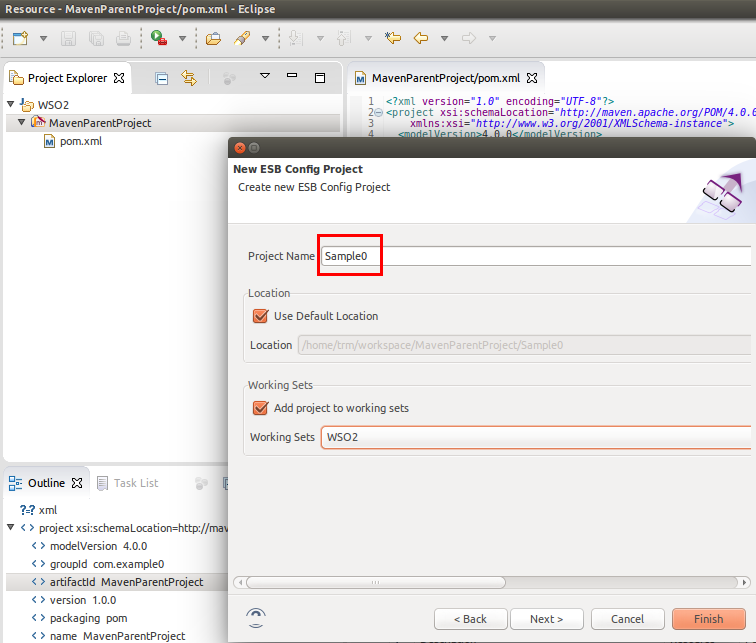
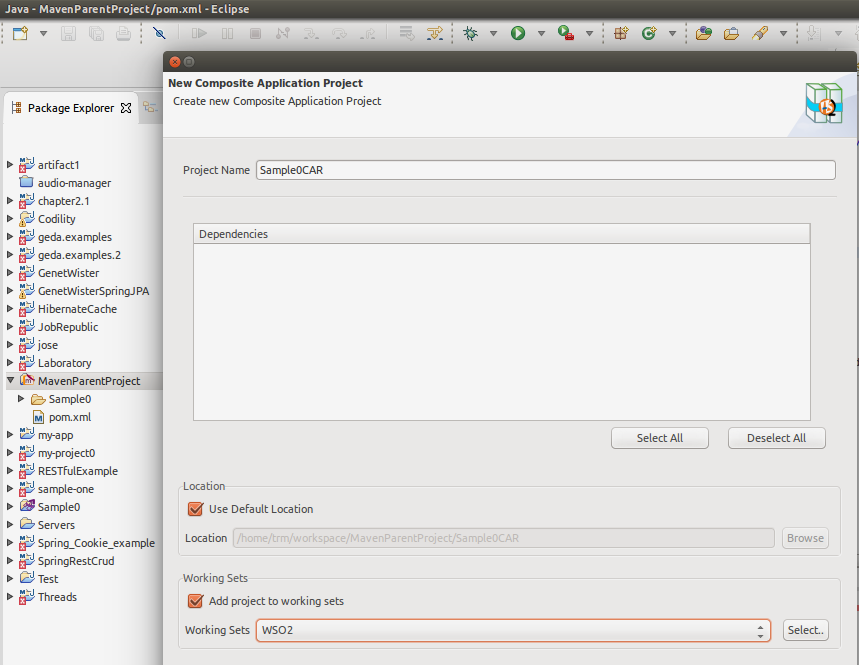
Press Next. The project’s name is Sample0.
-Before you continue, discover this useful ebook:-
This ESB Config project is created inside the Multi-Module project.
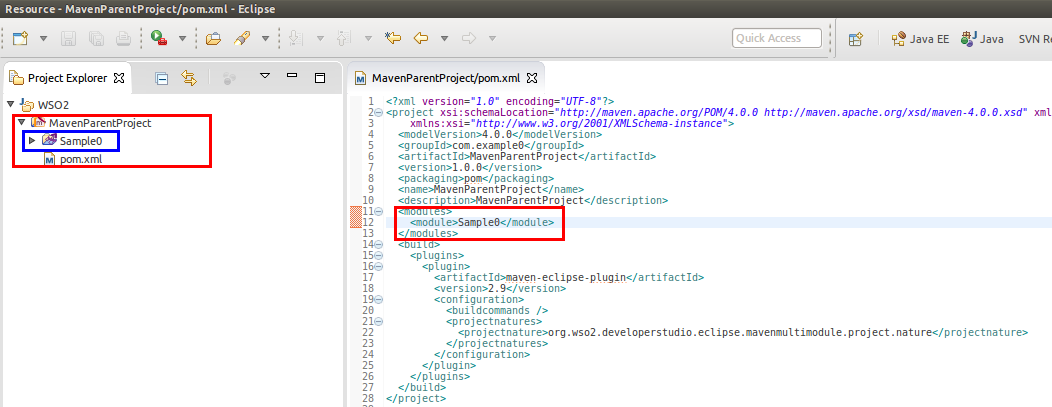
As you can see, in the blue square you can find the ESB configuration project. In the Multi-Module Project’s POM file you can find the new Sample0 module (red square).
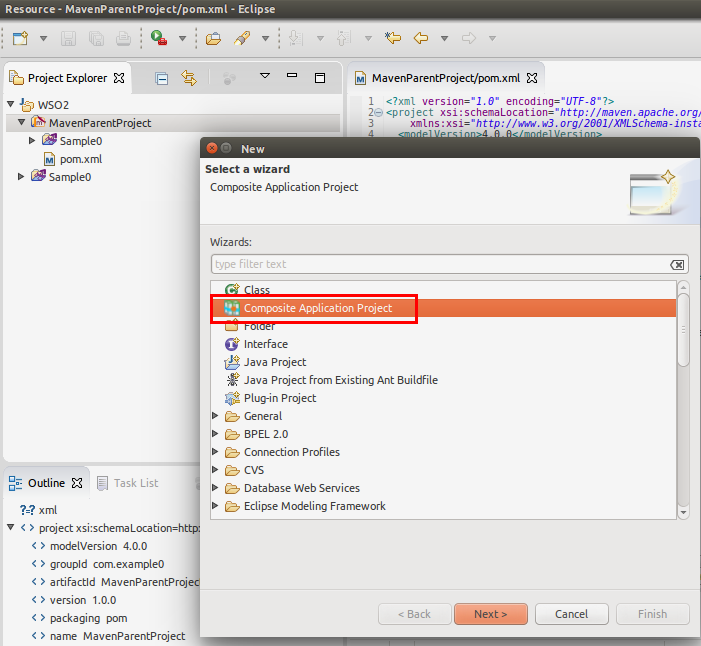
The next project that we need to create within the Multi-Module project is the Composite Application Project, where the CAR file, along with all of the ESB’s configuration, will be generated.
This is the file that is imported in WSO2ESB to generate the sequence. Are you with us so far?
Now, select ‘Next’. The name of the project is Sample0CAR. Press Next.
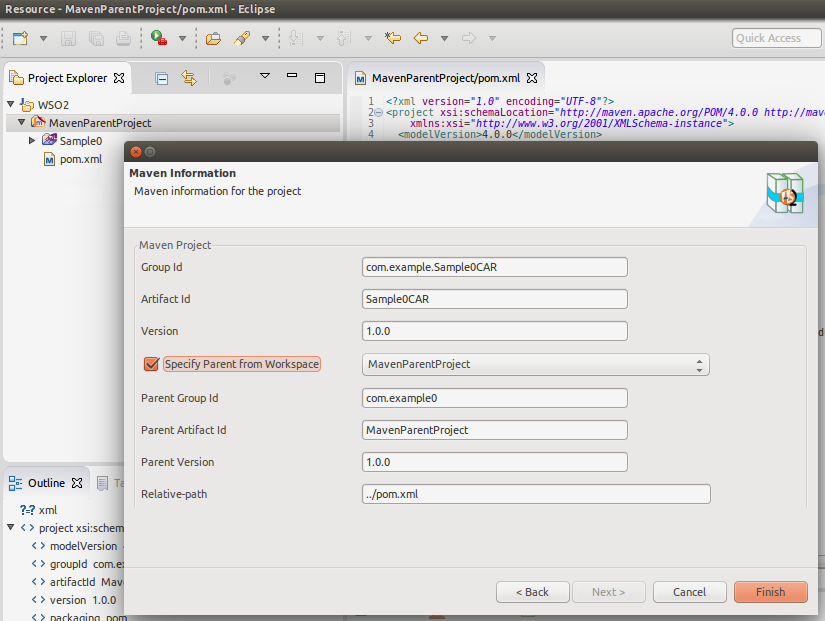
As with the ESB Config project, select the Multi Module Project as the “parent” project and press Finish.
Now, in the Multi-Module project, add the new Composite Application Project module. The resulting structure would be as follows:
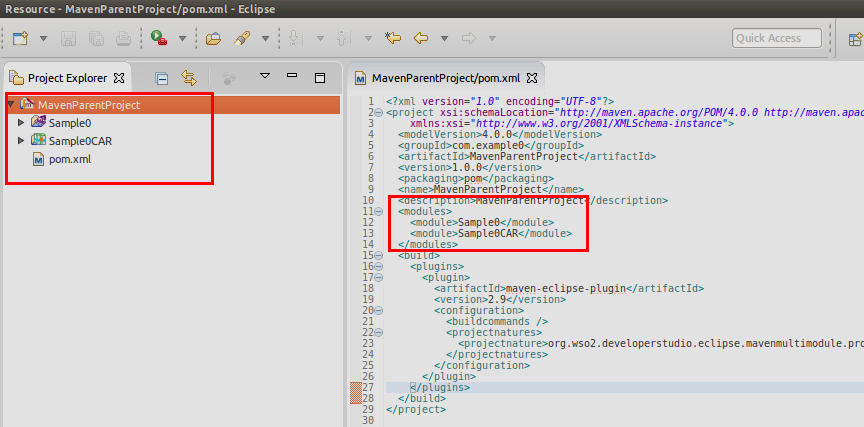
To the left, you can find the hierarchical structure of the MultiModule project, and to the right the two modules that were added: the ESB module and the CAR project module.
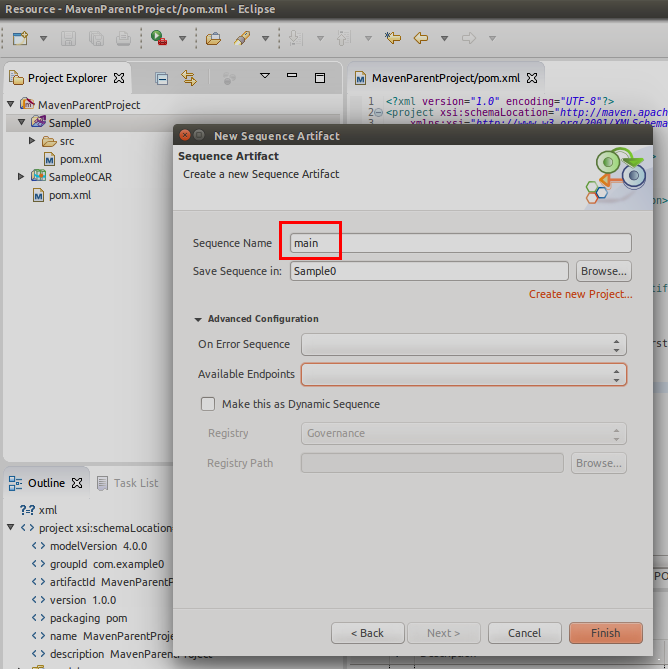
Now, select the Sample0 project, the ESB Configuration project by right-clicking and selecting: New→Sequence.
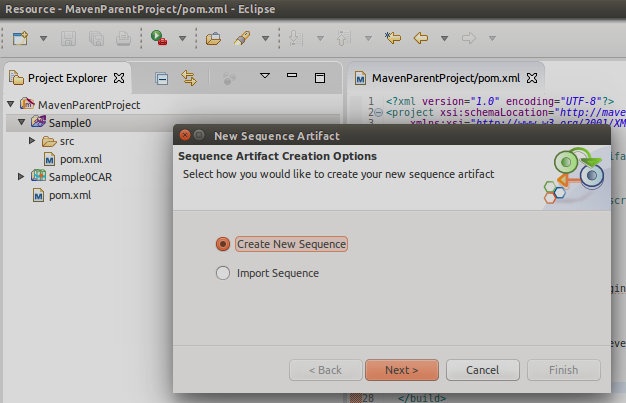
Press Next. The name of the sequence is main. Then, press Finish.
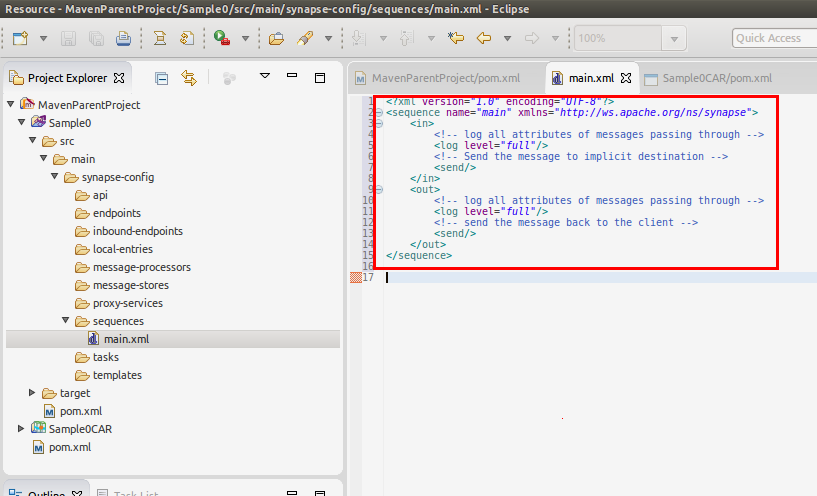
The next step is copying the following sequence into the main.xml file:
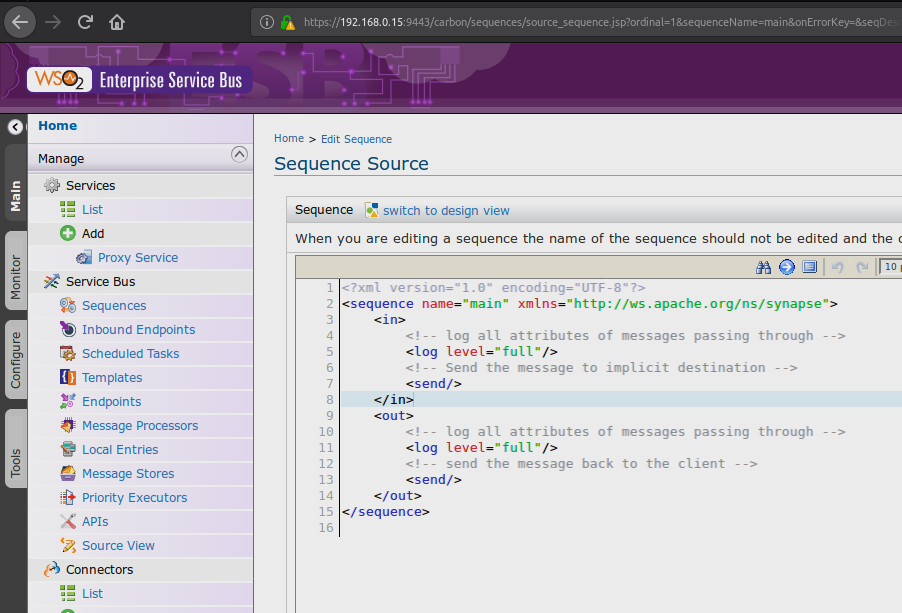
<?xml version="1.0" encoding="UTF-8"?>
<sequence name="main" xmlns="http://ws.apache.org/ns/synapse">
   <in>
       <!-- log all attributes of messages passing through -->
       <log level="full"/>
       <!-- Send the message to implicit destination -->
       <send/>
   </in>
   <out>
       <!-- log all attributes of messages passing through -->
       <log level="full"/>
       <!-- send the message back to the client -->
       <send/>
   </out>
</sequence>
The final result would be:
-Achieve the digital transformation of your company with the experts of WSO2!-
Now, select the pom.xml file within the Sample0CAR project. Select the Sample0 artifact, which is the ESB sequence, and save.

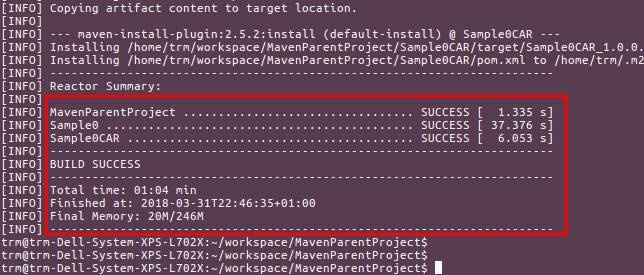
Now, in the command line, compile the Multi-Module project with Maven.

If everything has successfully compiled, the ‘BUILD SUCCESS’ message will be displayed, as shown in the following image.
The CAR file has now been generated in the target folder:
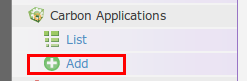
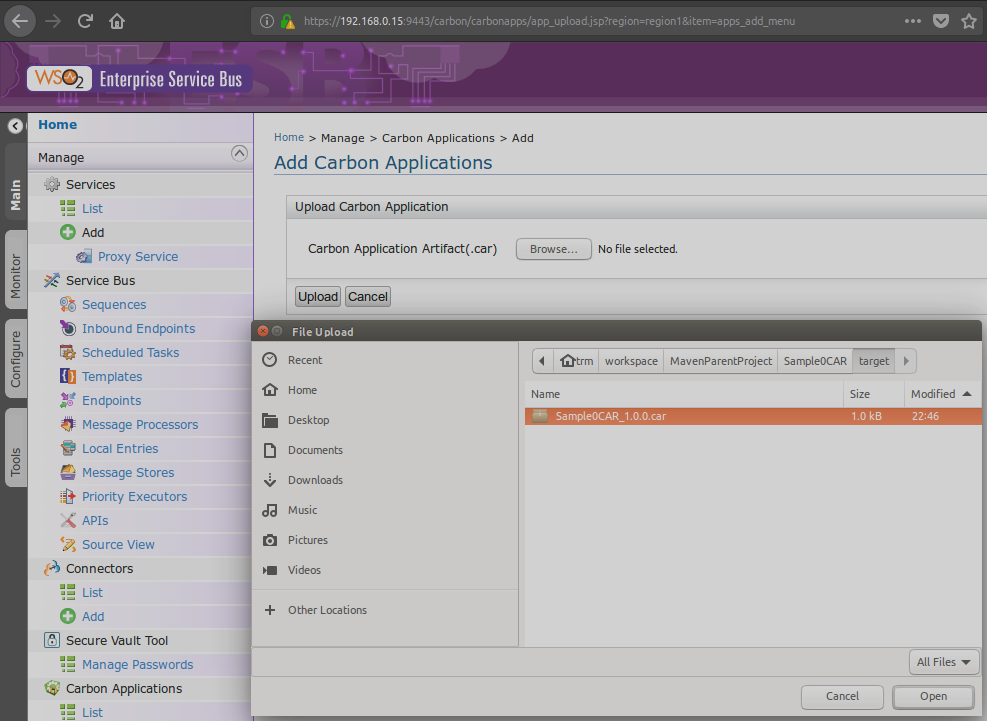
Import this file into WSO2ESB. In order to do this, execute the ESB: ./wso2server.sh Afterward, select Add in the Carbon Applications menu.
Now, select the generated CAR file:
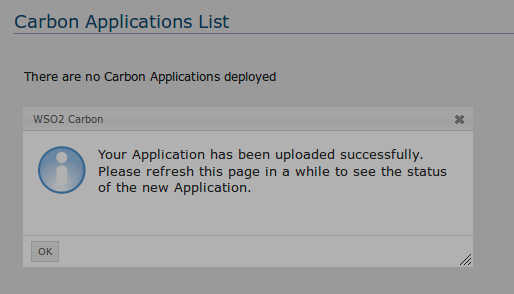
If the steps were properly followed, WSO2ESB will show us a message congratulating us for it, as follows:
Via the command console, we can also see the ESB’s output log. It shows the result of the deployment of the CAR file in the ESB.

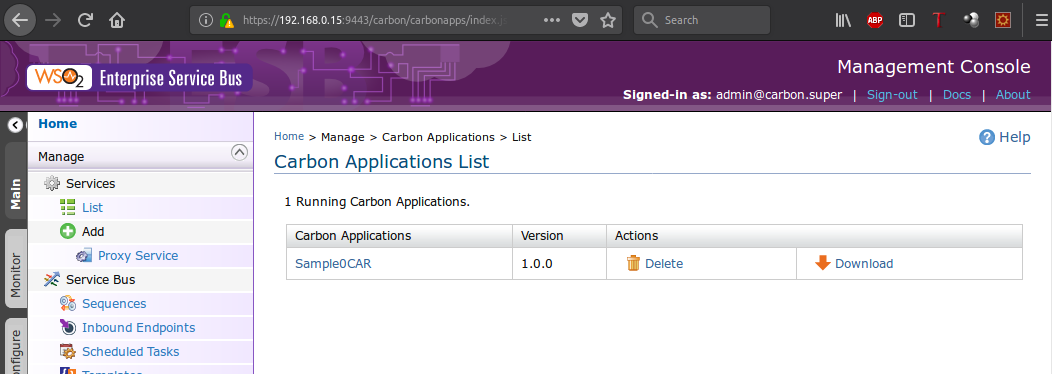
In the ESB, the sequence shows in the Carbon application list.
If you want to see the expanded sequence, go to: Service Bus→ Sequences → Edit and that’s it!
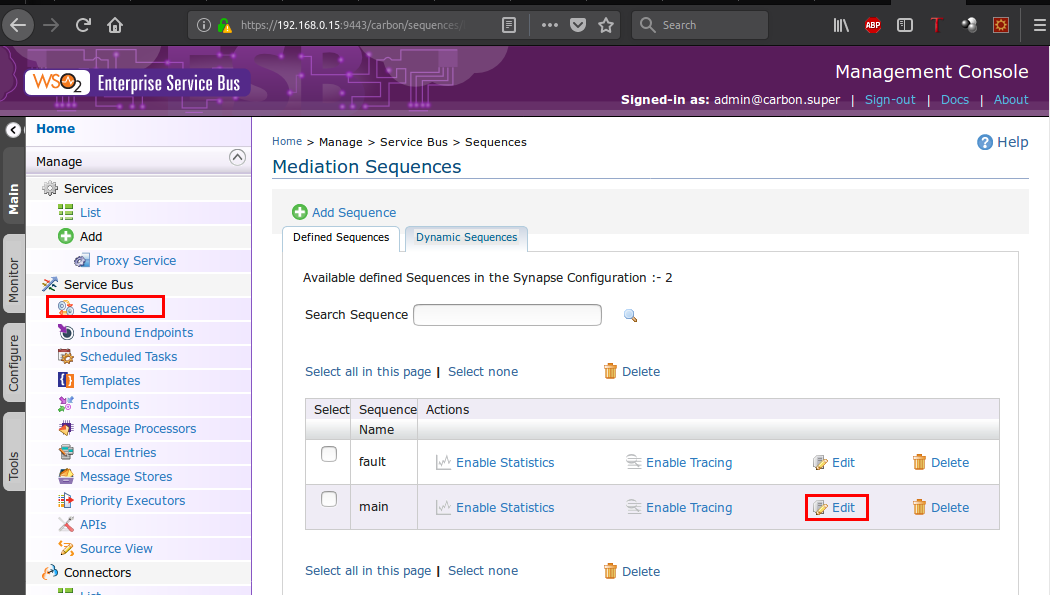
If you click on the Switch to Source link, you will see the sequence:
Testing the sequence.
In order to test the sequence, send a request from Axis2 Client to Axis2 server via the ESB. To accomplish this, first you need to run the Axis2 or backend server:
/wso2esb-4.9.0/samples/axis2Server$ sudo ./axis2server.sh
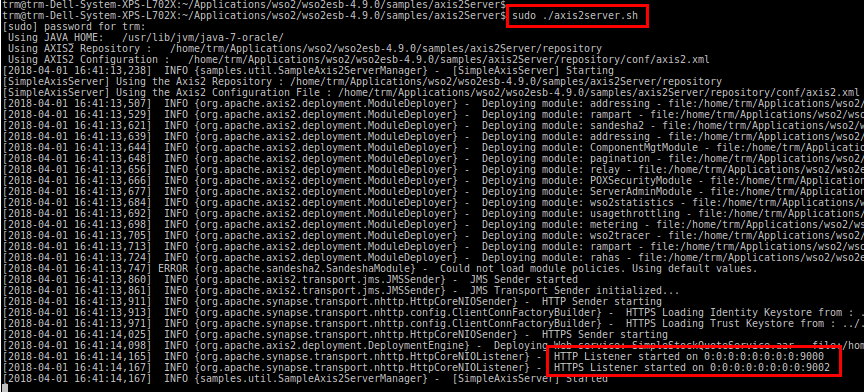
As can be seen in the image, Axis2Server uses two ports to receive requests: HTTP 9000 and HTTPS 9002.
-A short break: Is your company ready for GDPR? –
Now use the client to send the request. You can find the client in the following directory:
/wso2esb-4.9.0/samples/axis2Client
The client
The client that we will use is stock quote
Create and send a stock quote request. It can be executed in the ‘smart client’, ‘proxy’ and ‘gateway’ modes by specifying the WSA, transport and endpoints / HTTP proxy URL.
Optionally, a (security) policy could be applied to the requests. The required stock symbol and operation can be specified in the following way:
Examples:
1) ant stock quote
2) ant stock quote [-Dsymbol=IBM|MSFT|SUN|..]
[-Dmode=quote | custom quote | full quote | place order | marketactivity]
[-Daddurl=http://localhost:9000/soap/SimpleStockQuoteService]
[-Dtrpurl=http://localhost:8280]
[-Dprxurl=http://localhost:8280]
[-Drest=true]
[-Dwsrm=true]
[-Dpolicy=../../repository/samples/resources/policy/policy_1.xml]
Modes:
quote – send a quote request for a single stock
custom quote – sends a quote request for in a custom format
full quote – obtain quotation reports for a period (e.g., 365 days of the year)
placeholder – places an order for stock via a one-way request
market activity – obtain a market activity report.
The service
The service we will use is SimpleStockQuoteService
This service has four operations: getQuote (in-out), getFullQuote (in-out), getMarketActivity (in-out) and placeOrder (in-only). The getQuote operation will generate a sample stock quotation for a given symbol. The getFullQuote operation will generate a stock quotation history for the symbol across several days, and the getMarketActivity operation returns stock quotations for a given list of symbols. The placeOrder operation will take a one-way message for a request.
Smart client mode request
sudo ant stock quote -Daddurl=http://localhost:9000/services/SimpleStockQuoteService -Dtrpurl=http://localhost:8280/
addurl: This property indicates the endpoint that the request is sent to (WS-Addressing EPR).
Trpurl: Transport URL, in this case, it is the ESB, as a mediator of the request.
Eclipse’s TCP Monitor
Before sending the request, we will configure Eclipse’s TCP Monitor so as to display the messages between the Client and the ESB, and between the ESB and the Backend. To configure it, there is a tab in Eclipse titled TCP Monitor. Here we configure those two sniffers just like we did in the previous chapter.
Now we need to slightly modify the call to use the ports used by the Sniffer for listening.
sudo ant stock quote -Daddurl=http://localhost:9001/services/SimpleStockQuoteService -Dtrpurl=http://localhost:8281/
The client’s log output shows that the request was successful since we get a response from the server.
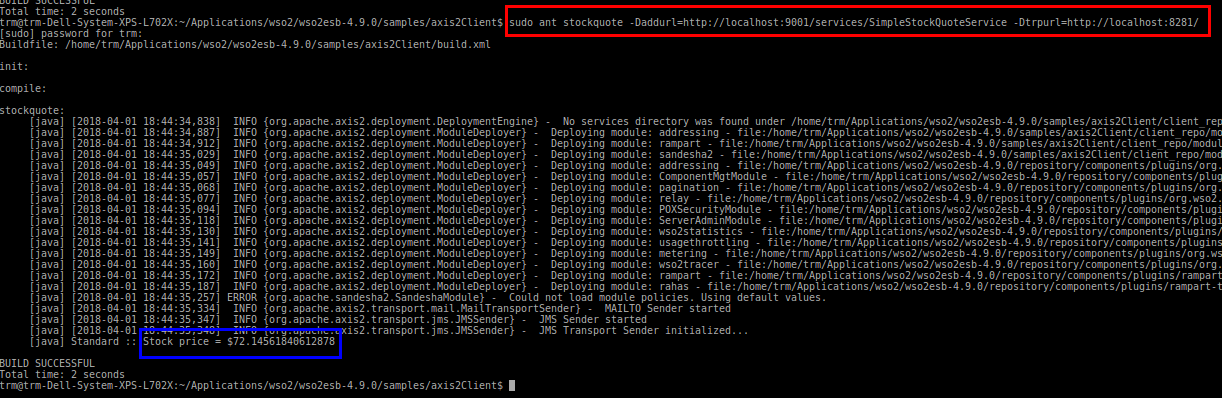
Stock price = $72.14561840612878
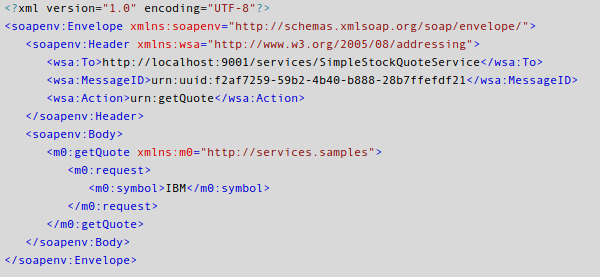
The SOA request received by the first Sniffer between the Client and the ESB is:
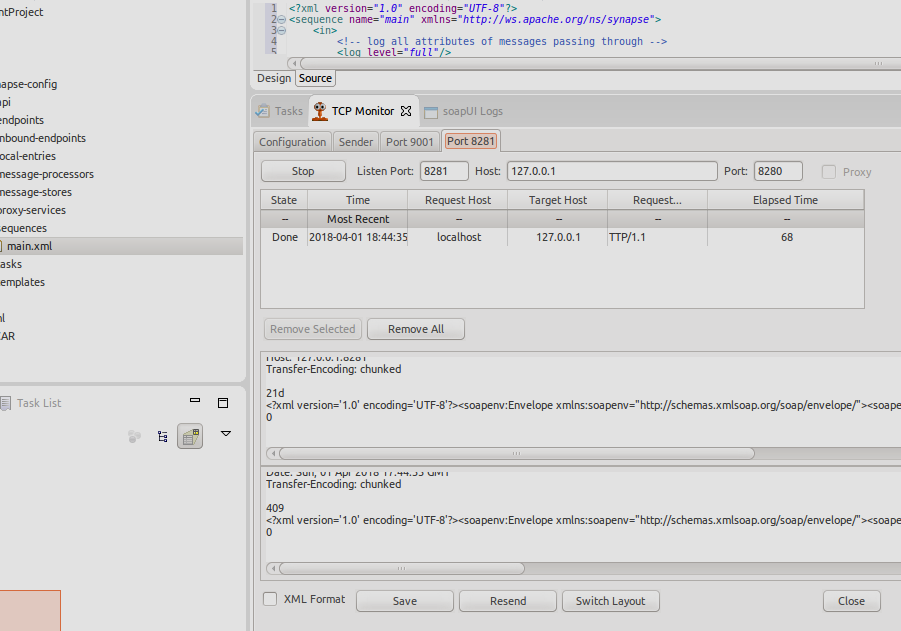
In the previous image, you can see the configuration of Eclipse’s TCP Monitor and the request and reply in XML. Next, the message picked up by the first Sniffer appears.
POST / HTTP/1.1
Content-Type: text/xml; charset=UTF-8
SOAPAction: “urn:getQuote”
User-Agent: Axis2
Host: 127.0.0.1:8281
Transfer-Encoding: chunked
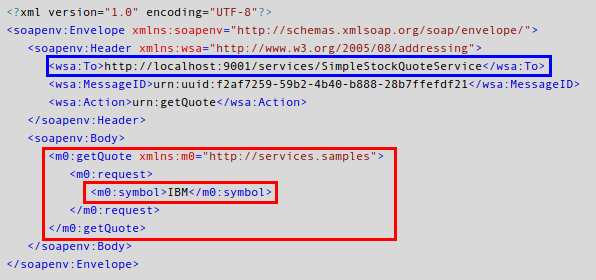
The method or action being called is getQuote. This will generate a sample stock quote for the IBM symbol. The message’s final destination address is under wsa:To.
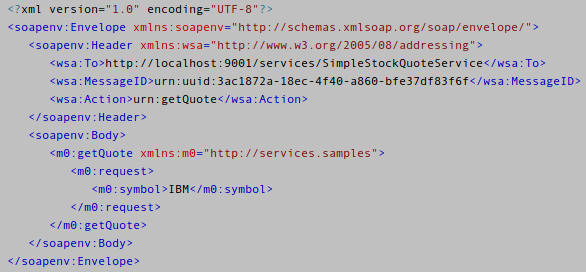
Below you can see the logs generated by the mediator in the ESB:
As you can see, the message is identical. The difference lies in the new message headers added by Synapse.
To, indicates the message’s destination.
MessageID, as the message identifier.
Direction, indicates whether the message is a request or a response.
INFO – LogMediator
To: http://localhost:9001/services/SimpleStockQuoteService,
WSAction: urn:getQuote,
SOAPAction: urn:getQuote,
ReplyTo: http://www.w3.org/2005/08/addressing/anonymous,
MessageID: urn:uuid:f2af7259-59b2-4b40-b888-28b7ffefdf21,
Direction: request,
Envelope:
This is the request message captured by the second sniffer. It is the message that is sent by the ESB:
POST /services/SimpleStockQuoteService HTTP/1.1
Content-Type: text/xml; charset=UTF-8
SOAPAction: “urn:getQuote”
Transfer-Encoding: chunked
Host: 127.0.0.1:9001
Connection: Keep-Alive
User-Agent: Synapse-PT-HttpComponents-NIO
This message arrives at the SimpleStockQuoteService service and generates a log message in the console.
![]()
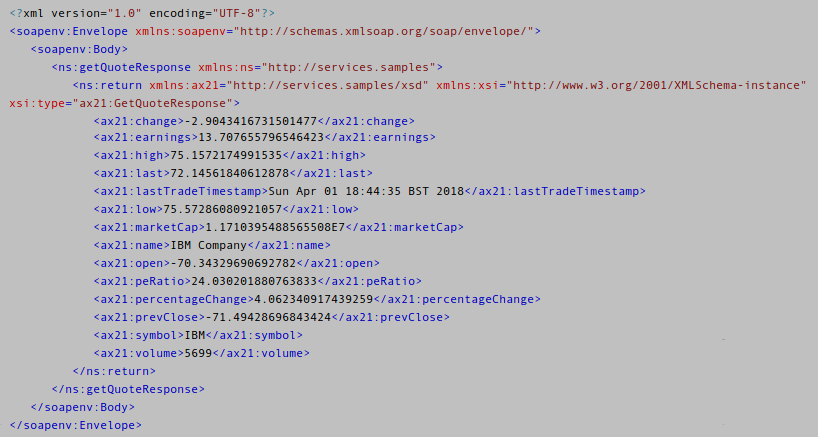
The response to the request by this service is picked up by the second Sniffer:
HTTP/1.1 200 OK
Content-Type: text/xml; charset=UTF-8
Date: Sun, 01 Apr 2018 17:44:35 GMT
Transfer-Encoding: chunked
Connection: Keep-Alive
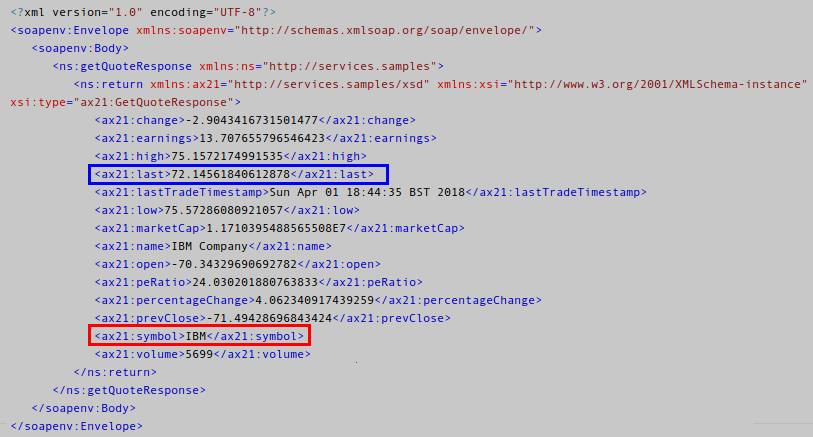
The symbol that is associated with the request is IBM, as can be seen in the red square. In the blue square, you can see the latest quotation shown by the Client.
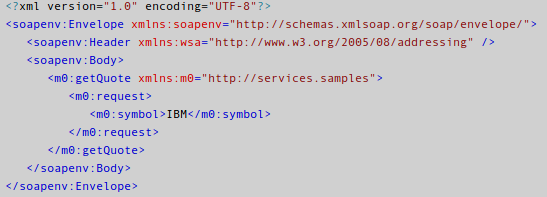
Below is the ESB’s log:
As you can see in the headers, there is no message destination in the To property. On the other hand, there is no Action either, since it is a response message, as indicated in the Direction header.
Since this is a new message, a new MessageID is generated.
LogMediator
To: http://www.w3.org/2005/08/addressing/anonymous,
WSAction: ,
SOAPAction: ,
ReplyTo: http://www.w3.org/2005/08/addressing/anonymous,
MessageID: urn:uuid:b4b13707-2516-49e7-aeca-0b386dc3fa33,
Direction: response,
Envelope:
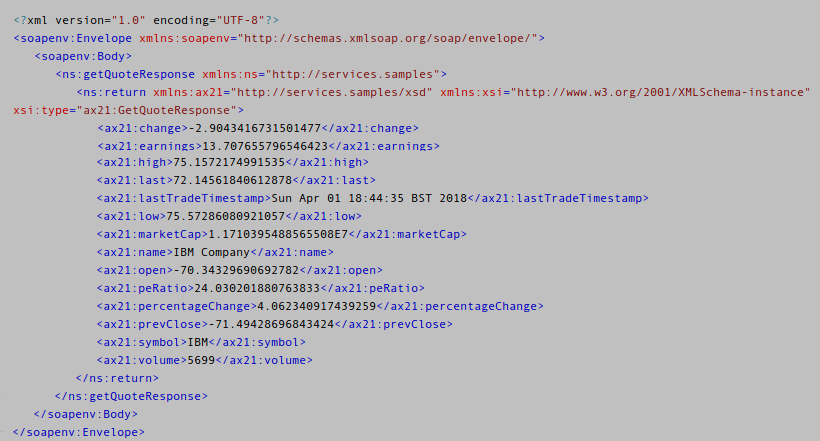
Lastly, the response shown by the first Sniffer is as follows (Response coming from the ESB):
HTTP/1.1 200 OK
Content-Type: text/xml; charset=UTF-8; charset=UTF-8
Date: Sun, 01 Apr 2018 17:44:35 GMT
Transfer-Encoding: chunked
The payload is identical to the response message for the rest of the mediators, the ESB and the second Sniffer. The value for the ax21: last field is the one shown by the client logs, as we have seen.
Proxy client mode request
To execute the request on the client in proxy mode:
ant stock quote -Daddurl=http://localhost:9001/services/SimpleStockQuoteService -Dprxurl=http://localhost:8281/
prxurl: In this mode, the client uses ‘prxurl’ as an HTTP proxy for sending the request. Therefore, by configuring ‘prxurl’ in Synapse, the client can ensure that the message arrives in Synapse for the mediation.
Once the request has been issued, the first Sniffer shows this request message:
POST http://localhost:9001/services/SimpleStockQuoteService HTTP/1.1
Content-Type: text/xml; charset=UTF-8
SOAPAction: “urn:getQuote”
User-Agent: Axis2
Proxy-Authorization: Basic Og==
Host: 127.0.0.1:8281
Proxy-Connection: Keep-Alive
Transfer-Encoding: chunked
The payload is always the same.
The Proxy-Authorization HTTP request header contains the credentials to authenticate a user agent on a proxy server. In this case, there are no credentials in use. They are coded in Base 64 (https://www.base64decode.org/). The coded value is the username: password, in this case, there is no value.
You can also see the content of the second Sniffer and the ESB’s log, as well as the response value obtained by the fist Sniffer. It is not necessary to show them since they are similar to the ones already shown.
Conclusion
This time around, we have used WSO2 Developer Studio to generate the ESB’s configuration and follow good practices, and the TCP Monitor as a Sniffer integrated into Eclipse.
All of these environment plugins facilitate the task of working with WSO2 integration tools. Not only with the ESB, but also with WSO2API Manager, for example.
The environment configuration details are always the same in all chapters. If you have doubts in future instalments, make sure you check out this article. Oh, and if you missed the second instalment of this section on ESB: WSO2 Quick Start & Installation Guide, find it here.