
Today, we’re going to take a look at Red Hat Fuse, Red Hat’s agile integration solution. With it. we’ll explore the world of micro-integrations and will be able to take a step forward to modernize our infrastructures and leave legacy systems behind.
Red Hat Fuse: What is it?
Red Hat Fuse is based on a stable set of widely used Open Source projects, but with the backing and support of a company like Red Hat. It is based on Apache Camel for micro-integrations and can be deployed on-premise or in a cloud environment through Red Hat OpenShift.
To see all this, we are going to work out way through an example in which we will obtain a message, transform it, and then send it to another system. In addition to seeing the simplicity of creating the integration, we will also see how we can deploy it and have it readily quickly.
Features of Apache Camel
As we’ve already mentioned, Red Hat Fuse is based on Apache Camel, which has two distinguishing features in terms of architecture and deployment. On the one hand, it has a wide catalog of components that facilitate easy connection with different frameworks and servers. On the other hand, Red Hat Fuse allows us to deploy it in different ways. This enables a more traditional approach with JBoss EAP deployments, more dynamic approach with Karaf, or a more self-contained approach with Spring Boot. For our example, we will use the Spring Boot framework as a base, which is one of the most widely used options when creating a Java microservice.
If you prefer, you can also create the project with XML. In addition, for this language, Red Hat will provide you with a development tool called CodeReady Studio. It has an autocomplete function, a large catalog of components and a design view that can prove very useful when developing.
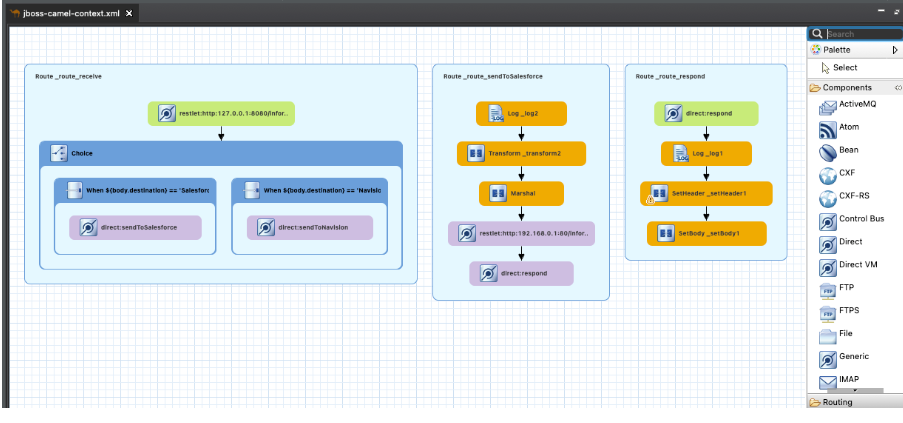
Figure 1. Red Hat
How to perform a micro-integration with Red Hat Fuse
Getting back to our example with Java code, it will be composed of three main components. The class that allows the startup, the class that contains the integration paths, and the configuration file.
1.The boot class will be the one that will indicate that we are using a Spring Boot application and the one that will enable the launch of the project without the need to deploy it in another server.
@SpringBootApplication
public class RedHatFuseApplication {
  public static void main(final String[] args) {
    SpringApplication.run(RedHatFuseApplication.class, args);
  }
}
2. Next, we will take a look at the class that contains the different integrations of which the project is composed. These integrations are defined as ‘routes’. For our integration, we will have a main ‘route’ that will be exposed to the outside as a REST API and can be invoked via a POST method. This ‘route’ will check the content of the message, and depending on it, will decide to perform one action or another.
from("direct:transform").log("body: ${body}").choice()
  .when().simple("${body.destination} == 'Salesforce'").to("direct:sendToSalesforce")
  .when().simple("${body.destination} == 'Navision'").to("direct:sendToNavision");
3. Once the destination has been differentiated, the message can be treated in a differentiated manner, performing the appropriate transformations and/or redirections. In the example, we can see how we create a transformation and it is conveniently redirected to the target system through its own REST API.
from("direct:sendToSalesforce").log("Salesforce")
  .setHeader("Authorization", simple("Bearer {{salesforce.bearer.token}}"))
  .process(exchange -> {
      final Instruction instruction = exchange.getIn().getBody(Instruction.class);
      exchange.getIn().setBody(instruction.getInformation());})
  .marshal().json()
  .toD("{{salesforce.host}}/services/data/v56.0/sobjects/Instruction?bridgeEndpoint=true")
  .to("direct:respond");
Finally, we will create a ‘route’ to return the standard response to the user who performed the operation. In our case, a 201 response code and empty payload.
from("direct:respond").log("responding").setHeader(Exchange.HTTP_RESPONSE_CODE, constant(201)).setBody(constant());
4. Once we have our integration, all that’s left to do is deploy it. As we have indicated above, Red Hat Fuse has a clear orientation towards the cloud and agile. However, with the adopted solution, we could deploy the integration with a simple Java command. With the help of the appropriate Red Hat Fuse and fabric8 plugins, the image can be created and booted, in two simple commands.
mvn clean package -Pfuse7-generate-image
docker run -p 8080:8080 chakray/redhat-fuse-integration:1.0.0
5. All that’s left to do is test the application, this can be checked using the following command.
curl --location --request POST 'http://server:8080/fuseIntegration/instruction' \
--header 'Content-Type: application/json' \
--data-raw '{
    "serviceId": 1001,
    "description": "Information,
    "date": null,
    "destination: "Salesforce,
    "information":{
        "serial_Number__c" : "1000",
        "printer_Model__c" : "XZO-5"
      }
}'
Conclusion
As you can see, Red Hat Fuse allows us to integrate between systems quickly and easily without the need for a powerful server and ample resources to deploy it. In addition, it also has the ability to deploy in the cloud, with all the versatility that this entails.
If your company needs help, that’s what we’re here for, so contact us today!